|
Olympus E-3 A Technical Review and Reference |
|
|
My other articles related to the |
|
This is a technical, detailed write-up of the new Olympus SLR flagship, the E-3. A shorter write-up on this subject, Olympus E-3: The First (and Second) Look can be recommended as a quick read before digging into this one (and, possibly, after). As of this update (January, 2009) the article is complete. Minor additions or corrections may still be added from time to time, but I do not expect anything important. As always, any corrections and suggestions from Readers are most welcome; they really help. |
 Image shot with an E-510 and 14-54 mm ZD; aperture priority: 1/3 s at F/11, ISO 200; reference WB (two daylight fluorescent panels), sharpness and contrast at N-2. Click on the picture to see it in XGA size, or, if your monitor has UXGA or higher resolution, click here. Note: All images in a thin frame like this are clickable! | |
| Other E-3 articles: | |
|
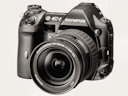
The E-1, introduced back in 2003, was the first camera of the Olympus E-System line of SLRs designed, from ground up, as digital, and not as digital modifications of film SLRs (we remember those times, when the "old" and "new" parts of a camera even had separate power supplies!). The camera carved for itself a cozy market niche of enthusiastic followers, especially after it started selling heavily discounted, and was (still is) capable of most pleasing results. Four years is, however, a long time in the digital camera world, and a new model addressing the expectations and needs of professionals and advanced amateurs seemed somewhat overdue. So here it is: the new E-3 started selling in the U. S. late November, 2007. As an avid user of three previous Olympus SLR models, I was very much interested to find out how does it stand up to our expectations. As soon as the first specs became known, I decided not to buy the E-3, regardless of how good it may turn out to be. I didn't want a camera body weighing more than about 600 g or so, and I'm not a professional user who needs it to be abuse- and weather-proof. From the point of image quality, the E-510 I'm using as my principal picture-taking tool is performing just fine, thank you; I haven't outgrown that camera yet. Besides, I need this money to buy more lenses, which I consider a more essential purchase. Therefore I wasn't even planning to write a detailed review of the E-3, similar to those I wrote on E-300, E-500, and E-510. Then a fellow photographer living nearby kindly offered me his new E-3 to use for a few weeks, so that I can review this camera. This I couldn't refuse, being too much of a camera buff (who desperately is also trying to take some pictures as well). Thank you, Don; I've shortened the life span of your camera by about two thousand frames, but at least I know something about it, and so will the visitors to these pages. (Thanks are also due to two more Readers, one from Virginia and one from Pennsylvania, who followed with similar offers just a few days later, and to some others, who were considering different ways to achieve the same goal.) So here it is: the new Olympus flagship, the long-awaited E-3.
The "official" specs are available at a number of Olympus sites, for example, here. In the table below I'm trying to be clear about cases when my own observations or measurements do not agree with the specs claimed by the manufacturer; I am also adding some data items not published by Olympus and, as always, quite a lot of commentary and explanations. | |
|
Construction:
Magnesium alloy chassis with a polycarbonate shell
(Images by Olympus) |
Note that this is a full metal body, not just a frame, like in lesser Olympus (and not only) models, providing the necessary rigidity. Obviously, it greatly improves camera's resistance to abuse and its dimensional stability, at the expense of bulk, weight, and cost.
This chassis looks quite similar to that in Nikon D300 or Canon 40D (albeit it seems more full than in both those cameras). The chassis is manufactured using the Thixomold® forming process, which has a number of advantages over traditional die-casting or metal injection techniques. If I remember right, the last camera chassis using this technology was in the Nikon F6. Thixomolding, improving the uniformity of the polycrystalline metal, typically provides a gain of more than 20% in strength, while allowing for tighter dimensional tolerances. (See the Advanced Forming Technology site for more.) The body feels very solid, except for the tilting LCD monitor, and, to some extent, the raising internal flash; especially the former feels a bit plasticky. No doubt, both will become weak spots in camera's ruggedness. The build quality is, as expected from Olympus top-tier offerings, first-class; noticeably better than I've seen in other cameras priced below $2000. A tough job to match, literally. The shape is thoughtfully profiled. What I like most is the thumb grip (very important for a camera of this weight), and an indentation of the front face at the left, allowing my left hand an easier access to the lens' zoom ring. The backward slant of the top side is also a nice touch we haven't seen since the days of the E-1, For more impressions on body ergonomics, see my First (and Second) Look. | ||||||||||||||||||||||||
|
Finish:
Black polycarbonate | In addition to the grip and thumb rest, the part (just mentioned above) where your left palm goes against the body is also rubberized. Very nice: it helps in handling this heavy body. | ||||||||||||||||||||||||
|
Weatherproofing: Yes
(Image by Olympus) |
The E-3 body has forty or so gaskets in critical places (correct me if I've got the number wrong), to make it weatherproof, so it is supposed to survive more than just an occasional drizzle, even with the built-in flash raised.
How useful it is, depends on how, when, and where you use the camera. For some users (like myself, so far at least), this is just an extra feature, reflected in camera's bulk, weight, and cost; some will find it indispensable. In the original posting of this article I assumed that the weatherproofing in the E-3 sets it apart from other similar models. While this seems to be true in case of the Canon 40D, I'm not quite sure about the comparison with the D-300. The latter also has gasketing, but I have yet to see any claims by Nikon regarding this matter, except for "advanced moisture and dust protection" mentioned in some promotional materials. I've also checked the manuals of both cameras: neither mentions weather- or moisture-proofing; not once. Strange. Still, I remember somebody's story from an Arctic cruise. With all other photographers aboard using Canon and Nikon models, he ended up being the only one who kept taking pictures with his E-1 when the weather went bad. I would expect the E-3 to be built to the same standards. | ||||||||||||||||||||||||
Body size (W×H) and weight:
|
This is quite bulky and heavy, especially if you've been using a compact SLR before; a bit too much than I would like. Again, some people like the camera to feel more substantial, so they will be happy; largely a matter of taste. Forget about one-handed shooting (which is a bad habit anyway).
It took me more than a week to start feeling comfortable with the E-3 but it is possible, and still, this is better than the obscene size and weight of some top-end professional cameras. Here is a brief comparison against cameras from the same class (feature- and price-wise):
I'm not quoting the body depth, as it is not really meaningful in comparisons: it is usually the lens which defines the overall depth of the camera. The weight does include batteries. | ||||||||||||||||||||||||
|
Lens mount:
Four Thirds standard
(Photo by Olympus) |
This standard specifies not only the geometry and mechanical aspects of the lens mount, but also the electronic data interface between the lens and the body. (See also the Image Sensor section below.)
For more than one reason, I am a believer in this standard. Too bad so far only Olympus and Panasonic make cameras using it (with one Leica model being a clone of a Panasonic). As of this writing (February, 2008) there are 30 Four Thirds lenses available, with four more pending, and another four deprecated. Not counting Leica (which brands lenses for the Panasonic line), Sigma is the only independent lens maker supporting Four Thirds, although the support is not as strong as that for the more common brands and often delayed.
For some photographers at least, the availability of often excellent (and always at least good) Olympus lenses was the prevailing reason to join the Four Thirds (or, more exactly, Olympus E-System) bandwagon. As a notable example, the |
|
Bundled lens:
12-60 mm, F/2.8-4.0 ZD ED SWD
(Photo by Olympus)
Compared with the 14-54 mm ZD |
The E-3 is often sold together with the new 12-60 mm ZD lens. This is a fairly "standard" (i.e., general-use) zoom range, extended a bit on both ends, especially the wide one.
This is the first SWD ("Silent Wave Drive", another meaningless moniker) lens in the Olympus line; "SWD" denotes the new kind of the built-in autofocus motor, supposed to be faster and more precise. It remains compatible with any previous E-System (or Four Thirds) SLRs. While it took me a while to warm up to the E-3, with this lens it was a love affair on first sight (more exactly, from the moment I saw first samples on my monitor, full pixel size). Great resolution on- and off-axis, well-controlled chromatic aberration, moderate geometric distortion at the wide end — I am thrilled. First of all, the focal length range, equivalent to 24-120 mm on a 35-mm film camera, is very generous, ranging from an almost-if-not-quite extreme wide angle to a moderate telephoto. In my book, this beats the "superzooms", ranging from 28 or 36 mm EFL to 150 or 180 mm: the extra wide angle is more useful in my book (if much harder to design and implement). Secondly, this is achieved without sacrifices in optical quality. This lens consistently delivers better images than the older 14-54 mm ZD (an excellent lens by itself) — visibly, if not by a wide margin. To see this, you will need to use the E-3 (or E-510/E-410), as only these cameras allow you to turn noise filtering off, to enjoy the full detail the new NMOS sensors are capable off. Most of my E-3 image samples were shot with this lens, so you may have a look, including a number of full-frame, original off-camera images. I also wrote a separate User Report on the 12-60 mm ZD ED SWD (this is the full, official name). This lens adds another 575 g to the camera's body weight; it is also 11 mm longer than the 14-54 mm ZD, not to mention a burning hole ($950!) in my pocket, but I am more than willing to face these consequences. |
|
Using legacy lenses:
Yes, with adapter
E-3 with a 300 mm F/4 Zeiss Sonnar from the early Sixties, in Exakta mount |
Four Thirds cameras, because of having a smaller backfocus distance than any other SLR system, can accept almost any "legacy" lens from the pre-digital era, with a proper mechanical adapter, addressing the mechanical incompatibility of lens mounts.
One such adapter (accepting the "classic" OM Zuiko lenses) is sold by Olympus, many others are offered by independent vendors, fitting lenses of almost any 35 mm SLR system of the past. Obviously, such lenses have to be focused manually, and exposure automation (metering) is possible only with the aperture closed down to the working F-number. Details and more references can be found in another article here. In January, 2008, Olympus modified the E-3 firmware (as well as that for the E-510), allowing the body-based image stabilization to be used with legacy lenses. All you need to do is to enter manually the focal length in use, so that the IS system knows the rules of the game. The manual focus confirmation (where the AF system detects when a manually-controlled lens achieves focus) is still not possible with legacy lenses. |
|
Sensor type:
Live MOS (NMOS) |
This is, supposedly, almost the same sensor as the one used on the E-510 and E-410, with some tweaks to microlenses covering each individual photosite, and to the signal-pickup electronics. At least this is what people say, as both Olympus and Panasonic (chip manufacturer) keep mum on the subject.
From the E-1 to E-500, Olympus SLRs were using the (excellent) CCDs made by Kodak. The switch was widely (and often bitterly) discussed, but seems like water under the bridge now. The NMOS ("negative-channel metal oxide semiconductor"; don't ask me, not my branch of physics) sensors are here to stay for a while. |
|
Effective sensor size:
17.3 x 13.0 mm
|
This is defined by the Four Thirds system specifications, no longer a matter of choice (unless you want to give up Four Thirds at all).
Sometimes I wonder if a square, 17.3×17.3 mm format would still be compatible; basically, it should work. The mirror in the E-300 and E-330 swings around the shorter edge, so there is enough room in the mirror chamber; such a square would also almost fit into the image circle of current lenses. A model giving you a choice of the square format in addition to both vertical and horizontal 4:3 aspect ratio (without changing the camera orientation) would rise some eyebrows! Sorry for digressing, sometimes I just can't help it... The arguments about "intrinsic" disadvantages of this size compared to the common 3:2 APS-C format (Canon: 14.8×22.2 mm) stem, in most cases at least, from ignoring the numbers. Because most of the standard print sizes are closer to 4:3 than to 3:2 in proportions, the excess in the longer dimension is usually cropped off; what remains is 14% in frame height. This is barely significant, if at all. Besides, not the pixel pitch itself defines the noise or dynamic range, but the photosite size (accounting for the area between those). In this fill factor Panasonic claims to have an advantage — not that it really matters. For a more detailed discussion of sensor size issues, see here. |
|
Pixel count:
10 megapixels |
The number of photosites from which the converted RGB image is recorded is 9.98 million (more exactly: 9,980,928). In the traditional computer terms this can be expressed as 9.52 "binary" megapixels (where "mega" means 220, or 1.049 million).
This is the same as the pixel count of the E-510/E-410, or twice as much (1.4 times the linear resolution) as in the E-1. Doubling the pixel count makes a visible difference — if the lenses can fill these pictures with detail, and in this case they clearly can. In fact, the raw .ORF files have information recorded from about 4% more or 10,416,000 pixels (9.93 "binary" MP), and some raw-to-RGB conversion programs allow you to generate JPEGs of this size; see File Format and Compression below. In all Bayer-pattern cameras (read: all models except for Sigma SLRs so far) the actual number of megapixels of recorded information is actually about one third of this nominal pixel count; for every pixel the resulting image two out of three RGB components are interpolated from the neighbors. For more, see When Is a Megapixel Not a Megapixel. |
|
Native image size:
3648×2736 |
This is the "ideal" 4:3 aspect ratio, which, for me at least, is most suitable for 80% of pictures. The 3:2 proportions used in 35-mm film (and copied to the APS-C format) resulted from a technical necessity (or practicality) back in 1911.
The Japanese were right when they tried to introduce the 24×32 frame format on 35-mm film back in the Fifties, but they had to give it up when the U. S. photofinishers just said no. This did not change: while all of the larger print formats are closer to the 4:3 ratio, the smallest widely used one is 4×6" — still 3:2. In spite of the fact that 95% (or more) of digital cameras sold are 4:3, very few photofinishers offer the 4.5×6" size, fitting these proportions. |
|
Color depth:
12 bits per RGB component |
I was hoping to see more in the E-3, but this is not just the matter of changing the number of bits in analog-to-digital conversion; all image pipe components (both before and after the converter) have to be ready. Obviously, they are not ready. I don't think it matters yet, but in a few years it may.
On the other hand, all computer displays I know of are capable of only 8 bits per color so far; the common operating systems do not support more, either, and a similar limitation is present in the printing process, so the final images have to be reduced to this depth anyway. Anything more has an advantage only in the image postprocessing stage, and it is the first bits above eight what counts most there. |
|
Capture sensitivity:
ISO 100 to 3200 in 0.3 EV or 1 EV increments |
This is 1 EV higher than in the E-510, with some further improvement in image quality (noise, tonal scale, colors). My impression so far is that ISO 800 gives quite good results (although I prefer to venture beyond ISO 400 only if I have to), and ISO 1600 — quite usable.
Like other manufacturers, Olympus decided to address the high-ISO noise problem by means of noise filtering; they also now follow the crowd by applying it too aggressively (for my taste, at least). This kills some of the (impressive) detail the lenses and imager are capable off. Luckily, the degree of this filtering can be adjusted in four steps (you have to do that through the menu system; too bad!) |
|
Infrared sensitivity:
Exposure factor of about 1000× (10 EV)
14-42 mm ZD, Hoya R72 filter |
This is about the same as the IR sensitivity of other NMOS-based Olympus SLRs, the E-410 and E-510. It means that taking pictures in infrared is possible (if barely so).
For example, the picture at the left required an exposure of 1/2 s at F/4, ISO 200. The same scene photographed in visible light needed 1/2500 s (same F-number and ISO). |
|
Dust removal:
Yes, ultrasonic.
|
A speck of dust sitting on a frame of film affects only that frame; such a speck on a digital camera sensor (or rather a multi-function filter just in front of it) will leave a black spot on all frames shot until it is removed. And dust may get (and usually gets) into the mirror chamber every time a lens is changed.
Olympus has a remedy for this since the original E-1. A dedicated micromotor vibrates the protective filter with an ultrasonic frequency; this, in principle at least, should shake most such particles off, and those have a chance to be trapped on sticky strips on the bottom of the chamber. (These strips should be replaced every three years by Olympus service, according to the manual.) The system seems to be working just fine. A few cases of specks I had over the years in my E-300, E-500, and E-510 were gone after a few frames, and I never had to clean the protective filter by hand. Other manufacturers were initially denying the significance of the problem, only to address it in later models, using the same solution. I know of only one comparison of dust shake-off systems on different brands of cameras; it was performed by Róbert Irházy and published at PixInfo.com; according to that, the Olympus system is significantly more effective than others (some of which do no seem to make any difference at all). The dust shake-off is activated every time the camera is turned on (or wakes up from the sleep state). It adds a slight delay to the process, but I do not find this objectionable (the delay seems to be reduced in the E-3 as compared to previous models). |
|
Sensor cleaning option:
Yes |
This, when activated from the menu system, raises the mirror and opens the shutter, thus exposing the sensor (really: protective filter in front of it), so that it can be cleaned. With all Olympus SLRs I've been using for years, I never had a need to do this.
This is a tricky operation and should be always done with full battery: when the camera runs out of juice, the shutter and mirror may return to the working position in the least suitable moment, with disastrous results! |
White Balance:
|
This is similar to what everyone else offers, with a few extras.
First of all, the Reference WB allows you to set the WB by reading the light of a white (or other neutral) surface. In previous Olympus models I've used I found this method to be accurate and reliable, and it is works equally well in the E-3. To access this function, you've got to have it assigned to the [Fn] (user-defined) button. Pressing that button and then the shutter release will cause a test picture to be taken (assuming you point the camera at the neutral reference surface) and analyzed, with the reading stored in one of the available four slots. The camera will refuse to do that under some circumstances (the reference surface too busy, or different light sources mixed together). I would like to see also another way of activating this feature, without devoting the [Fn] button to it, as this, obviously, precludes its use for anything else. This could be done with use of the Control Panel, with a "modifier" button — very much like the custom white balance setting, see below. The custom WB is accessed via its dedicated button or from the Control Panel. In either case, pressing the [+/-] button when this setting is displayed allows to dial in the desired color temperature (many users I've talked to were unaware of this trick and used the menu system instead). The adjustment range is very wide; in particular, I found the settings below 2500°K (missing on some highly acclaimed cameras) useful in low-wattage tungsten shooting. The open shade preset should work well for shaded subjects illuminated by the light from a clear sky. I've sometimes seen it used under overcast conditions, which is a misunderstanding. The cloudy position may or may not work right: depending on the actual thickness of the cloud cover, the effective color temperature may vary. This is the least dependable of outdoor settings, at least in my experience. The tungsten setting is still a guesswork, as the color temperature of incandescent light strongly depends on the wattage of bulbs used. Many household lights have a lower wattage than this preset assumes, and will be rendered shifted towards the red. Complaining about that makes the same sense as expecting that one shoe size will fit all people. In most cases, when shooting under this kind of light I first take a reference WB reading, or just adjust the custom WB down by trial and error as needed. The Auto WB in E-3 (and other cameras I've tried) usually renders these scenes too warm, so I cannot depend on it here. An extra degree of complexity is introduced when the scene is lighted with a number of bulbs, differing in wattage. For your tabletop studio purpose use all lamps of the same power and kind. Fluorescent lights are a special case, as their light color composition does not follow the black body distribution (on which the concept of color temperature is based). While the current breed of fluorescent tubes provides much more "natural" light than those of just twenty years ago, the spectrum may still be far from natural, which may cause problems with color rendition. The three fluorescent presets in the E-3 are intended for three quite different types of this light. If you are not sure, you have to choose between them by trial and error, as the Auto WB may or may not work right here. Flash WB is a new option in the E-3; the setting is very close to daylight and can be used instead of it, if you'd like your sunny-weather pictures to look a bit warmer. Some cameras I've used in the past had the sunny preset at this color temperature. All WB settings can share a common correction (in ±7 discrete steps each in blue-red and green-magenta planes), or each can be individually modified. If you complain your camera renders colors too cool, just adjust this, customizing the colors to your taste. Last but not least, remember that the WB setting is applied only after the picture has been taken, in the process of converting the raw sensor information into RGB. If you set the camera to store images in the raw form, this adjustment is delayed to the stage of postprocessing; while the setting is "remembered" in the file, it can be changed then at no price in image quality. |
WB Sensors:
External WB sensor (just below the logo) |
Yes, in addition to analyzing the image and deciding how to adjust the colors, the E-3 has a separate, external WB sensor, measuring the incident light. This provides a reference reading, independent on what is in the image itself, very much like (although not as accurate) a stand-alone incident-light meter with color readout.
For the last few years I've been waiting for a camera manufacturer with guts enough to provide such a stand-alone meter, capable of sending the information to the camera. In many applications this would be the most reliable way of setting the white balance and exposure. If Olympus had asked me in advance (they didn't) about what I wanted to see in the E-3, this would have been the second top suggestion, after a larger viewfinder. The external WB sensor can be turned off from one of the Settings submenus (quite well hidden, not under WB, where you would look first), but in most situations it should be left on — that is, if you are using Auto WB at all. I rarely do. |
|
WB bracketing:
Three steps each in two color planes; three or nine frames total. | I consider this feature rather useless: while only a single picture is taken in the process, it is saved as multiple files, each with a different WB setting. The same can be done during the raw-to-RGB processing stage, as long as you use the raw format in the camera. |
|
Noise suppression:
Yes, both static and random |
The noise seen in digital images consists if two components, as described in my general noise article. These differ in origin and character, and, like in previous models, Olympus is providing two separate ways to handle them in the E-3. The naming used here is a bit confusing (as the name does not indicate which kind of noise is being handled), but we will have to live with that.
Noise Reduction (NR) — to remove the static noise, which (at given ISO and shutter speed) has the same pattern from one frame to another. This is handled by the camera capturing another, "dark" frame just after the first one (i.e., the picture by itself), and subtracting it from the latter before writing to memory card. This method is especially effective in removing the bright specs ("hot pixels") showing at long exposures and high ISOs,but it deals also quite well with other instances when the light response varies consistently from one pixel (or photosite) to another. On the other hand, it slightly increases the level of random noise (see the next bullet), so the camera applies it only when it does more good than harm: at longest exposure times. Even if you turn it on (which is done from the menu), the camera will decide if to actually use it. Because of the second, "dark" exposure, it adds an extra delay before the image file is saved (equal to, or slightly longer than, the shutter time). Because of that, the setting will be disabled when the E-3 is in sequential drive mode. The manual does not specify at what exposure times does the noise reduction actually kick in. In the E-510 it was simple: 8 s at ISO 100, 4 s at higher settings. In the E-3, however, it looks like this happens at shorter speeds: I am sure it is used at 2 seconds (all ISOs), and almost sure at one second, but it is possible that the limit is at even faster speeds. (Unfortunately, the Noise Reduction field in EXIF data shows only if NR was set, not if it was actually applied; pretty useless.) If I find some time, I will investigate the matter further. Noise Filtering (NF) reduces the random noise, where the response to light of a given pixel varies from one instance to another. This is done by averaging of the neighboring photosite readouts (and/or resulting pixels) at the stage when the raw information is being converted into RGB (this means that raw files are not affected). To make the results more palatable, filtering algorithms try to detect what part of the variability is noise and what is image detail proper — for example, if a contour is detected, the averaging may be done along it, but not across. This, however, may sometimes lead to unexpected results. While the effects may be quite pleasing, the process invariably leads to some loss of detail; this is always a compromise. As such, the "right" way of doing it may, to a large, extent, depend on preferences of the photographer. This is why I am glad that Olympus allows to select the degree of noise filtering: from Off to High in four discrete steps. Off does not mean that there is no filtering done at all; some of it is inherent in the demosaicing of the Bayer pattern, some more may be added on top of it as a "zero-reference" default. It is also quite possible that the same nominal setting may be actually different for various ISOs. Olympus provides no information on this subject. I remember my first impression when I saw E-510 images with noise filtering turned off; the resulting resolution seemed just hard to believe. I am still using that camera with NF off all the time. My impressions about the E-3 are similar, except that I suspect that Olympus might have tweaked the algorithms a bit; I am not sure If I wouldn't be willing with the Low setting instead. I will know more after having analyzed a set of comparative samples, shot specially for this purpose. Real soon; watch this space. |
|
Color space:
sRGB or Adobe RGB |
This setting defines how the colors are represented by a mixture of three basic components. It should be left at the (default) sRGB, unless you really know what you are doing in postprocessing; sRGB is the standard in which most screen monitors and printers work.
I've met users who have set this to Adobe RGB because someone told them it is "better". No, in general use it is not. |
Picture Modes:
|
This feature was first introduced on the E-500, and I still like it. It is very much like having an instant choice between six different kinds of film (without having to use interchangeable camera backs, remember those?).
Each of these presets, best accessible from the Control Panel, has its own assigned values for a number of image conversion parameters (see the next section). These values are persistent: the camera remembers them for each Picture Mode even when you switch between those. The E-3, as compared to previous models in the line, adds two Picture Modes: Portrait and Custom. While I expect the former is expected to provide better rendition of skin tones (actually, I haven't used it yet), the latter is an extra slot to store your preferences for a special occasion. The Custom Picture Mode is somewhat special, as for it you also choose one of the other modes to be used as a starting point in customization. You may set it as, say, Muted with your own adjustments to the parameters of the latter. This is the only mode which also remembers its Gradation setting (see below), a design I find inconsistent. |
Image adjustment:
|
First of all, remember that all these adjustments are applied only during the raw-to-RGB conversion; if you save your images as raw (ORF) files, they can be applied in off-camera raw development "as set", or changed. The former option may not be available in third-party converters (those, however, may have their own tricks).
Second, the three first parameters on this list are not absolute values, but they are added on top of defaults assigned to particular Picture Modes. Thus, for example, the Vivid mode with contrast adjustment of zero has a contrast higher than the Muted mode with the same (zero) contrast dialed in. Of course, Olympus does not think you deserve the information on how large these offsets are, but I disagree.
New in the E-3 is the Auto gradation setting (sometimes referred to as Shadow Adjustment Technology). All Olympus says about it is that it "Divides the image into detailed regions and adjusts the brightness separately for each region". This suggests that another transition curve adjustment is being done, expanding the tonal range of shadows and, possibly, highlights (at the expense of mid-tones, of course). This can be also tried off-camera: the latest version of Olympus Master allows to apply this setting to raw images in development. (This assumes that the feature is implemented the same way in the program and in the firmware.) What remains unclear is whether the correction is applied to the whole image, or locally. While the phrasing may suggest the latter, my experiments make me skeptical: the tonal curve seems to be adjusted globally, plus the histogram is sometimes stretched a bit. In some images this brought out the shadow detail quite nicely (together with enhancing shadow noise, as expected), but nothing I wouldn't do equally well by a simple curve adjustment in postprocessing of a raw (or even JPEG) image. In any case, the Gradation (Auto or not) curve is applied when the image is being converted to RGB (or right after that), so it does not affect raw images. Doing the same thing "by hand" in postprocessing, especially (but not only) of raw images, gives me more flexibility in balancing the shadow detail versus shadow noise and overall contrast of the image; this is why I do not think about this feature as something of major importance. In the Monotone Picture Mode (the proper English word is "monochrome") you cannot adjust saturation (which is obvious) or gradation (perhaps because running out of space in the Control Panel). You can, however do the raw-to-monochrome conversion applying an equivalent of a color filter in B&W photography, for example, orange to accentuate the sky. Another option allows to add a tint to the resulting image. |
Lens correction:
| Four Third lenses transfer to the camera the information of the geometric distortion they introduce (especially at wide angles) and on the light fall-off away from the lens axis. These flaws can then be corrected during the raw-to-RGB conversion in the camera (light fall-off only), or in postprocessing (both, assuming you're using Olympus software). In the latter case (postprocessing) the corrections can be also applied to images captured as JPEGs. |
In-camera image editing
|
This is a more limited choice than in the E-510, where I have never used these features; I doubt E-3 users will put these to work, either.
The raw-to-JPEG conversion uses the same software as in the conversion automatically applied when a picture is taken. The image adjustment parameters (for example: white balance, sharpening, noise filter) are not applied as set when the picture was taken, but as set at the moment of performing the conversion. Shadow adjustment works, I presume, in a way similar to the Auto gradation. If the latter has been already applied, the effects will be cumulative. |
Image file format:
|
Starting from the E-410/E-510, ORF (Olympus Raw Format) files are compressed using a lossless compression scheme. This allows for smaller raw file sizes. The manual says ORF files are, on average, 11 MB large; my own experience shows sizes ranging from 9.4 MB to 9.5 MB (except at ISO 3200, when 11 GB seems to be the norm). This means that a card 1 GB in size will store about 100 raw images.
Pros and cons of using the raw format are described in another article.
|
|
JPEG compression:
1:2.7, 1:4, 1:8, and 1:12 | These are nominal (possibly average) compression ratios; the actual ones will vary from image to image. I find the 1:4 compression most practical for my uses, only occasionally (samples) switching to 1:2.7. |
Average file size:
|
Again, this is as quoted by Olympus. The numbers I see are in the same ballpark; for example, 45 1:2.7 images in one series of my lake scene samples occupy 313 MB, which is almost exactly 7 MB per file, close enough to the "official" value of 6.8 MB.
In other words, a 1 GB card should accommodate about 140 1:2.7 jPEGs or more than 200 1:4 ones. |
Image size (pixels):
|
The same choice as in the E-510; wide enough for any purpose. Not really useful from where I stand, as it seems safest to always shoot at the native resolution, reducing the image size later if needed (which can be also done in-camera, see the previous section).
The "native" size, surprisingly, turns out being not-so-native after all. The actual pixel dimensions of raw images (after conversion into RGB in postprocessing) are a bit larger: 3720×2800. This is a tiny difference, but it adds about 2% to the image width and height, or 4% to its area, increasing the camera's pixel count by 0.4 MP. It is also a bit off the 4:3 size ratio (remember the odd 3008×2000 format of some older Nikon SLRs?). January, 2009: I've just learned that the edge areas are more difficult to convert from photosite readings into pixels (raw-to-RGB), and therefore most manufacturers just discard them. Some converters, however, will do that, even if the quality at the very edges may suffer. |
Image quality presets:
|
This affects how (format, pixel size, and compression) your images are stored to the card.
From the Control Panel (or, if you like to suffer, from the Camera 1 menu, you have a choice between
This is fast and convenient, as long as you decide on these presets once and forget you can change them (and this I would recommend, indeed). Now, the presets have to be set up separately in the Settings G submenu of the Settings 1 menu, option named Shower Set (just kidding, instead of Shower the menu shows an icon looking like a sidewise-pointing shower head). Each of the presets can be defined as a combination of two factors:
Presets available from the Control Panel are shown there in terms of these names; for example, Raw+LSF means "raw plus Large/Super Fine", and MN — "Medium/Normal". This is better than just the "traditional" SHQ, HQ, and SQ (Super High, High and Standard) settings used in previous Olympus cameras: at least once you decide what Small and Medium means, you'll see at a glance what you're dialing in. Still, my advice is to do the pre-setting work just once and never change this. Less is more. |
Storage medium:
|
The camera has separate slots for these types; both can be installed at the same time, and switching between the cards is done on-the-fly via the Control Panel.
While this is not a critical feature, I like having two card slots. This is better than carrying an emergency spare, because the second card will not get misplaced; you may also choose to create backups, or selections to be given to somebody, without having access to a computer. What I dislike (and very much so!) is the xD-Picture card choice for the second slot. These cards are the slowest-performing, most size-limited, and least widespread on the market, offering nothing in exchange for these limitations except for higher prices. See my article on that subject: The xD-Picture Card Abomination. The Compact Flash interface supports the UDMA (high-speed) protocol, which, theoretically at least, means that it is capable of higher writing speeds to UDMA-enabled cards. My measurements, however, do not show any significant improvement, see below. |
|
Writing speed:
0.6 s per raw image
(Image by Olympus) |
Lightning fast, as per my measurements, at least with a fast card.
The clocking procedure I've been using previously (see here) turned out to be inadequate for such speeds, so I had to modify it for the E-3 (this will also benefit other recent cameras, for which my existing numbers are overestimated). What I'm measuring now is the time elapsed between just after firing the first shot in a sequence of 20 raw frames, and the moment when red light stops blinking (writing completed). The camera is multi-tasking (does it not have three processors?), so it keeps taking pictures while the writing process is not slowed down or interrupted. Actually, a graph I found on one of Olympus Web sites suggests that the E-3 may have four CPUs — unless the presentation mixes up logical and physical entities.
Here are the numbers for some cards I've checked, rounded to the nearest
How does this compare with the E-510? Surprise: the results are identical, except for the latest (8 GB) Extreme IV, where the E-3 has some edge. For a more detailed comparison, see my E-System card speed article. |
|
Computer interface:
USB 2.0, storage-class device |
This interface works with the actual, full speed of USB 2.0 (not the "full speed" misnomer). With a fast card, transfer speeds are quite impressive.
"Storage-class device" means that when you connect the camera to a computer (Windows, Mac OS, Linux, whatever), the latter will see it as another disk drive, and no software (drivers, applications) has to be installed. Olympus users may take that for granted for years, but with a Canon camera (including the most recent models) the transfer is possible only if you install proprietary Canon software (or you can take the card out and use a reader). Transferring 1 GB of data in 173 files from the E-3, using the Extreme IV CF card, to my new Asus U6S laptop took 214 seconds, so the effective rate was 4.8 MB/s. (The same transfer from my E-510 took 213 seconds.) |
Dual viewing:
| In addition to the traditional SLR viewfinder, the E-3 offers a live preview of the scene on the LCD monitor. While for most uses the latter option is inferior to the former one, in some situations and under some circumstances it may have clear advantages. |
SLR viewing system:
(Image by Olympus) |
A framing test revealed two things. First, the coverage is, indeed, as close to full-frame as I could measure: no worse than 99.8% in each dimension (probably just 100%). Second, the finder screen alignment seems to be, again, within a measurement error from ideal: my result was 0.044° (or less than three pixels in 3600). This is as close as I can align a straight line to the finder edge. I did this test only after a Reader asked about a rumor about a "design error" resulting in a tilted finder view. While this can always happen in an individual camera, it is highly unlikely, and I haven't discovered anything of that kind. By increasing frame coverage and magnification from 95% (linear) and 1 × respectively, in the E-510 to 100% and 1.15× Olympus significantly improved the new camera's viewing experience, to the level of its main competitors. (The E-1 offered a 100% coverage and 1× magnification.) This, at long last, puts to sleep the (deserved) complaints about small finders in Olympus SLRs. Using this finder after handling the E-510 is a pure joy (although when I compare it against my 35-mm Minolta XD, lots of this feeling disappears). The manufacturers quote the finder magnification value as the apparent size of the viewed image in terms of the subject size as seen with a naked eye from the same vantage point. This, obviously, is affected by the lens used, and (less obviously) by the finder eyepiece diopter setting. The values usually quoted are for 50 mm and -1 diopter, respectively. You may want to see my comparison of apparent finder sizes for a number of cameras of various brands; this may be quite educational (the updated comparison includes, among others, the new E-30). Note that the Nikon D300 finder is still wider (thanks to the 3:2 aspect ratio), but the E-3's — taller (if just by a symbolic amount). Interestingly, comparing the E-3 against E-510 side-by-side one gets an impression that the difference is more dramatic than it really is. Anyway, for me the larger finder is the most significant improvement in the E-3 from its predecessors, and this is the one feature I would love to see in the expected mid-line camera from Olympus. The focusing screen is not user-changeable, although there are service-installable options. It has eleven AF point marks and a circle showing the spot metering sensitivity region. This makes it a bit busy; I would prefer getting rid of the focus points (a blinking LED in the point selected is enough). |
Information shown:
|
A digital information readout is provided below the screen view in the finder. This is better than the vertical bar used in recent E-System models, and the readout is quite rich.
The first six items on the list contain the full information on a given setting (i.e., either a value or a multi-state indicator). The remaining ones are of the on/off type, just indicating that the setting is at a non-default position, or that a feature is activated.
The designers did a good job cramming all this into the available space and still keeping it legible; no complaints here. |
|
Diopter adjustment:
From -3 to +1 diopters | A typical range. The adjustment knob, to the right of the eyepiece, is adequate for the purpose, a bit easier to operate than in the E-510. |
Other features:
|
Olympus has given up on the eyecup mount used in the E-1, adopting the slide-on standard used in all other E-System cameras instead. The newer system is simpler and I like it more.
The eyecup included with the camera is EP-7, a new model, very similar to the EP-6 which is available as an option for other E-System cameras (except for the E-1). This one is better (for me, at least) than the smaller EP-5 included with the E-410/E-510; the difference from (and an advantage over) the EP-6 is in smaller thickness only, while the shape and other dimensions remain the same. The ME-1 magnifying eyecup (1.2×) fits, but does not allow you to see the whole frame at once, too bad; angle finders (Olympus or third-party) suffer from the same flaw. All other finder accessories working with other Olympus SLRs (except for the E-1) will also work; they are described in separate story. The eyepiece shutter, built into the finder and activated with a small lever just below and to the left of the eyepiece allows to block the harmful light which otherwise may enter the viewing/metering system the "wrong way" when you shoot without your eye at the finder. Having to use a plastic, slide-on eyepiece cover in the E-510 could be quite irritating. Mirror lockup, once enabled, will create "locked" versions of all drive modes, available via the drive mode interface (direct or Control Panel); this way it becomes accessible without going into the menu system. |
|
Type:
Mirror-up, main imager used |
Live View allows to view the scene before the picture is taken, using for that the same monitor which serves the purpose of displaying existing pictures.
The first interchangeable-lens SLR with the Live View, the Olympus E-330, had two independent systems to provide this feature. One had a separate imager for that purpose, sitting behind a series of mirrors (so that it could be used with the main mirror up and shutter closed). The other system used the image picked up by the same imager which is used for picture-taking; this requires the mirror to be up and the shutter to stay open. That dual solution has been discussed in one of my Quest articles, in addition to the E-330 write-up; to put things in the right context, refer at least to the first one. While the first approach might have some advantages over the second one, it is also quite convoluted, costly, and suffers from a number of other problems. Starting from the E-410/E-510 Olympus limited their cameras to the second LV type only. This is the same choice as that made by other manufacturers now offering this feature (which they originally dismissed as not really useful). The E-3 incrementally improves on Live View over the E-510. There is no revolution here, but the previewed image looks better, and the system is more responsive in use. The latter may be due to the new shutter and mirror construction in this camera. These operate faster now, to provide increased frame rates, and Live View gains from this as a side benefit. Consider all what happens when you use the Live View:
This looks like a lot of mechanical activity; no wonder the camera is thumping, clapping and whirring for quite a while. This, however, is hard to avoid. This sequence could be streamlined a bit by removing the (seemingly) unnecessary mirror-down movement in Step 5 and mirror-up in Step 6; I believe this serves no actual purpose; possibly a "legacy" thing, making the whole sequence easier to implement by re-using some of the existing logic. I am not sure if other makers also go through these two steps. Another speed-up could be achieved by using the imager for autofocus and exposure metering; this could eliminate another two mirror travels. Such a solution, however, does not come without a price, as you will see below. |
|
Imager-based AF and AE:
No |
It is possible to design a system which, in the Live View mode, would use the image sensor for autofocus and/or autoexposure. Most non-SLR digital cameras work this way. The Panasonic L-10 also provides this capability.
Without having to use the "regular" AF and AE sensors, the mirror could stay up the whole time, no longer needed to redirect the image to them. This could simplify the whole picture-taking sequence and make it significantly faster. Olympus, however, decided against that, with good reasons. The "main" AF sensors are faster and more accurate than the contrast-detection procedure used with the imager; using just one AE system provides results more consistent between both modes of picture-taking. In fact, some kind of exposure readout (and even a luminance histogram) is provided during the Live View use, but this is only for information purposes; the actual exposure will still be determined by the AE sensors reading the light off the viewing screen. |
Live View data display and options:
|
The difference between the two top bullets on this list is that the first one shows what you have set the camera to, while the second — what camera expects to set when the picture is actually made. The exposure reading done by the imager may be different than that done by the 49-point metering matrix reading the light off the viewing screen.
To be exact, what belongs to the second group depends on the exposure mode. For example, in Program, this will be aperture and shutter speed; in Aperture Priority — just the latter. If ISO is set to Auto, its value will also count as one of these parameters. The luminance histogram seems to be quite accurate: after all, it is taken off the same sensor as the final image — but, possibly, at different settings, see above, so all depends on how the two exposure readouts differ. The problem I've observed in the E-510, with live histogram behaving erratically at lower light levels, has been fixed in the E-3, at least in firmware v. 1.1. (It also has been addressed in that camera.) See also the next paragraph. The image shown in Live View reflects the exposure as predicted by the imager (see above), so it should look, approximately at least, as the picture which will be taken. Sometimes, however, this may be impossible (for example, with flash), or just too dark for convenient preview. (The latter is very true in infrared, when the imager meters the light much lower than the "regular" sensors.) In such cases you may want to activate the Live View Boost, which will bring the display to reasonable (i.e., easy to view) brightness levels, regardless of the exposure settings. This is done from the menu system, so the feature cannot be easily switched on and off. I never use this feature, with one exception: infrared. Probably because of some technical limitations, the live histogram in the "boosted" mode reflects the luminance distribution not as expected to be in the picture, but as adjusted for viewing convenience (you can easily check that it does not react to changes in exposure compensation). This makes it useless, so the feature should rather be disabled when the boost is on, or modified to reflect the boost adjustment. The predicted exposure readout, though, is OK in this mode. |
|
Type:
Mechanical, focal-plane, electronic control
|
A standard solution in digital SLRs. This is an entirely new shutter, re-designed to meet the higher frame rate, top speed, and reliability requirements. The shutter is rated at 150,000 exposures (in the E-510: 60; in 40D: 100; in D300: 150 thousand frames.)
You may also want to have a look at my article describing how a focal plane shutter works. |
|
Speeds:
60 s – 1/8000 s, up to 8 minutes in bulb setting |
This whole range is available in all exposure modes but, depending on aperture and/or ISO setting, the lowest speeds may become inaccessible because of limits on the autoexposure range. The capability to provide the top speed of 1/8000 s is a combined effect of increased curtain travel speed and narrower shutter slit, see below. |
|
Max. flash synch speed:
1/250 s | This is what Olympus says, and what you can set when using one of the dedicated flashes. In reality, I believe it to be solid at 1/320 s; see the Flash section. |
|
Release:
Soft-touch, electronic | Quite precise, more than in the E-510, but still not back to the class of the E-20, I would say. |
Modes available:
|
Switching between these modes is done by pressing one of the buttons to the left of the prism hump, and turning the front (only) control wheel. (A nasty solution, see Exposure Control below.)
The self-timer delay can be set to 2 or 10 seconds, and the IR remote delay — to 0 or 2 seconds. The only feedback showing that the countdown started is the red light at camera's front. At that time, the process can still be canceled by pressing the drive/mode button again. Each of the drive modes may have the mirror lock individually enabled. |
|
Sequential rate:
5 FPS in high-speed, 1-4 FPS in low-speed |
When this mode is active, the camera will keep taking pictures as long as the shutter release is down, unless the memory buffer fills up. At that moment, the rate will slow down to match the card writing speed. The shooting can be resumed even if the buffer is still being written out.
The actual frame rate of the low-speed setting can be pre-set from the menu system to any integer value from 1 to 4 FPS. Checking this with a SanDisk Extreme IV card, I've clocked the E-3 at 18 raw frames in 3.2 seconds (this would be 5.1 FPS) and then one frame every 0.6 second. (A similar check with an xD "H" card yielded a similar frame rate, but a sequence length of 14 frames before slowing down to the glacial pace of one frame every two seconds.) Note that my rate measurements may have as much as 10% of an error (I've got to buy myself a mechanical stopwatch: taking a series of its pictures would make the process easier and more accurate.) With highest-quality (1:2.7) JPEGs being written to the Extreme IV, I've got 30 frames in 5.8 seconds (5.2 FPS) before the rate dropped down; at a compression of 1:4 the camera should be capable of keeping up indefinitely (although I haven't checked that). In the continuous autofocus (C-AF) mode the burst rate will be lower, as the camera attempts to autofocus between frames. Having sequential rates above 3 FPS is nice, although useful only in some applications. Still, when shooting bracketed sequences I enjoyed the super-fast response. Now, how does this compare to other models in this class? Canon claims 6.5 FPS for the 40D, while Nikon — up to 6 FPS for the D300 (8 FPS with external power), and the Sony A700 promises 5 FPS, which is fast enough for any uses I can think of. |
Remote release:
Two Olympus infrared remotes |
The wired remote is designated as RM-CB1, different than the RM-UC1, intended for the E-410 and E-510. Actually, this one has been around for a long time, at least since the original E-10. At that time, I posted a short description here. It plugs into a proprietary socket at the left side of the camera. This socket is covered with a screw-on cap which I dearly hate since 2001. A wireless, infrared remote can also be used. Olympus offers (or used to offer) two models:
Unfortunately, the good, old times are over: Olympus no longer includes one of these in the box, as it used to with all its cameras. The RM-1 is being offered as a $40 option, often discounted to $30, which is grossly excessive. Luckily, there are third party alternatives, although I'm not familiar with any of them. Last but not least, the Olympus Studio software ($100) allows you to access all settings (except for zoom), trigger the camera, and save images to the computer — all via the USB connection. There is also camera control software available from Pine Tree Computing (which I've never used); from all I know it does not support the E-3; the same seems be true about Cam2Com, another such application. |
|
Time-lapse sequences:
No | Why? Why? Why? This is purely a firmware thing, and it has been done many times before (including the E-10/E-20). |
|
Light metering:
Full-aperture TTL, an array of 49 sensors |
Full-aperture TTL metering is now an SLR standard, originated by Topcon of Japan in 1963 in their Super D. The E-3 uses a matrix of 49 (7×7) sensors to do that, measuring the light off the viewing screen. (The latter is important, as it may cause metering errors with lenses not designed for the Four Thirds standard.)
The metering in E-3 is precise and consistent, although only the photographer will really know how to assign the available dynamic range to the scene, and therefore — what exposure compensation, if any, to apply. |
Metering modes:
|
ESP is a proprietary acronym for the Olympus flavor of matrix metering. Such metering is used by most manufacturers, and the name does not mean much, if anything. In this mode the camera decides on the exposure, taking a number of discrete readouts from different parts of the frame. But even this does not free the photographer from thinking (see my remark on exposure compensation above).
Hidden in the menu system (not accessible via any other interface) is an option allowing to switch between a "regular" ESP metering mode, and the ESP+AF one, in which a greater weight is assigned to the area used to autofocus on. Being able to set this externally (or via the Control Panel) would be nice. The center-weighted mode does its averaging with emphasis on the frame center. Many photographers, especially those from the "old school" feel better using this approach. Spot metering measures the light only in the central 2% (according to Olympus) of the frame; the approximate metering area is shown as a circle in the center of the viewfinder. If you know what you are doing, this may bring most rewarding results. Two additional flavors of the spot metering mode: Highlight Spot and Shadow Spot are like the basic one, applying a given offset up or down, respectively, to the measured exposure. This offset (of the value not documented by Olympus) will render the metered area as a highlight or a shadow. I find using the "regular" spot plus exposure compensation more flexible, faster, and safer. |
|
Metering range:
EV 1 to 20 in all metering modes (ISO 100, F/2.0 lens) |
This is a more complicated way of saying that, at ISO 100, the camera can measure exposures corresponding to up to two seconds at the maximum aperture, regardless of what this maximum aperture is for that lens. (For each doubling of the ISO setting, cut this time in half; for example, we'll get 1/15 s at ISO 3200.) With scenes requiring a longer exposure, metering will be impossible or, at least, not reliable.
Example: with an F/4 lens used at F/11, ISO 200, the E-3 will properly measure exposures up to 8 seconds. To arrive to that value, take the "base" 2 seconds, double it three times (three full F-stops between F/4 and F/11), then divide by two (ISO 200 vs. ISO 100). My experiments show that in the useful autoexposure range in the E-3 extends somewhat below the nominal low end; maybe Olympus has more strict accuracy requirements than mine. This is close to other digital SLRs: for example, the Nikon D300 goes from 0 to 20 EV in the matrix mode, and from EV 2 to 20 in spot metering. |
Exposure control modes:
|
This is a choice one would expect, with two user slots available (instead of "scene modes" used on lower-shelf cameras), plus the two underwater modes (see later). In a quite unexpected move, Olympus decided to save top deck real estate, so the E-3 does not have the ever-so-common mode dial there; switching between exposure models is done by pressing the middle one of the three identical buttons to the left of the prism and then turning the (rear only!) control dial.
While this system does work (and I've got used to it after a week or so), I do not like it. More on this in the Controls section. |
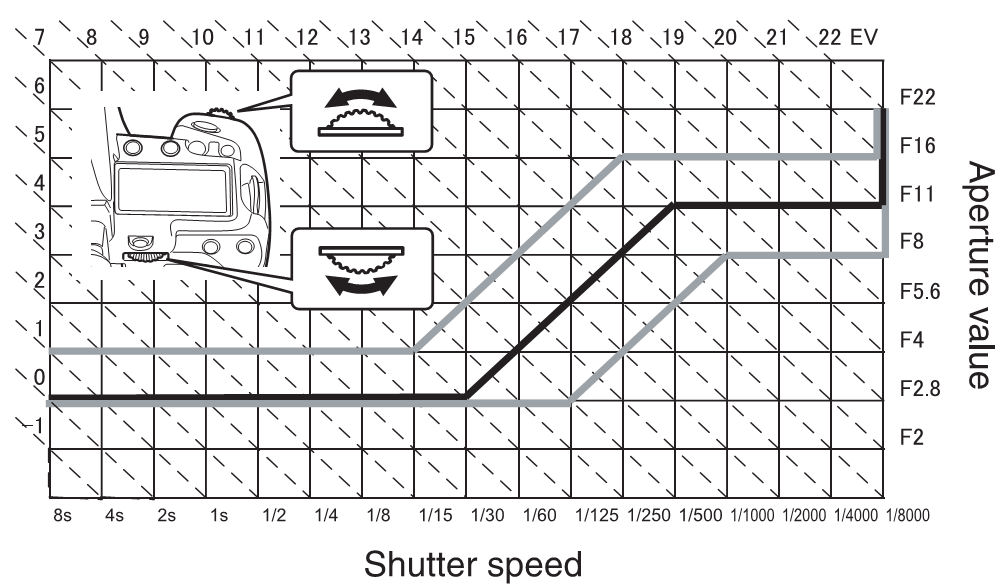
Exposure program with an F/2.8 lens at F = 14 mm (Graph by Olympus) |
The program mode adjusts both shutter and aperture to match the light level. How this is done, is shown in this graph (borrowed from the User Manual). As the scene becomes brighter (EV numbers are shown at diagonal lines), the shutter and aperture settings change as follows:
Shifting the program towards faster or slower shutter speeds is done by turning the control wheel (depending on preferences set). This is shown by the gray lines in the graph. The graph shows that the program shifted towards slower speeds does not use the full aperture (smallest F-number): one horizontal gray line runs above the black one. The horizontal segment [3] of the program line is also moved up or down, depending on the shift direction. Program shift may look like an useful feature, but I don't find it such; to have control over aperture or shutter speed used, most of us will prefer to be in aperture or shutter priority mode. In addition, it is only indicated by a "Ps" mark in all three data displays, which gives you no clue in which direction to turn the adjustment wheel to get rid of the shift. By default the shift is accessed via the rear control wheel, but this can be re-assigned in a number of ways.
Aperture and shutter priority I do not have to explain: you set one parameter and the camera adjusts the other. Time ("bulb") exposure mode allows for manual shutter timing up to 8 minutes: press the release (or the wired RM-CB1 remote) to open, let go to close. The bulb setting is now accessible as a separate exposure mode, not as one of shutter speed choices as it used to be on previous Olympus cameras. The underwater modes become available only if the Function, [Fn], button has been previously assigned to them. If this is the case, they will be added to the sequence; more, if the [Fn] button is pressed in any non-UW mode, the camera will instantly switch to Underwater Wide, and then the button will keep toggling between that and Underwater Macro. The manual does not say anything specific about these modes (besides what can be figured out from their names), and I know nothing about them, either, so the above is just for the record. Gone is the "Auto" mode of the E-510 and, obviously, all the "scene modes". |
|
Exposure compensation:
From -5 to +5 EV. |
This can be done in 1/3, 1/2, or 1 EV increments, depending on a preference setting.
The quasi-analog compensation scale extends only from -3 to +3 EV, and the adjustment value is shown as a number only in the Control Panel (not in the finder or in the top display), but this is not a problem, as adjustments outside ±3 EV are extremely rare (the only time I exceed this limit is in infrared). Most cameras of other brands limit that to ±2 EV anyway. Exposure compensation is dialed in when (or shortly after) the dedicated [+/-] button next to the shutter release is pressed. This button has a different shape, but, being placed between ones used to change the ISO and white balance, it is not so easy to operate with your eye at the viewfinder. This is why the option to assign this function to one of the control dials alone is a viable alternative. |
|
Exposure bracketing:
Three or five frames, adjustable value; also ISO and flash bracketing |
Autoexposure bracketing can be dialed in after pressing simultaneously the [Mode] and [AF] buttons. (This may be not most intuitive combination, but it is better than going through the menu system in the E-510!)
The exposure difference between neighboring frames can be set to
In film cameras I've used (at least those with autowind), the camera would automatically shoot all frames as needed upon a single shutter release. Not so in the E-3: you have to press the release button three or five times (the indicator in the Control Panel changes color in the middle of the sequence, the ones in the finder or top panel blink). You may switch the drive mode to sequential, but even then you have to keep the shutter pressed long enough, or the sequence will be incomplete (although the shooting will stop after the sequence is done.) This means that to use bracketing I have to alter two settings, not just one, and I find it quite irritating. At least there should be a preference setting to change this. Exposure adjustment in this process depends on the mode: in shutter priority the aperture is changed from one frame to another; in aperture priority the shutter, and in program — both (in the same amount). ISO bracketing is basically the same, achieving the effect by adjusting the ISO down and up from the value set. Three frames can be shot, with the ISO difference between them as above. If you are already at the ISO setting limit, two or three frames in the sequence will be identical, i.e., using the same ISO value. Flash bracketing, you guess, changes the light output from the flash up and down for a three-frame sequence. I've never used this feature, but it may be of limited usability because the flash needs some time to recharge. Note: if you set the camera to do two kinds of bracketing at the same time, only one will be actually done. For example, activating AE bracketing and then ISO bracketing as well will result only in the latter one being applied. |
|
Autoexposure lock:
Yes |
This feature is implemented in the E-3 very nicely, exactly the same way as it was in the E-510, therefore I will just copy the description from that camera's review, with minor edits:
By default, the autoexposure locks when you half-press the shutter release, and so does autofocus. If you want to separate these two functions, pressing and holding the The way in which the autoexposure and autofocus are used is largely a matter of the photographer's habits and preferences. Therefore I'm glad Olympus allows to customize these functions in three different aspects.
All this may look complicated, but you do it just once to customize your camera (unless your preferences change, but this does not happen every day). For details, refer to the proper section of my E-3 customization article. |
|
Autofocus:
Passive TTL, phase-detection |
A passive autofocus system depends on a set of light sensors, dedicated solely to this purpose, and placed at the bottom of the mirror chamber. (To make that possible, the main mirror has to be semi-transparent, and another, smaller one has to ride piggyback behind it; quite a complex, but most proven, approach.) All current SLRs use this solution.
The effective distance from the lens to the AF sensors is (or at least should be) the same as that to the image sensor (and to the finder screen). This means that whatever is in focus on the imager, is also in focus on the viewing screen, and on the AF sensors. These detect how out-of-focus the image is, and send corrective information to the AF motor in the lens. (With multiple AF sensors, the process involves some logic for choosing which of them to trust.) After the motor adjusts the focus, the process is repeated da capo al fine. Phase detection usually works better and faster than the competing method of contrast detection, as the system knows both the magnitude and direction of the adjustment needed. |
|
Number and type of sensors:
Eleven, twin cross
AF sensor pattern
The twin sensor principle
|
This addresses the complaints about "only" three AF sensors in previous Olympus SLRs. More must be better, the market says. Actually, letting the camera decide on which of these multiple points to focus is rarely the best approach, unless you are a snapshooter. In most situations I prefer to use just the central point, preferring to make this choice myself.
Still, in a more casual shooting (or when photographing rapidly changing scenes) this may become useful. My doubts are not about using this system at all, but about using it as a default. More, under some circumstances (tripod!), re-pointing the camera to lock a focus reading is not practical. In those situations using a single spot selected by the photographer out of eleven available ones may be preferred. What is more important than just the number of sensors is their kind. Some cameras have only some (often just one) sensor of the cross type, i.e., sensitive to both vertical and horizontal detail, with the rest detecting only horizontal (or vertical) patterns. This was, for example, the case with the E-510. In the E-3 all sensors are of the cross type (same as the nine sensors in the Canon 40D). More, all of them are of "twin" type, each with a double sensing array; this is supposed to increase focusing accuracy. How well does this all work in real life may be a different story, but Olympus claims their AF system is, as of its introduction, the fastest one on the market. After comparing it against the Nikon D300 (in daylight), I may say that both feel about the same; some sources raise doubts if whether this is also the case at lower light levels. I've also compared the E-3 (with its 12-60 mm ZD lens) directly against the E-510 (using the 14-54 mm ZD); yes, it focuses faster than that camera, although I wouldn't call the changes revolutionary. Cross sensors or not, the E-3 sometimes balked at the periodic pattern of my closet door louvers. In any case, this is a fast and solid AF system. Just give it enough detail to focus on. |
|
Autofocus EV range:
From EV -2 to 19 (with an F/2 lens) |
This makes the system four times more sensitive than it was in the E-510 (0-19), quite a progress.
Again, like with autoexposure, the low end of -2 EV can be expressed in more understandable way: exposures of up to 16 seconds at full lens aperture, regardless of that aperture. Don't you wish camera makers were using my way of presenting this specification? The nominal -2 EV limit is very low, and I have to admit I had some doubts here. Thus, I've run some tests, dimming the light in my breakfast nook and shooting a wicket basket hidden behind a wall corner from that light. I could barely see anything in the viewfinder under these conditions. And yes, the claim holds the water! I was getting properly autofocused pictures down to 30 seconds at the full aperture of F/4, ISO 100, even if the autoexposure being a bit flaky at this light (as expected 4 EV below the specified low end). But if my 30-second images were underexposed, this means the "right" exposure should be even longer, so all I can say is that the AF system performs OK at least one EV below the nominal limit. Impressive. (For the record: I was using a five-point cross pattern for this test.) Another remark: while the 12-60 mm ZD was sometimes showing some hesitation in the process, the 14-54 mm ZD acted in a quite assured manner. I do not have, however, any numbers on that, so treat this just as an anecdotal evidence. |
Focusing modes:
|
The continuous AF mode keeps adjusting the focus from the moment the release button is half-pressed all the way until the shutter fires (more exactly: until the mirror goes up). It is a predictive system, extrapolating the subjects's position to the moment the picture is taken. I haven't tried this on the E-3. With the E-500, when shooting a dog beach in Annapolis, I had better results with the single-focus mode. Maybe I have to learn how to use C-AF; never too late.
The "plus manual" modes allow the photographer to adjust the focus manually after the AF is done, and while the shutter button is still held down. Actually, with the new SWD lenses (at least the 12-60 mm ZD I've tried), for this adjustment you do not need to switch to those modes explicitly: it is always available. This means that these modes are included mostly for compatibility with older lenses. The solution is implemented very well: the combination of the lens focusing ring (smooth and precise) and the new viewfinder (large, bright, and snapping into focus) is something you have to try to believe. The manual focus mode means focusing with that ring, with only the viewfinder (or Live View) as a feedback. Once again, the E-3 viewfinder makes this mode genuinely usable (as opposed to earlier Olympus models, with finders not adequate for this purpose). Not that I consider MF a deal-making feature, focusing manually in quite rare cases, mostly with a few legacy lenses I try for fun. While in the MF mode, the AF system still is used to generate a "focus OK" confirmation in the viewfinder, but this works only with Four Thirds lenses, not legacy ones. Some users may find it disappointing, especially as there are third-party lens adapters (the Dandelion from Russia, to start with) which reportedly enable this functionality. I haven't tried the Dandelion, so do not ask. In an apparent contradiction, even if you do not need manual focusing, you may end up using the MF mode from time to time. This mode allows "autofocus on demand" (if you assign this function to the Lock button). This allows to lock the focus on a selected point without having to keep any button pressed; for example, before shooting a series of pictures which you would like to be focused identically. I found that quite useful when working on image samples, but not only. In such a case you have to remember that most zooms (perhaps all Four Thirds ones?) need to be refocused every time the focal length is changed. Now, some features which I (and, possibly, a few other nitpickers out there) may still consider missing.
|
|
Autofocus lock:
Yes | By default, the autofocus is locked together with autoexposure when the shutter release is half-pressed. This can be customized to your preferences, as described under AE lock. |
AF release lock:
|
This means that in the Single AF mode the shutter will refuse to fire if the focus was not achieved. In Continuous AF it will fire regardless.
This makes perfect sense, but both these behaviors can be customized to your preference. The same setting also decides if the shutter can be released before the (internal or dedicated) flash is recharged (yes, this also works depending on what focusing mode are you in). |
|
AF assist beam:
No; flash used instead |
The built-in flash will be, if needed, used as a focus-assist light — as long as it is raised at the moment. This will be used even if the flash (as a source of illumination) is disabled. I find the feature quite annoying; luckily, with the AF sensitivity of the E-3 being quite high, I can usually afford not to use it. A deep-red AF assist lamp would be better.
Olympus dedicated flashes provide such a lamp, and it works very well even in total darkness (being also less obtrusive). |
|
Operating principle:
Body-based, moving sensor |
Still cameras use image stabilization systems of two different kinds. Both depend on information derived from a device (a gyroscope or equivalent) which detects camera/lens shake (in terms of spacecraft dynamics this would be called changes of "attitude"), but the signal is then used differently:
Makers of lens-based stabilization systems (Canon, Nikon) claim that it can work better, because each implementation can be tweaked best to the lens in which it is contained. Those who offer the body-based approach (Pentax, Sony, Olympus) say that their way works just fine, thank you. There is no doubt, however, that being able to use image stabilization with any lens is a very attractive option for many camera users. Canon and Nikon offer IS only in some lenses, mostly with longer focal lengths (where this is most useful, anyway), and mostly at a premium. A recent (January, 2008) firmware update allows the IS system in the E-3 (or E-510) to be used with "legacy" lenses, i.e., ones providing no information exchange with the camera's body. This was a long-awaited removal of a rather arbitrarily imposed limitation, and those who enjoy using their classic OM Zuikos in the digital era reacted quite enthusiastically. I believe the years of lens-based IS are numbered, except, maybe, some high-end market niches. For some time both approaches will, however co-exist, sometimes even within the same camera system. This is already happening: some of the Leica lenses for the Panasonic SLR line contain image stabilization. With such a lens fitted on an Olympus body (after all, both brands follow the Four Thirds standard), you can choose system to use (the other one has to be turned off). |
Operating modes:
|
In the first mode (referred to as Mode 1 by Olympus) the camera movement compensation occurs both in the horizontal and vertical dimension. This is the mode most of us will be using 99% of the time.
The second, panning mode (Mode 2) is intended for cases when the photographer is intentionally moving the camera (held in the landscape format) to follow a horizontally traveling subject. Obviously, what we need then is image stabilization only in the vertical dimension. Switching between these modes (or turning IS off) is done with help of the [IS] button and the control dial. It is recommended to turn IS off when shooting from a tripod (perhaps just in case, but, indeed, the camera may be trying to do something not quite reasonable then). |
|
Stabilization effectiveness:
2 to 5 EV (as claimed by Olympus)
This sample: |
These numbers (by Olympus) show how much slower shutter speeds can be hand-held with IS enabled, compared to without IS. The quoted values of 2 to 5 EV translate into exposures from 4 to 32 times longer, and I find this claim more than a bit suspect (like similar claims by other manufacturers). Obviously, this depends on the focal length of the lens used, its weight and shape, your shooting technique, plus, possibly, other factors — but, still, exposures thirty times longer?
When testing the E-510, I have developed a procedure to determine this difference. The procedure is, I believe, sound and solid, even if based on subjective evaluation: it does a statistical evaluation of a large number of comparative samples, shot at various shutter speeds. With the method in place, it was not a problem to run such a test for the E-3. Here are the basic results:
The full data can be found in a separate article on this subject. The bottom line is: while there is no doubt that image stabilization in the E-3 is working, its effects are far from those claimed by Olympus. Is this a disappointment? In one sense yes, as always when a claim does not match reality. In another — no: this does not mean that the E-3 is doing worse than competing models, as I have serious doubts on the validity of similar claims being made for those. |
|
Internal:
GN 13 m at ISO 100 |
This is just a tad more than the E-510, similar to what most built-in flashes in this class provide.
Deciding whether to provide a built-in flash in a camera of this type is not easy choice; actually, a hopeless task. If you do include it — it will probably become one of the weakest points in camera's resistance to abuse and elements; if not — 60% of reviews will point this omission as a flaw; and reviews sell cameras. An intrinsic problem with built-in flashes is that they are not any good for almost any applications. They are too small, too weak, too close to the lens — and I know of no way around that. Still, an internal flash may have its uses: not only in emergencies, when you do not have a "real" one handy, but also as a fill-in light outdoors, or to trigger a slave unit (or units). General issues aside, back to the flash in this camera. First, it no longer pops up automatically "as needed" (whatever that may mean); a right decision. Auto-popping flashes are evil. Two, you will notice that the flash raises quite high above the camera. This is also good; both to reduce the chance of a redeye effect, and to avoid the lens casting a shadow into its field of view. This is why Olympus advises against using the internal unit with the 12-60 mm lens at 12 mm from a distance less than 2 meters (with other "standard" ZD zooms the warning refers to less than 1.2 m). I've checked that, and it looks that I can get away with as little as 1.5 m to the scene, as long as I'm not using the lens hood. There is some visible light fall-off at this focal length, but this was to be expected. The flash recharge time is usually about three seconds (quite fast), but this, of course, depends how strong the preceding burst of light was (aperture, ISO, subject distance). |
|
External:
Olympus dedicated flash system |
The Olympus flash system, at present, includes three units: FL-50R, FL-36R, and FL-20, plus a ring flash and a dual on-lens one. The "R" versions are replacing older "non-R" ones, being functionally identical except for one new feature: ability to be remotely controlled from the built-in unit (this might have be the real reason why that unit was included!).
Another article describes the Olympus flashes, except that at the moment it needs to be updated with information on the remote control issue; in addition, FL-36 has its own write-up on this site. I will not be repeating that information here. Let me only mention that FL-20 is probably too weak and too limited for any real use with this camera, and FL-36 ("R" or not), while OK for direct illumination, is barely adequate for bouncing the light off the ceiling. E-3 users will be best served by the FL-50R — or, if remote control is not an issue, the plain FL-50 while it is still available, often heavily discounted. Unfortunately, neither FL-50R nor FL-36R have a second burner, providing a fill when the main one is used bounced; in the past I found that to be perhaps the best solution for an on-camera flash. The FL-40 flash unit, designed for older Olympus cameras, does not integrate itself with the TTL metering system in the E-3; see below for more on that. Metz sells a number of flashes supposed to work in full TTL-Auto compatibility with E-System cameras, but I haven't used them and I'm not sure how smoothly they integrate with the E-3. The same about one ProMaster model, with reportedly, the interface module updated to current Olympus specs. In any case, don't ask me, this is all I know. Really. |
|
Remotely controlled flash:
Yes, up to 12 units in 3 groups
The RC Flash Control Panel |
While Olympus does not go into any details, I have no doubt that the remote units get instructions from the built-in one via a burst of light. As I haven't used the "R" flashes, I do not know if this is infrared or visible. (If you know, I will appreciate the information.)
If this feature is enabled from the menu, the Control Panel will have two pages (with the [Info] button switching between them); the second one is devoted exclusively to the remote flash system. Up to three groups of remote flashes to be controlled simultaneously, and for each group independently you can set a number of parameters, most important of which is the exposure mode: TTL, Auto, on Manual. TTL is the pre-flash based metering, Auto uses the flash's own thyristor system to throttle the light, and Manual can be set to a fraction of the maximum output. Thanks to the Reader who provided an explanation why I might sometimes want different groups to work in different exposure modes. Indeed, this may be useful in some situations. |
|
Slave flash option:
Yes. |
Slave units can be triggered by the output of the built-in flash set to manual. The use of slaves is limited to that mode only because of two reasons:
|
External connections:
|
The hot shoe will accept, in addition to Olympus system flash units, any generic flash with a single contact pin. (Some systems, like Sony/Minolta do not allow for that.)
Olympus provides a number of cables used to connect these two to off-camera flashes or flash brackets. I haven't used any of them. The flash socket to the top-left of the lens mount follows the well-established standard which will work with most flash units ever made; it is protected with another one of those pesky screw-on caps which you will lose the first time you take it off. |
|
Non-dedicated flash units:
Yes, up to 12V (?) trigger voltage |
Olympus is not specific in specifying what is the highest safe trigger voltage of a third-party unit when used with the E-3, but I have used up to 12 V with other E-System cameras, so I am sure this is safe. Maybe you could get away with more, but I wouldn't try.
This excludes some of the older flashes, which may have up to 300 V on the contact pin, so that the camera's electronics can be damaged. Non-dedicated units (including the older FL-40 by Olympus) still can provide some exposure automation with use of the unit's own metering circuitry. This is done while the camera's exposure is set manually. Such a flash knows nothing about the camera, the camera knows nothing about it, and the whole interaction between both is limited to closing the triggering circuit. There is nothing wrong about it, though, and sometimes I think I'm getting more predictable results this way. As a matter of fact, a good, powerful thyristor flash can be bought for less than the Olympus feeble FL-20 sells for, and it is quite easy to use (once you read the instruction manual), providing an inexpensive yet capable alternative to the overpriced Olympus units. The remainder of the flash section deals only with Olympus units (or the internal one). |
Flash modes:
Some of these are available only in particular autoexposure modes, as shown in brackets []. |
Now, this looks quite convoluted, because it is. Note that various flash modes are accessible only from particular exposure modes; this is to exclude combinations which do not make much sense.
Manually throttled flash power is accessible only for the built-in flash; probably to allow for a variable amount of fill-in and/or triggering slave units. Most of the external flashes (including the dedicated Olympus models) have their own controls to allow this. The internal unit can be set to full, 1/4, 1/16, or 1/64 light output. The two Auto settings (with the red-eye one providing a pre-flash to avoid the red-eye effect) allow the camera to decide whether to use the flash under given circumstances. They should be taken away: I just cannot imagine even a semi-serious amateur taking a picture, only to see afterwards what the camera decided to do. If you are not sure whether you want to use flash in a given situation, this means you are not ready for an SLR, regardless of specs and price. The Slow modes are intended to provide a mix of ambient and flash light. The feature is not really useful: the camera applies the exposure as measured in the ambient light, and then adds flash on top of it, without modifying that exposure. Yes, I've checked this, although not in a systematic manner. For me, this does not make much, if any, sense, at least until the feature is well-documented. Some camera systems have a related option, allowing the user to choose the fill ratio. This is a genuinely useful thing, sadly missing on Olympus cameras. The first-curtain (default) and second-curtain synchronization modes differ in when exactly the flash fires: as early or as late, respectively, as possible during the time when the shutter is fully open (i.e., the sensor fully exposed to light). In the first case any motion streaks due to the subject exposure by the ambient light will precede the flash-generated image; in the second — follow it. Off disables the built-in or external flash (even if it is raised or turned on). The internal unit, if raised, will still be used for focus assist. The way things are, the flash modes provide just the basic functionality and add a number of redundant or useless options. |
|
Flash compensation:
From -3 to +3 EV. |
This compensation is dialed in with the front control wheel in combination with the flash control button (the rear wheel changes the flash mode described above, so you have to remember to turn the right one). It can be applied on top of or instead of the regular exposure compensation, depending on how your preferences are set. The adjustment step is the same as in both compensation options.
Any compensation dialed in on the Olympus FL-50 and FL-36 ("R" or not) dedicated flashes is additional, i.e., applied on top of any corrections set on the camera. |
|
Flash metering:
Through-the-lens pre-flash. | To allow the camera to determine the exposure parameters needed, the flash emits a single pre-flash just before the picture is taken. This, reflected from the subject and metered by the camera's AE circuits, is used to set the exposure. |
Max. flash synch speed:
|
My tests with three different third-party flashes (all of the thyristor type, i.e., metering their own light), make me believe that you can always get away with the shutter of 1/320 s. This is close to the nominal value (which seems a tad on the conservative side). Well, perhaps Olympus leaves some room for flashes with light duration longer than the ones I've used, see below. At 1/400 s you can achieve full synchronization, but only if the duration of the flash is short enough (i.e., if the light burst is throttled well below the nominal capacity), which is often the case in direct (i.e. not bounced) use. When the flash runs close to full power (longer burst), you may see the shutter obscuring some of the frame as it begins to close. (If you are not sure what I mean, refer to my shutter article.) Then, 1/500 s is definitely a case when the shutter is never fully open, so flash synchronization is never possible at that speed. The camera will not allow you to use a shutter speed faster than 1/250 s when a dedicated (or internal) flash is being used (except in the Super FP mode). The Super FP mode allows for flash synchronization at any shutter speed, at the expense of the effective flash intensity (guide number) and higher power consumption. In this mode (supported by the FL-36 and FL-50 units, both old and the "R" type) the flash emits not a single, short light pulse, but a few hundred of weaker ones, jointly covering the whole time it takes the shutter to travel the whole frame height. This assures proper exposition at shutter speeds all the way to 1/8000 s. The Super FP mode can be useful, but only under specific conditions. It is indispensable when we want to provide flash as a fill, and the ambient light calls for exposures shorter than 1/250 s. It is not available with the built-in unit, which is perfectly understandable (power usage, heat dissipation). |
Type and size:

The LCD monitor, magnified |
Olympus specifies this as 230,000 pixels, but these are really single R, G, and B elements, and an RGB pixel consists of three of those.
Interestingly, for years I was the only one complaining about this common misrepresentation, and only recently some other writers started noticing it. Credits are also due to Nikon, the first manufacturer who switched to the "right" way of counting; for their (beautiful) D300 monitor they specify 307,000 pixels or 920,000 RGB "dots". This is four times the pixel count (or twice the linear resolution) of the competition, including the E-3 or Canon 40D. (For the latter Canon still claims 230,000 "pixels", like Olympus does.) To round up our survey, the Sony A700 uses the same monitor as Nikon, but puts a claim to 920,000 "pixels" again. From which of these companies would you buy a used car? The contrast and color are good, and I would be perfectly happy with it — if I haven't played with a D300 recently. The white dot near one of the corners of the monitor is an ambient light sensor; its readings are used to adjust monitor brightness (with some delay). This can sometimes be annoying, but the auto-adjustment can be disabled from the menu; your choice. |
Display modes:
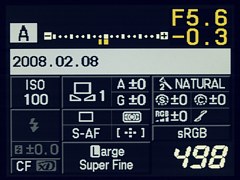
|
Switching between all these displays is done with use of four buttons, one of which (image review) sits prominently above the arrow key cluster, and the other three are half-hidden in a recess below the monitor. While the first is easily accessible with your thumb, the others are not. Their placement is something I do not like too much: they are just too easy to confuse, being of the same shape and not clearly visible if you handle the camera somewhat below your line of sight.
I understand the problems designers were facing: this was, basically, the last usable place left on the body, but this does not mean I have to like this design. Only now I fully realized how good a job did Olympus do with controls on the E-510, with even less room available. Maybe just moving the (dedicated) Delete button elsewhere, plus, possibly, providing a ridge between the Live View button and two others would help? It is hard to tell without trying. The Control Panel, shown in the picture at the left, is described in detail in its own section of the user interface discussion. |
Image review:
|
If this option is activated, the just-taken image will be immediately shown on the monitor, for a preset duration. The camera will use the last active display mode, and the display will be interrupted if any control is operated. The image cannot be deleted while viewed this way.
Pressing the [Play] button recalls the last image taken, and the arrow keys are then used to scroll through images. While the image is being shown, you may use the [Info] button to toggle between various display modes, as enumerated on the left. The basic and detailed file information display is just that; I would gladly see them merged into just one option, instead being able to see a full-screen image with just the basic exposure data: aperture, speed, ISO. The way things are, in order to see these you have to go to the detailed display, with the image is reduced to 1/4 of the screen (including the indicator of the AF sensor used), and with four tiny histograms added: luminance and individual RGB components. As useful as the detailed display can be (single-component histograms are the best way to check if a given channel has not been overloaded, even if the overall luminance stays within limits), the basic exposure information mode would be very handy. The modes showing clipped highlights and shadows as blinking spots can be also useful, helping to detect areas too small to be visible in the luminance histogram (what about a logarithmic scale?); I would, however, consider merging these two into one, with different colors marking both extremes. I've seen this implementation before, and it makes sense, removing one step in the process of switching between modes. The control dial is used to change the image magnification (up to 14×) or to enter the thumbnail display (or a calendar, allowing to find pictures from a given date). When an image is magnified, the [Info] button acts a bit differently, switching between three displays: just magnified (arrows move between images, keeping the scale), magnified with scroll (arrows used to move around), and full-screen, with a frame showing the selected fragment (arrows used to move the latter). The [Fn] button pressed in the image display mode jumps straight to the 10× magnification, and then toggles between these three states. Handy, but you have to remember. Then, with use of the AF point selection button, [...], you may compare a selected fragment of one frame with the same fragment of another, with a number of options available. This is the same as in the E-510, too confusing to be really useful, with the same button performing different functions, depending on the current display status. Sure, theoretically this may be a great feature — but only if I'm using the camera (and only this camera) full-time; after a two-day break you'll have to start memorizing all this again. I consider this rather a wasted effort. An important, and often overlooked, fact is that what camera shows as image review is not the full picture "as saved". Instead, a separate "proxy image" is stored as a part of the EXIF data in the image file. That proxy image is 1600×1200 pixels, a 410 kB JPEG — a high compression ratio of 1:14. This means that at a 5× magnification the 320×240 display shows already all detail available for preview (plus any compression artifacts, easily visible at a glance), and magnifications above that do not really add anything, thus not really helping in a better evaluation of the viewed picture. (The only advantage of higher magnifications is that the image can be viewed from a larger distance, a plus for middle-aged photographers.) |
|
Video output:
PAL and NTSC | The contents of the monitor can be also sent to a TV set. A standard video cable is used for this purpose, using a concentric socket next to the USB one. I never had a need to use this feature, but some people may. |
Tilt and swivel:
|
This is a huge improvement in monitor usability with Live View and a minor one otherwise. With Live View being most useful (for me at least) for low- and high-angle shooting, the feature is quite crippled on cameras which do not allow to change the monitor angle, at least in the vertical dimension (i.e., on all current Live View cameras except for the E-330).
The E-3 monitor may also be turned to face the subject, which may be useful for self-portraits. Depending on the position, the displayed image is inverted as needed, to provide the right orientation for viewing. Unfolding the monitor, swiveling it by 180° and putting it back down (two movements of your hand), reverses the monitor and puts it flush with the camera's back side, protecting it from damage. Nice, similar to the C-5060WZ. It this position all essential camera settings can still be adjusted with the feedback provided by the monochrome status display on camera's top. I am not sure if two degrees of freedom provided in this monitor are really necessary; perhaps one would be fine: a tilt from -45° to +90° (+180° could not be practical for geometry reasons). This way the monitor would stay behind the camera all the time, instead of sticking out way to the left. I think I would prefer that. |
|
Alternative display:
Yes, LCD on top
|
This does not fit into any other section, so I'm putting it here.
With the E-3 you do not need the color monitor to change camera's settings, at least these which can be accessed with external controls. This can be also done with help of the monochrome LCD Status Display, located on camera's top, to the right of the prism hood. These displays, once ubiquitous on digital cameras, went the way of the dodo, as they use too much of the valuable space; their functionality has been taken over by LCD monitors. Professional cameras of monstrous sizes are still including them (sometimes even two!), but many smaller models do not. My old C-5060WZ compact had a tiny but functional display of this kind; Olympus SLRs (after the E-1) had none. Times are changing. This display consumes almost no power, so it stays on all the time when the camera is powered, showing not only the essential shooting parameters (shutter speed, aperture, exposure compensation), but also the remaining card capacity (in frames) and a truckload of tiny indicators. Some of those only show that a given setting is off its default, others are more specific. This display is quite detailed, maybe even too detailed, but this may be a matter of taste; besides, I'm getting used to it. A button next to the prism hood turns on display backlighting, which greatly enhances its usability. In any case, many E-3 users will appreciate this option. It greatly extends battery life and allows the monitor to be turned off and folded towards the camera's back, so it is less prone to damage. |
|
Power source:
One BLM-1 Li-Ion battery
|
The same battery was used in most previous Olympus E-System cameras (except for the E-400 and E-410). It was originally introduced with the C-5060WZ in late 2003.
The battery is rated for 500 charge/discharge cycles. While I haven't checked that, my two BLM-1's from the original batch, more than four years old and quite heavily used, are still working; so do three more of a more recent vintage. The only one which died recently was a third-party replacement model, three years old (bought from a respectable supplier, not on the eBay). This means you get what you pay for; if you are considering getting a third-party spare, at least check James Attfield's article. One of the main advantages of Li-Ion batteries over NiMH AA's is the low self-discharge rate. My trusty C-5060WZ is now seeing only occasional use, sometimes sitting in a drawer for three months, and the BLM-1 has proven itself well in this context. The Li-Ion technology is still being tweaked and refined; I am slightly disappointed that Olympus is not offering a newer version, with a somewhat higher capacity. This happens if you are not facing any competition...
|
|
Energy stored:
10.8 Wh (1500 mAh at 7.2V) |
This is similar to what other cameras in this class use (Canon 40D: 1390 mAh; Nikon D300: 1500 mAh).
According to specifications, the battery will last through 610 frames (as per the CIPA standard, which I consider not strict enough, especially regarding flash use, to be a standard). This is with partial use of flash, but without the Live view or image stabilization, which should both reduce this number considerably. Anyway, this is a tad less than the 650 frames the E-510 was rated for, although I don't know how accurate these numbers may be. |
|
Charger:
BCM-2, included |
The same charger was included with many previous Olympus cameras, starting from the C-5060WZ. It recharges batteries quite slowly (about five hours, starting from empty, two or three hours if the battery was used up in the camera), but slow charging is better for battery longevity. A faster, optional BCM-1 charger is available, but your batteries may suffer.
I have only one problem with the BCM-2: it does not accept the smaller BLS-1 batteries, used in the E-410. I can easily imagine someone using an E-3, with a spare E-410 body as a lightweight, inexpensive but capable backup. In such a situation the photographer has to travel with two chargers, not convenient. |
Additional power sources:
The E-3 with the HLD-4 grip
The LBH-1 battery holder |
The AC-1 power supply accepts worldwide voltage and uses a proprietary plug on the camera's end. This is the same adapter which was used with the E-1 and E-300 (in the latter case, if you had battery grip).
The HLD-4 power grip is different from those for the E-1 and E-300: the E-3 body shape and size have changed. The grip accepts two BLM-1 batteries (it also will work when only one is installed), or six AA ones (NiMH or alkaline). According to Olympus, autofocusing and some other camera functions will be faster when the HLD-4 is being used. There are reports that NiMH batteries, because of lower voltage, may not work right with the HLD-4. Having not used this accessory, I am not in a position to confirm or deny this. February, 2009: The reports are probably right, as in the new E-30 there is a new option, specifying the battery type used in the grip. The grip duplicates some of the controls on the camera itself: the shutter release, both control dials, Function and AF pattern selection buttons; this adds to the convenience in vertical-format shooting. There is also a switch disabling these, as a precaution for when the camera is used in landscape mode or just carried around. At $180 or so, the HLD-4 is more affordable than its counterpart used with the E-1. On some markets it is currently offered free to E-3 buyers. The (optional) LBH-1 battery holder is a small, plastic box with electrical connections, into which you may fit three CR123 or CR123A single-use lithium batteries; then the whole thing goes into the camera's regular battery compartment. The 123's are widely available, so it may be handy to have this adapter somewhere in your bag when you travel, just in case. While these batteries provide much less energy, they may carry you through an emergency. |
|
There are three control interfaces in the E-3, similar to all Olympus SLRs, starting from the E-500:
With the other Olympus SLRs I used and enjoyed in the past, I came to a simple rule of thumb: if a setting is accessible from the menu system only, set it once and forget about it. Entering the menus should be treated rather as camera's upkeep, not a part of operating it. This proved itself to be true, with a few exceptions. Now, a quick walk-through of all three interfaces listed above. The general modus operandi of these controls in Olympus SLRs remains the same since 2000 or so: parameters are changed with a control dial when (or shortly after) a button assigned to this function is pressed. Simple and consistent. The "grace period" during which the dial has to be operated after pressing the button is adjustable from the menu; it may be changed from zero (dial works only while the button is down) to infinity (the button has to be pressed again to de-assign the function from the dial.) All basic camera settings have their own buttons assigned; additionally, the dials may also have a "no-button" association. This means that the number of directly accessible settings is limited by the number of buttons on the camera body. Too many would confuse users, too few will be too limiting. This is why some features must be accessed in a less direct way: through the Control Panel or the menu system. Olympus tries to work around this limitation by assigning two functions to each of the three buttons to the left of the prism; one in conjunction with the front dial, and another with the rear one. I consider this solution lacking; even after three weeks of using this camera full-time, I sometimes find myself inadvertently changing the "other" setting. (Actually, this may be now happening more often than in the beginning, as I grew more familiar with the camera, paying less attention). For where I stand, one good function is better than two half-baked ones. It does not help that both corresponding fields are then highlighted in the (rear) Control Panel; using two colors might have helped a little. In general, I think that having both dials do the same thing in conjunction with some buttons and two different things with others was not the best decision. In a bold, controversial move (trying to find room for the large status display at the top side of the camera) the designers gave up on the traditional Mode Dial for switching between program, aperture priority, etc. Until I started using the camera, I didn't consider this a problem; now I do, even if I can live with it. The exposure modes are now changed with use of the button/dial metaphor and, to make things worse, this setting does not have a whole button to it, just a half — the rear dial has to be used here, as the front one is used with the same button to switch between various drive modes (including self-timer). Relegating a function from its own dial to just half a button is not only a matter of elegance. It really makes operating the camera less straightforward, and I seem not to be alone in this feeling. I really hope this will be improved in the next model; if not the mode dial, then, at least, maybe a separate button of a more distinct shape, feel, and location. Anything but half a button, please... Maybe the idea of a big, complete status display needs some rethinking. I could live with a smaller one (just shutter, aperture, ISO, and exposure compensation), in exchange for having the mode dial back. I've also heard users complain about the placing of exposure compensation and ISO adjustment buttons too close to each other. While I wasn't initially thrilled with this arrangement, it was quite easy to get used to. Still, I found that re-assigning the compensation to the front control dial alone is more convenient and faster. I found that dial quite unlikely to be turned by accident, so why not? The camera's behavior became more civilized. The front dial is positioned too low for my taste; I have to re-position my hands to access it after using the grip to actually hold the camera. I consider this an ergonomic flaw. People with larger hands than mine may find this even more annoying. Working from a tripod this is not a problem; in handheld shooting it may be, unless I learn to hold the camera differently. One more complaint: the AF sensor selection behaves, unlike all other controls, differently in the "grace period" than when the button is actually held down. (In the latter case it changes the AF sensor pattern; in the former, it moves that pattern around.) This is just another way of assigning two functions to one button. The "press and turn" metaphor with "grace period" is simple and consistent; breaking this consistency is a sin. February, 2009: An improvement suggested in the original posting of this article, using the cursor keys to move the AF point around, was implemented in Version 1.3 of the firmware. The point can be moved this way in a short "grace period" after half-pressing the shutter release, and [OK] will bring it back to the default position. OK, enough complaints, at least for now. None of them is a real deal-breaker, and I could easily list twice as many things I do like about the ergonomics of this camera; then, don't even get me started on some other models I've tried recently (no names, please). Let us go in the details. | |

|
Most of the buttons are located in four distinct places on the camera's body: three to the left of the prism (on the top side), four to the right of it, just above the status display, another four just below the monitor, and the rest — on the right-hand half of the rear side. While visiting the complaints department, let me add that I'm also not so happy with the design of two of these groups: one below the monitor, and the other, to the left of the prism housing. Each of them has too many identically shaped buttons too close each to other. I understand the space constraints and such, but this somehow does not feel right; maybe it is time to consider using some other available real estate, like the front, or the upper half of the left side? (The E-10 put the latter to a good use.) At first I felt uneasy about the exposure compensation button in a row of four; later I found that row livable (still, I've re-assigned the compensation to the front dial alone anyway.) |
|
Here is the full list. Buttons which work in conjunction with control dials are marked with a (D); those which toggle between different states of a setting, with a (T).
The Control Panel, shown on the color TFT monitor and invoked with a press of the [INFO] button, serves a dual role. First, it is a comprehensive display of (almost) all picture-taking settings of the camera, more complete, logically arranged, and more readable than the monochrome Status Display on the top. Second, it also allows the user to change most, if not all, of those settings, using a simple and efficient "point to it, and then change it" metaphor. I've tried similar active displays on almost all competing camera lines, and this is the one I consider the best. Here is the full listing of what you see there, divided in two basic groups, depending on their interactivity.
There is no longer a choice between a full and simplified version of the Control Panel display as in the E-510; this makes turning it on or off faster. I'm not missing that feature. There is also no more a choice of display color schemes (like in the E-500). The system is actually so good that in some situations I prefer to use it over direct access buttons, not having to turn the camera around to access them (or, rather, to verify if I'm pressing the right one). Maybe with growing familiarity with the camera this would gradually change, but so far I'm using a mix of both ways. Aperture and shutter speed are displayed in larger characters on the top, and the exposure compensation is shown both numerically and graphically (both the "regular" and flash adjustment, if applicable, below and above the scale, respectively). As an alternative to pressing the [Info] button to turn the Control Panel on, also [OK] can be used. This will not only activate the display but also highlight the last accessed parameter. [INFO] will also toggle between this panel, and the RC Flash mode display (but only it the latter is enabled from the options). The list of flaws and limitations I would like to see addressed remains unchanged since the E-510, and here it is:
And, frankly, I was expecting the E-3 to have an eyepiece sensor, turning the Control Panel off when the camera is brought up to the eye.
There are five menus here: It looks like after my opinionated criticism of the menu system in the E-510, Olympus interface team revisited it for the first time in ages, coming back with some improvements along the lines I've suggested (at least I would like to think so). In particular, I was complaining about menus being too long, and arranged, to put it mildly, not in the most logical way. With zillions of settings to provide access to, it is difficult to cut down on the total count of menu items (although some progress there might be achieved by removing functions accessible from the Control Panel). What could be (and was) done, was branching the settings into a number of sub-menus, thematically arranged. In the E-510 I was often searching for an option, overlooking it in a long, linear Settings 1 menu, failing to find it in Settings 2, only to go back to the previous one — a frustrating experience after six months of using the camera. It is better now, although sometimes I am getting an impression that Olympus hired a new team of GUI designers, allowing them to touch only some part of the menu system (say, Settings 1), while leaving the rest to the old guard; possibly both teams were also forbidden to communicate with each other. This may sound harsh, so I owe you an example. The Settings 1 menu has a sub-menu called Display. Among others, it contains the setting of time after which the LCD monitor goes off, or the activation of Live View brightness auto-adjustment. So where you would expect to set the image auto-review time? Wrong, not here: this is a stand-alone item in the Settings 2 menu. All right, what about adjusting the overall brightness of the monitor? Wrong again, this is another separate item in Settings 2! Somehow, as soon as we reach the end of Settings 1, all logic goes away. I could still argue about a dozen or so other items assigned in a less-than-logical way. Why is External WB Detector in the Utility section (and not in Image/Color/WB which would be an obvious choice)? Why is sensor cleaning in Settings 1/Utility, but pixel mapping in Settings 2 if both are periodic maintenance functions? Interestingly, out of 80 menu items, 46 (!) are within Settings 1. A software designer, even without looking at what is the meaning of a particular menu item, would suspect right away that something can be improved here; the tree seems unbalanced. Sometimes it cannot be avoided, but usually it can. At the risk of taxing your patience, let me list some thinkable improvements which could change a lot:
While these changes would be quite radical, they could attain two goals: (a) only preferences and maintenance functions would have to be accessed via menus; no shooting parameters; and (b) even those functions would be easier and faster to navigate among. What else could a photographer wish? With all that said, the current improvement is visible, and I'm already more at home with the menu system in the E-3 than I ever was with the E-510 or E-500, in spite of being more familiar with those cameras. The E-3, like its immediate predecessors, can be heavily customized, tweaked to the photographer's taste, needs, and preferences. Most importantly, once this is done, you can just start enjoying the camera, without worrying of those details. (That is, until the firmware is upgraded, when the process has to be repeated; better keep a list in a safe place.) Most of users will want to keep 80% of those options at their default values; the problem is that the remaining 20% may be different for every user. This is where the flexibility of the process comes so handy. Refer to Making the E-3 Work Your Way for details on customization and setup of this camera. Now, I'm in a tight spot. So is Olympus. Simply: they did such a good job in this department with the E-510, that I'm hard pressed to find where E-3 may be improving on that camera. On the E-510 I said: "The colors are vibrant, tonal transitions smooth and detailed. [...] The biggest shock comes, however, when you disable the in-camera dynamic noise filtering: the gain in sharpness reveals a quite incredible amount of detail — and the lenses are capable of filling it in." This is fully applicable to the E-3, in spades. It consistently kept delivering most impressive results — but so was my humble E-510 at half the price! So, what does the extra $1000 bring you? In addition to build quality, weatherproofing, finder size, frame rate, what has been improved in the final result? First of all, we are facing the principle of diminishing returns. Every next $100 brings you less gain; just accept it. Some changes will be visible only at very close scrutiny — once you start from a level already quite high. I still have a few hundred sample images to scrutinize, but I already have some general observations to share.
Have a look for yourself; here are some pages with E-3 image samples:
A 150-page printed Instruction Manual is included. (A PDF file can be downloaded from Olympus here.) There is also a small Quick Start guide, but I don't think anybody who spends $1600 for a camera (body only) will need it. Still, nice. In the past three weeks I actually lived with this manual. It is what I, to be frank, expected: not as bad as Olympus instructions of five years ago, but still no cigar. 80% of the information in this (nicely printed and laid out, nicely illustrated) book is something anyone who used a digital camera in the past can figure out just by playing with the E-3 and going through the controls. The remaining 20% is scattered in a rather random manner, hard to find and easy to overlook. Lots of basic questions remain unanswered. What fill ratio does the built-in flash provide outdoors? At what exposures is Noise Reduction actually used? The translation from Japanese has three major problems. One: it is too literal. With two very different languages this was doomed to fail. Using two languages on a daily basis, I know the problem. The flow of thought changes from one to another. The translators should have been asked to rewrite, not just translate the manual. Two, the English skill used in translation leaves much to be desired. This leads to some unintended, comical effects, or, worse, quite unclear passages. Three: there is already some generally recognized terminology in the field; this should be used instead of creating ad-hoc new translations, like "specified flash" (should be: "dedicated"), "anti-shock" (proper: "mirror lock") and others. The Olympus engineers are perfectionists. Why should their efforts be diluted with inferior documentation? The program which tries to do everything (image manager, image editor, raw developer, firmware updater) will remain a jack of all trades and master of none. Besides, it is time for Olympus to realize that their market consists of people at various technical literacy levels, and with different needs; people buying very different kinds of cameras. Should they all use the same software? Someone who buys a first snapshot camera may have very different needs than a person getting a pro-level SLR, don't you think so? Besides, any photographer interested in an SLR will, most probably, already have his preferred image manager and editor. For these people, Olympus Master will be just a dead piece of code, taking disk space on their computers, and used occasionally only, for Olympus-specific tasks. There are companies specializing in these applications, sold to wider markets, and Olympus (or any other camera maker) is wasting effort try to do those people's job. On the positive side, the newly updated Olympus Master 2.04 catches up with the in-camera raw-to-RGB conversion, providing the same set of adjustment as the camera does. This takes care of one of my complaints about the previous version. Still, the job it does in letting the user access Olympus-specific EXIF data in images is very poor. At least this should be done right. In addition to the camera body and the "kit" lens (if applicable), the box includes:
This is a very well-specified and well-performing camera; it will meet expectations of serious users, including many professionals. It improves upon the E-1 in almost every department, at the same time providing the same tonality and colors that camera was famous for. On the other hand, it also improves many aspects of its immediate predecessor, the E-510: bigger and brighter viewfinder, pro-class body and shutter construction, weatherproofing, frame rate, not to mention more responsive Live View using a swinging monitor (so far the only other such offering in the industry is the Olympus' own E-330 and the Panasonic L10). My criticism of some aspects of external control design should not detract from the above. Yes, I (mostly) prefer the external controls, if not the handling, of the Nikon D300, but yes, you will do just fine with these the way they are, especially if you take some effort to customize them to your preferences and habits. Besides, some of my critical remarks may stem from the fact that I was having high hopes in this area, expecting Olympus to surprise us with a "just perfect" design. This will have to wait until the next time. As I said in the other article, all the parts seem to be here, and yet the camera feels like less than the sum of them all; more like a result of a committee work, than that of an inspired individual. I think some of the previous Olympus models, even if lacking in features, had more individuality. What counts most, though, are the delivered results, and here I still have to find something to complain about. This is where nobody should feel disappointed. An advanced amateur/enthusiast (like myself or, probably, anyone reading this article) may find this camera too much in terms of weight and size. This is normal; one size does not fit all. Olympus was not trying to compete here with its own (or anyone else's) compact SLRs. When you compare the E-3 against other models in the same price range (Canon 40D, Nikon D300), you will see that weight and bulk of all these cameras are almost identical — and those cameras do not even have weatherproofing. Compare it against higher-aimed offerings from those makers, and you'll find the E-3 light and small. Then, some users even prefer to handle cameras with more substance. For more comments and opinions on the E-3, refer also to my First (and Second) Look article. February, 2009: The new E-30, while missing the E-3's gorgeous viewfinder and weatherproofing, offers very similar features and what looks like the same image quality (at a price just a tad lower, at least initially). No, I am not going to recommend one model over the other, because this will be largely a matter of your needs and preferences. I'm not giving the E-3 a "star rating", or a "highly recommended" (or whatever) verbal recommendation. I never do that, because choosing a camera is a multi-dimensional choice; you cannot just convert all dimensions to a common unit and add them together. If you are considering this camera as your basic picture-taking tool for the next few years, you will have to make the decision yourself, based on the facts, numbers, and image samples, your needs and preferences, and, possibly, as a last resort, my evaluation of individual features. Good luck. | |
|
Other E-3 reviews and resources There must be a hundred or so E-3 reviews and "reviews" in the Internet, so I have to be selective here. I'm keeping off any of the "got a camera, looks good, took a walk with it, wrote a review" kind, limiting myself to sources which, based on my past experience, are worth attention (mine or yours), regardless of how much I may agree or disagree with this or that part of the evaluation or commentary.
|
|
|
My other articles related to the |
|
Olympus® is a registered trademark of the Olympus Corporation.
This page is not sponsored or endorsed by Olympus (or anyone else) and presents solely the views of the author. |
| Home: wrotniak.net | Search this site | Change font size |
| Posted 2008/02/09, last updated 2009/11/29 | Copyright © 2008-2009 by J. Andrzej Wrotniak |
.x.jpg)
.x.jpg)
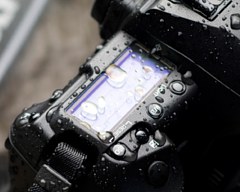

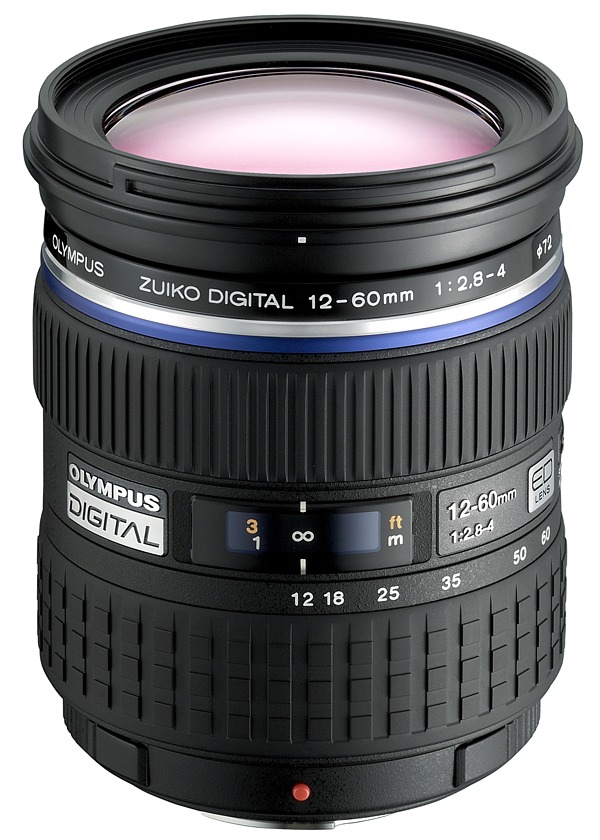
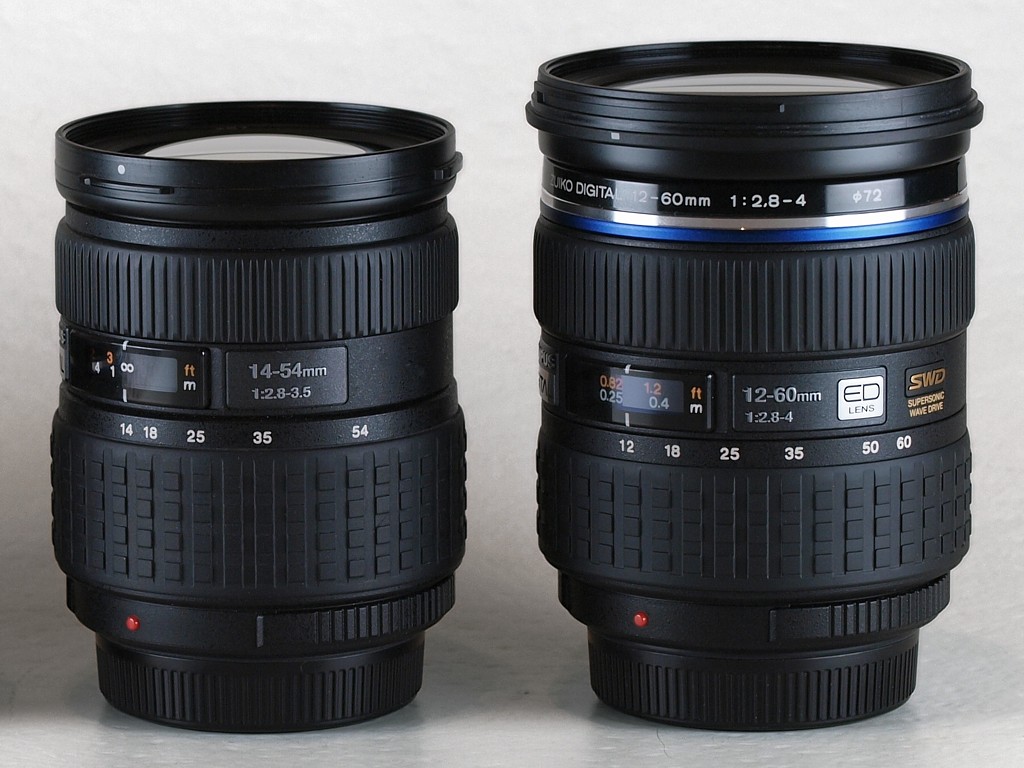


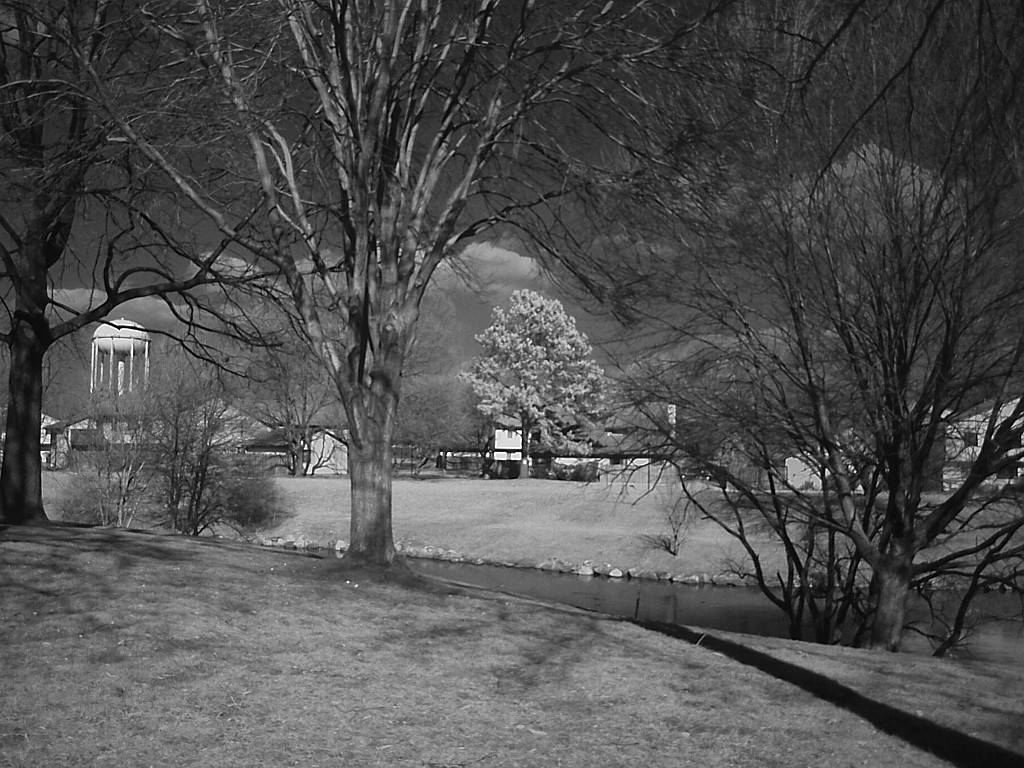
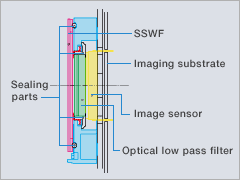
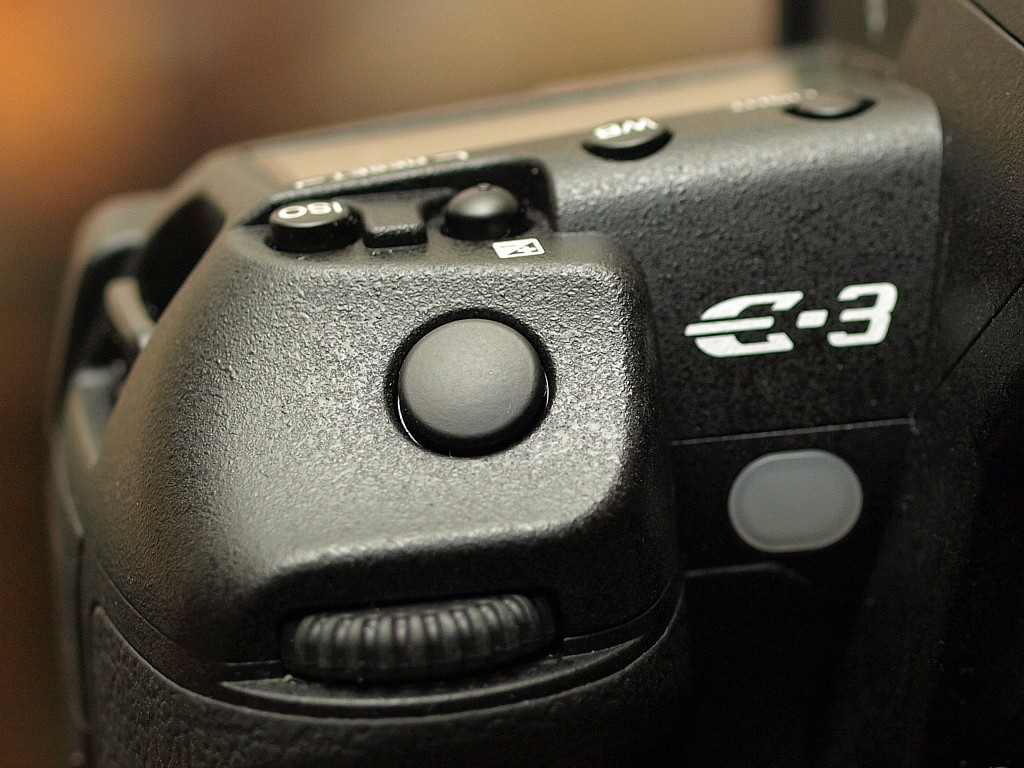
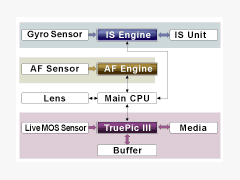


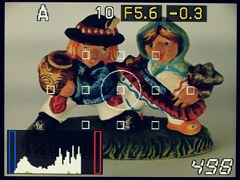
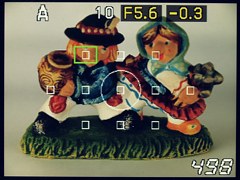
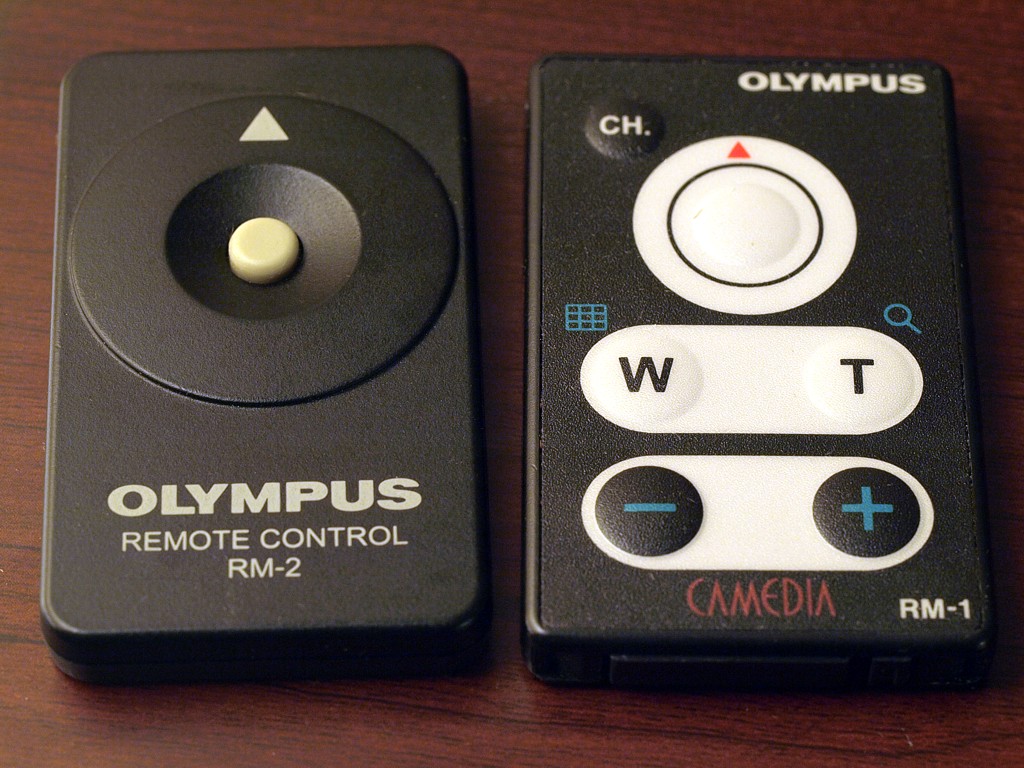
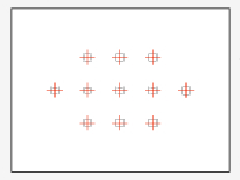
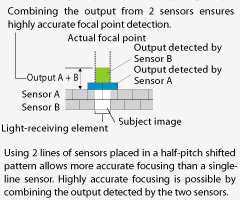

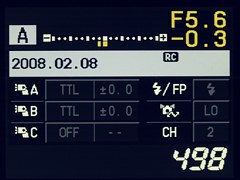
 1/400 s, bounced, non-dedicated flash below full capacity (F/2.0)
 1/400 s, the same flash maxed out (F/8.0)


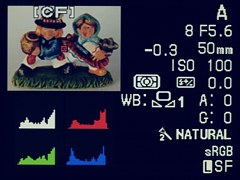

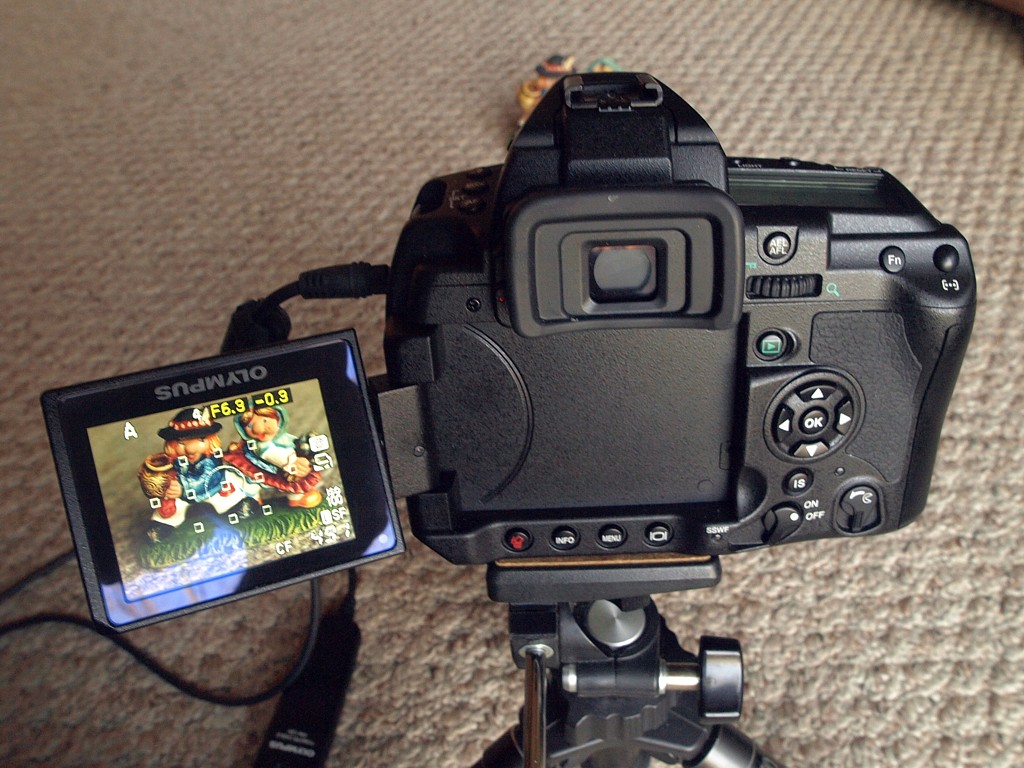

.x.jpg)
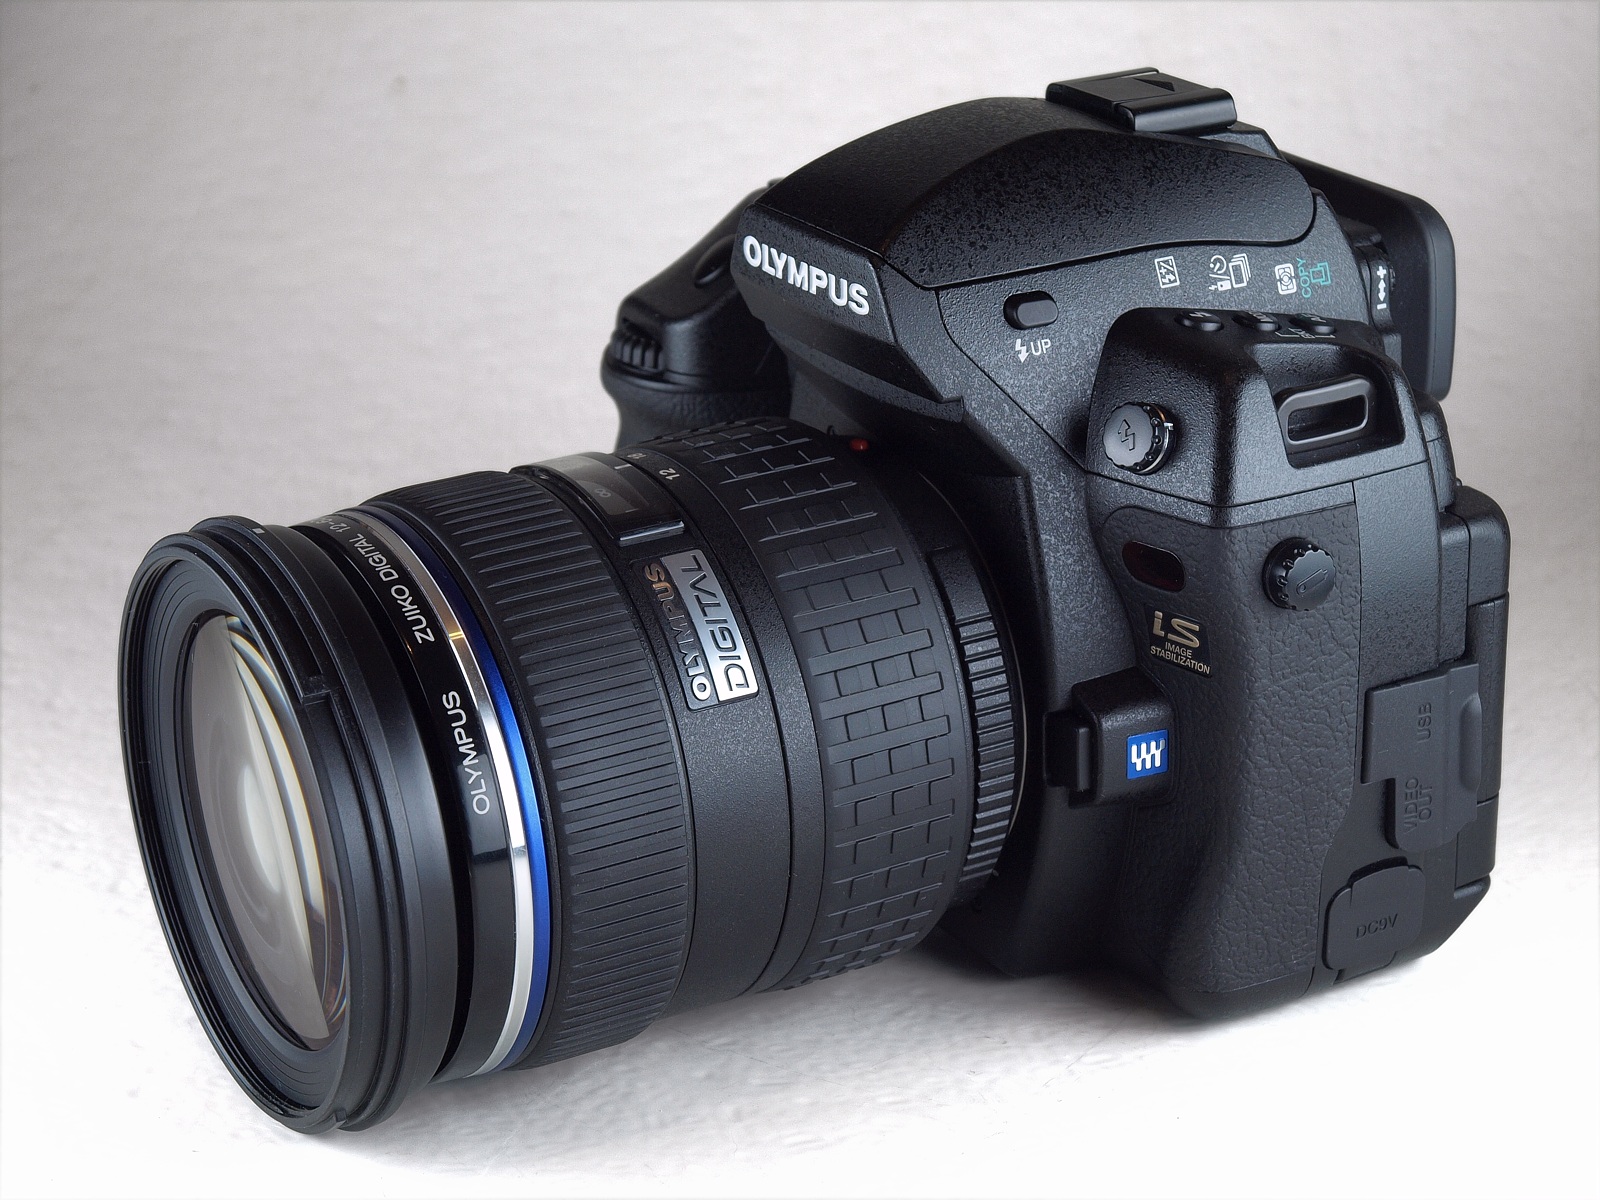