with articles on technical aspects of photography.
|
Depth of field and your digital camera |
|
|
Back to the Nitty-Gritty section, with articles on technical aspects of photography. |
|
This article, originally published here in 2000, was one of the first ones on the Web, dealing with the subject. It is still being developed (not just maintained), remaining up-to-date as of 2017. Some things don't change much.
|
See also: Doffy — a Windows program to generate custom DoF tables
' | 
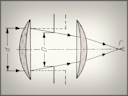
Reproduced from Technika Nowoczesnej Fotografii by Tadeusz Cyprian, 1949 The DoF range shown in white | |
|
A photographic lens renders a sharp image of points at one given distance, measured along the lens axis. This distance can be adjusted (the process of focusing). Any points at a different distance will be rendered more or less unsharp, and this unsharpness increases gradually as we move away from the "sharp" focus plane. Within some limits it will be small enough to consider the image of our point "sharp enough" for a given purpose. We are talking here only about the unsharpness due to the subject being out of the focused distance. Other sources of unsharpness are possible: camera shake, dirty lens, atmospheric conditions, and various optical flaws of the lens among others. These reasons remain outside of the scope of this article. The term depth of field (DoF) is often used to refer to the fact that points not exactly in focus are rendered acceptably sharp. Quantitatively, DoF is often defined as the distance between the closest acceptably rendered point on the lens axis and the furthest such point. Obviously, this value will depend on how much unsharpness we are willing to accept. Is it good or bad for your pictures? For many types of photography we would like to have everything in the frame as sharp as possible. This includes, but is not limited to, landscape, architecture, documentary, and vacation/family snapshots. Usually the more DoF the better for these applications. In some cases, however, we may want to use a more creative approach, with the main subject of the picture being sharp, while the background (and, if applicable, the foreground) is fuzzy, out of focus. With the main subject "standing out" from the surroundings, the picture may have more impact, being generally more pleasing to the eye. In such cases we want to MINImize the depth of field. This approach is especially useful in portraits, but not only. What is "acceptably sharp" — Circle of Confusion The extent of the depth of field depends on what we understand as "acceptably sharp" in the definition above. If we are willing to accept more unsharpness, the depth of field (or whatever we accept as depth of field) will extend more. For sharpness-critical applications, it will be very shallow. A (hypothetical) lens without any optical flaws, placed at a given distance from the image plane (film or digital sensor) will create point-like images only for point subjects at one given distance (as measured along the lens axis). For a point subject at any other distance, its image will be a circular spot, referred to as circle of confusion. The acceptable size (diameter) of the circle of confusion depends on how the photographic image will be magnified in the printing or viewing process, and from what distance it will be viewed — plus of course, on what you mean by "acceptable" in the magnified (printed, displayed) image. Obviously, a smaller image created by the lens has to undergo stronger magnification to be viewed. For example, a "full frame" in a digital (or 35-mm film) camera is 24×36 mm. To be printed as a typical 30×40 cm (12×16 inches) enlargement, or viewed on a 20" (diagonal) screen, it has to be magnified 12.5 times (for this aspect ratio, the usable part of the frame is only 24×32 mm). For the same print size, an image created on the 2/3" sensor of a digital compact camera (6.6×8.8 mm) will require a magnification of about 50×. The circle of confusion has to be four times smaller to result in similar sharpness of the viewed image. Roughly speaking, the magnified CoC (its angular size, as seen from a given viewing distance) has to stay smaller than the resolving power of the human eye, to be considered "sharp". Some (especially older) sources report that resolving power as 1/1000 of a radian; this means visually separating two points 1 mm apart at a distance of 1 meter. The generally-accepted value is 1/2000 or a little worse. I have seen values from 1/1600 to 1/2500 reported as measured. The value of 1/5000 is an obvious misunderstanding: it refers to the theoretical diffraction limit only. A consensus was reached to use the value of 1/1500 of a radian for this application, and it seems reasonable. For historic reasons, 1/1440 is used too, a difference of no practical effect. Above a certain size a typical viewing distance is the diagonal length of the image. For example, it is assumed that a 30×40 cm print is commonly viewed from 50 cm away. This simplifies things a lot. The acceptable CoC becomes independent on image size if expressed in terms of image diagonal. This also means that the maximum CoC in the image plane will be 1/1440 of the imager (or film) frame diagonal. For a "full frame" sensor this means .030 mm. (Note the nice, round value' I bet this was the reason why 1/1440 became popular.) Various sources quote full-frame values varying from 0.025 mm to 0.033 mm. This is hairsplitting; I will be using 0.03 mm. For entry-level cameras I've also seen 1/1000 being applied, as good enough for their intended users, while in scientific and technical photography the value of 1/3000 is not uncommon. Assuming the image frame size (film, sensor) stays the same, the following is true:
While points (1), (2), and (4) are getting quite a lot of exposure in photography books and articles, (3) is mentioned rather rarely. Some people may even think that it contradicts (4), which is not the case: both statements are valid. (On another extreme, some authors stress (3) and claim that (2) is not true. Once again, all depends what are the other controlled variables kept equal.) Note, however, that using a longer lens will not lead to shallower DoF in portrait shots, assuming the subject is identically framed in both cases; this is a direct consequence of (3). Longer lenses are used in portrait photography because they provide more pleasing perspective (the subject's nose is less exaggerated). Anyone who wants to use and control the depth of field creatively must realize and understand the points (1-4) above; without that all process will be reduced to a guesswork. Therefore if you are not sure, go back to the beginning of this section and read it again. No instant gratification here. It is a very short section anyway. The formulae leading (directly or indirectly) to these conclusions can be found near the end of this article, so can be graphs illustrating them. |
|
Example Here is an example of DoF in action. I took this picture on a whim, when unloading my grocery shopping.
|
| 
| 
Olympus E-M1 Mk.II with MZD 75/1.8 | Aperture priority (-.3 EV): 1/10s, F/2.0, ISO 400, Ref. WB Tripod, remote release with OI Share, available light AF set at sample area (1.0m) [full frame]
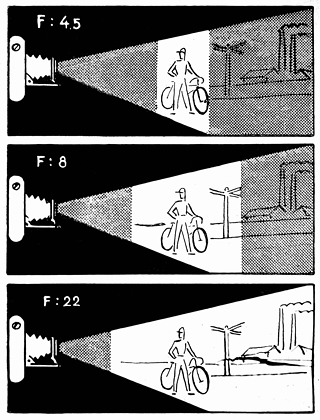
| I manually selected the AF area, but it was still quite large: almost the size of the bottle cap. We can see that the camera focused at the skull (more exactly: on the red bandana just behind it). At this focal length, aperture and distance even single millimeters count; DoF extends from 5 mm ahead of the focus plane to 5 mm behind (at F/8 it rises to about 20 mm on either side). To show how is DoF affected by aperture used, I shot the same scene at various F-numbers. Then I made a collage of vertical strips from all images, and this is how it looks, re-scaled to fit the page: | ||||
.t.jpg)
| |
|
As above, except apertures as shown and exposures from 1/10s to 13s. |
|
While this example does not really bring in anything which was not already said above, it gives yoa a feeling of the loss-of-sharpness effect. Besides, it looks good, so I wanted you to see it. What's so special about digital cameras? Actually, not much, except that most have sensors smaller (or much smaller) than the 35-mm film frame. Therefore the CoC size used to define "acceptably sharp" also has to be proportionally smaller. This would, seemingly, lead to less DoF in small-sensor cameras, if not for one additional fact: for the same image angle (field of view) a smaller sensor requires also a proportionally smaller lens focal length.
For example, a 100 mm lens on a 35-mm film camera gives the same field of view as a 25 mm (approximately) lens on a digital camera with a 2/3" sensor. This is why we often say that the EFL (equivalent focal length, implying the 35-mm film as a reference) of the latter lens is 100 mm. The ratio of these two values (here: 4.0) is often referred to as focal length equivalence ratio, or focal length multiplier. In this article I will denote this ratio as Some writers refer to M as crop factor, which is a wrong term. It suggests that the optics of a digital camera is the same as of the film one, except that we are using just a part of the frame. This is not the case: for the same sharpness of the final picture, a digital lens with a given M should have the absolute resolution (measured in the image plane) M times higher than a corresponding 35-mm film lens. On the other hand, it needs to deliver acceptable images only within an image circle which is M times smaller than in the other case. Would you say that a 35-mm camera has a crop factor of 2.5× compared to a 6×9 cm, medium-format one?
Definition reminder: Consider a camera using a lens of some focal length, f. This lens provides us, for that camera's image frame, with a given angle of view. The same angle can be achieved on a 35-mm (24×36 mm) camera with a focal length feq. The ratio
M remains the same for any lenses used on that camera and depends only on its frame size. feq is referred to as (35 mm-) equivalent focal length of our lens/camera combination. Here we are for some surprise. Even if the acceptable CoC size in digital cameras is M times smaller, the actual unsharpness of the image drops even faster because of the focal length being M times shorter (for the same field of view). As a result, cameras (digital or not) with smaller frames show more depth of field! This can be seen in the comparison of Figs. 1 and 1a showing DoF for two cameras with different sensor sizes, but even more clearly in Fig. 3. The relationship turns out to be quite simple. It can be summarized as The M×A Rule:
The depth of field of a camera with focal length equivalence ratio of M, at a given aperture For example: you are using a μFT (Micro Four Thirds) camera (M = 2) with a zoom lens set to the focal length of 25 mm (EFL = 50 mm) at the F/2.8 aperture. The depth of field you will be getting will be identical to that obtained with a 35-mm film camera using focal length of 50 mm, providing the same image angle, closed down to F/5.6 (as 2.8×2=5.6). This has nothing to do with your camera being digital — it is entirely a result of smaller frame size. Digital cameras come with differently sized sensors; the rule of thumb is that entry-level models have smallest ones (i.e., larger M), and for those models the effect is, obviously, strongest. This, by the way, is a lucky coincidence: the users of small-sensor cameras will usually be concerned in getting most depth of field, to get everything in the picture sharp. They usually tend not to worry about creative, out-of-focus background, and these cameras, usually are lacking direct control over the aperture, therefore providing no control over depth of field. As a result, switching from film to digital resulted in millions of vacation snapshots becoming sharper than before. On the other extreme, discerning photographers may want to control the DoF. This is one of the reasons why the so-called full-frame (M = 1) digital SLR are so common among professionals. Medium-format digital backs or cameras are also available, with M less than 1. For example: the Mamiya ZD digital SLR has the frame size of 36×48 mm, which translates into M = 0.72. To get an EFL of 100 mm you will have to use a focal length of 140 mm, and at F/2.8 the DoF will be comparable to that at F/2.0 on a 24×36 mm camera using a 100 mm lens. You can focus on your model's eyes, keeping her ears out-of-focus. Frame sizes and equivalence ratios Various digital camera models use sensors of varying sizes. These are usually denoted in terms of "inch fractions", a holdover from seventy years ago, when such a value actually corresponded to the outer diameter of a glass tube holding the image sensor in TV cameras. The glass tube is gone, the notation remains. Here is a sample of typical sensor sizes (nominal and actual), with the corresponding values of M, the focal length multiplier. The M values as shown are more than good enough for any practical use. |
| Sensor | Full Frame |
APS-C (DX) |
APS-C (Canon) |
4/3" (μFT) |
1" | 2/3" | 1/1.7" | 1/2" | 1/2.3" | 1/2.5" |
|---|---|---|---|---|---|---|---|---|---|---|
| Size [mm] | 24×36 | 15.6×23.5 | 14.8×22.2 | 13.0×17.3 | 8.80×13.2 | 6.60×8.80 | 5.58×7.44 | 4.80×6.40 | 4.63×6.17 | 4.30×5.73 |
| Diagonal [mm] | 43.3 | 28.2 | 26.7 | 21.6 | 15.86 | 11.00 | 9.30 | 8.00 | 7.71 | 7.16 |
| M | 1.00 | 1.53 | 1.62 | 2.00 | 2.73 | 3.93 | 4.65 | 5.41 | 5.61 | 6.04 |
| CoC [mm] | .0300 | .0196 | .0185 | .0150 | .0110 | .0076 | .0065 | .0055 | .0053 | .0050 |
| Notes | [1] | [2] | [3] | [4,5] |
|
Notes:
For the whole discussion of DoF to have sense, the pixel pitch (i.e., distance between centers of neighboring pixels) has to be smaller than the accepted CoC size. This is true for all cameras of two megapixels or more: even in a 2 MP sensor (1200×1600) pixel pitch is 1/2000 of the diagonal; less than the CoC of 1/1440. For most photographers the vastly increased depth of field in digital cameras is good news. Too many pictures taken with our 35 mm cameras were not quite good, running out of the depth of field. Especially in landscape photography it is very nice to have sharp foreground. In 1932 a group of American photographers, including Ansel Adams, founded Group f/64. The name was derived from the small aperture opening the group members deemed necessary for achieving acceptable depth of field with use of large-format view cameras. Now, you may think that F/64 gives you a huge depth of field. Let us have a closer look. A full-sized view camera has a frame of (approximately) 8×10 inches (20×25 cm), with a diagonal of 32 cm. This means, that for a given image angle, it needs a focal length 7.5 times larger than that for a 35-mm camera, or 30(!) times that for 2/3" sensor digitals. A quick application of the M×A rule brings us the bare truth: from the viewpoint of DoF, F/64 on an 8x10 camera is equivalent to F/8.5 on a "full frame" sensor, to F/4.2 on the μFT, or even wider, well below F/2.0 on compacts! In other words, the depth of field attained by closing a view camera lens all the way (with the resulting multi-second exposure times) may be matched or exceeded by your digital camera's lens fully open! For the smaller, "full plate" format (8½×6½ inches, 27 cm diagonal), the multiplier is 6×, so the corresponding aperture is F/11, still a huge difference. Being able to work with wider apertures (smaller F-numbers) allows us to use higher shutter speeds, thus eliminating another source of image unsharpness. Needless to say, most digital camera manuals do not mention anything on the subject: remember, we are just mass-market customers, a bunch of illiterate idiots! Still, program modes in such cameras are aware of that, clearly favoring wide apertures and high shutter speeds. Let us also remember, that with more DoF there is less need for accurate autofocus, especially if the sensor is really small (1/2.5" or less). Even with a μFT camera, M = 2: shooting at F/4 results in DoF like at F/8 on a 35-mm film (at the same image angle), a considerable advantage — if you are after more DoF. Now, whenever I'm shooting in aperture or shutter priority, I have to break my long-embedded SLR habits, and use apertures much wider than I'm used to. Usually there is no sense in using openings smaller (F-numbers greater) than F/5.6, when shooting at the wide-to-medium lens angle. Small apertures, i.e., large F-numbers, may lead to image degradation due to diffraction effects. While for a given image size it is the relative aperture (F-number) what counts here, small frames need more magnification for the same final (printed or viewed) image size; this is why diffraction is more painful with digital cameras, especially those with smallest sensors. This is one of the reasons the digital camera makers limit themselves to F/8 or F/11 on sensors of 2/3" and smaller, although greater DoF (greater F-numbers) could be quite useful in macro applications. The topic, however, is out of the scope of this article. The bad news is that it is much more difficult, using a digital camera, to blow the background out of focus, which is a pleasing effect in portrait and nature photography. You will have to use the longest possible focal length, and keep your lens wide open. Well, there is no free lunch. I would love to see a 50 mm, F/1.4 μFT lens, capable of DoF as shallow as a 100/2.8 lens on my film SLRs. (The 30/1.4 lens from Sigma comes close, but may be a tad too wide for portraits. 50 to 60 mm would be perfect!) Note of 2017: A year after I wrote this remark, Panasonic released the 42.5/1.2 Nocticron, fitting the bill more accurately than the MZD 25/1.2 Pro. At the same time, Cosina (oops, I mean Voigtländer) brought to the table not one, but four F/.95 lenses, of which, again, the 42.5/.95 gets closest. The near and far distance values defining the limits of acceptable sharpness can be calculated as
| with plus in the denominator used for the near (d1), and minus — for the far (d2) value. The notation is:
The value of c is often set to the 1/1440 of the frame diagonal: for example, 0.03 mm for 35 mm cameras, 0.015 mm for the μFT system, and so forth. As mentioned above, you may use another fraction, like 1/2000 or 1/1000, as long as you know what are the implications, and if you use the same value for all comparisons. You may like more the same formula re-shuffled to a slightly different form, proving exactly the same results:
| where h = f2/ac is close (but not equal) to the hyperfocal distance, described in a section that follows. Negative results for the far limit (i.e., with a '–' in the denominator) mean that it reaches the infinity. Remember that all lengths have to be expressed in the same units (whatever they are: millimeters, inches, or nautical miles).
Instead of using the above formula to compute di, some people prefer to compute the absolute value of
| In other words, if your camera is focused at d, acceptable circle of confusion will be achieved for subjects ranging in distance from d1 to d2, or from d–Δd1 to d+Δd2. Actually, because all three of d1, d2 and d are equally affected by the distance definition offset, d–Δd1 and d–Δd2 don't suffer from that bias. (Well, they still do, but much less than absolute DoF boundaries; their values are OK, but the corresponding d is still biased.) While the general dependencies outlined in the first half of this article work for any lens type and distance range, the numeric results of the formulae [1..3] are approximate. They are good enough for any practical use when the subject distance is much greater than the focal length (say, ten times or more); at lower distances they may start becoming inaccurate, especially for some types of lenses. Therefore using the formulae as they are needs some caution. Here is why.
The remainder of this section can be skipped, if you wish, without a harm to the general understanding of the DoF issues. This is for nitpickers only!)
In all these considerations the object distance is measured from the front cardinal plane, or front nodal plane (these two differ only if the medium on both sides of the lens is not the same, as in underwater photography). For an ideal lens, consisting of a single, symmetrical element, this plane passes through the lens center; for more complex lenses it may be elsewhere: within the lens barrel, or even outside of it; some (true) telephoto lenses have the front cardinal plane well ahead of the front element. The camera makers, however, usually define the object distance as measured from the image plane. This is, obviously, larger by a value of the distance between that plane and the front cardinal one. This distance depends on the lens design, its focal length, and often even on the object distance. There is no easy way of knowing it for a particular lens. (For a simple, idealized, lens the difference equals just the image distance, close, in turn, to the focal distance.) The difference between these two ways of defining the object distance can be neglected if that distance is much larger than the focal length; usually a factor of ten is enough. Changing focal length In many lenses (especially longer ones) the focal length starts to change as you focus closer, with the photographer being unaware of the fact. One more reason not to publish any tables for distances below 10× focal length (nominal, that is). For example, at larger subject distances (say, three meters or more) the field of view of the Olympus 15-54 mm ZD lens fully zoomed out is about 20% narrower than that of a 14-45 mm ZD; this reflects the 20% difference in the maximum focal length. When the focus is at 50 cm or so from the camera, however, the first lens covers slightly wider field than the second one, a surprise. This means that the focal length of the first lens decreases when focused close (this may be the case with both lenses, but in the second one the effect is less strong.) Lens asymmetry There is another, much less-known reason why the equations shown above are only approximate. This happens for asymmetric lenses, characterized by the so-called pupil magnification being different than one. That magnification is the ratio of the apparent aperture size seen from the lens rear to that size seen from the front. (You may also define the pupil magnification as the distance between the rear principal plane (with focus at infinity) and image plane, divided by the focal length.) The best known cases of such lenses used in film photography are the true telephotos, with the elements shifted significantly to the rear, or wide-angle lenses (using the inverted telephoto design), where these elements are shifted to the front, usually to make enough room for an SLR mirror. Lenses used in digital photography almost always use the inverted telephoto design, for a number of reasons, at least in the wide-angle to normal range. Once again, these deviations from our equations tend to disappear as the object distance increases; ten focal lengths is usually considered to be a reasonable limit of applicability. This is why my tables do not go below this value. The issue of asymmetric lenses is usually neglected even in advanced sources on photographic optics. The best description I was able to find is in the very informative article by Paul van Walree. The exact formula which should be used to account for lens asymmetry, is
| with Q = (P-1)/P, where P is the pupil magnification mentioned above. Note that this formula differs from [2] in just one detail: the Qf(d–f) term in the numerator. Unfortunately, I'm not aware of any manufacturer who would publish data on lens asymmetry, therefore we have no choice but ignore this correction. On the other hand, DoF tables published for some particular lenses may have the asymmetry accounted for (this, for example, seems to be the case for Olympus; I am not sure about other makers). Have another look at the formula [1] above. The far DoF limit (the one with a '–' sign used) becomes infinity for a single value of the subject distance, which is
| (You may often neglect the final f, as it is usually much smaller than f2/ac, and then dH becomes identical to h used in [2].) This is the so-called hyperfocal distance, and, as you can see, for any given focal length f it depends on the used aperture, a. Also note, that when we use d = dH in the DoF formula to compute the near DoF limit, the result will be dH/2. Thus, another handy thing to remember: The Hyperfocal Distance: Setting the focus to the hyperfocal distance (which is a function of focal length and aperture) will result in the DoF extending from half that distance to infinity. Digital cameras, with their shorter focal lengths, have much smaller hyperfocal distances. For the common focal length ratio, N=5, the "normal" focal length (EFL = 50 mm) is 10 mm. Using this value (with c=0.0061mm), for the aperture of F/4 we arrive to dH=4.1 m. Set your focus manually to this value, and you can take sharp pictures from two meters to infinity! Experienced photographers know and use this rule, which allows them to skip autofocus, and shoot reliably and quickly, without any autofocus lag. This works best for short and normal focal lengths; with longer lenses the hyperfocal distance may be too large for most applications. On the other hand, under many circumstances we are more willing to accept some unsharpness in closer subjects than in more distant ones. This is why some photographers prefer to set the focus to infinity (even if some DoF is "wasted" in the process).
If the lens is focused at infinity, the near DoF limit becomes close to the hyperfocal distance; more exactly, In my own practice, I often use a mixed approach, setting the focus to the hyperfocal distance computed for an aperture one stop (sometimes even two stops) wider than the one actually used. This is a somewhat special category of people, seemingly like everybody else — except for doing just one thing differently. In the past this could get them persecuted, ostracized, ridiculed, or, if they were lucky, just ignored. Now, however, things have changed. Pixel-peeping is OK; more, it became sort-of cool. It is all about viewing images on a computer screen, be it in an image viewer or in a Web browser. Most of us view the whole thing displayed the way it was composed by the author, shrunk to fit the screen if necessary (even better: already resized to fit the screen, or not much bigger than that). That's not what peepers do. As soon as the image loads, they zoom it up to the full, 1:1 pixel scale, enjoying detail, textures, revealed shadows and whatnot, occasionally zooming out a bit, only to come back in a moment — very much like this guy in a museum, spending an hour with his nose in a huge painting, trotting along it back and forth. Actually, I consider this a legitimate way of viewing pictures. Because they are viewing the image under higher magnification, pixel peepers are more fussy about its image sharpness, DoF, and CoC in particular. Some ask for DoF calculated with the tolerance down to a single pixel. This is not a reasonable request, as a pixel pitch value (for current cameras, at least) is below the resolution of a good lens/camera combination. For example, the resolution of the MZD 12-100/4.0 Pro lens on the E-M1 II was measured (in a Popular Photography test) as 2750 line pairs per picture height (LPPH). This translates into a CoC of .0047 mm or 1.4 px in diameter. (The relationship between CoC and LPPH is discussed in Ref. [5], see below.) This is just one of the reasons I consider a single pixel too strict for CoC diameter; double that makes more sense. This is 2W/NW (where W is the sensor frame width or height, and NW — that dimension in pixels). This gives .012 mm for the 24-MP Sony α9 (full frame), 2.5× less than the "classic" value for this format. For the E-M1 II (20MP) it is .0067 mm (down from .015 mm). Looking from the opposite angle: the .015-mm CoC has a size of about 4.5 pixels (on a 20-MP μFT camera). All this means just one thing: for a pixel-peeper the DoF zone will be much thinner than for other viewers. Them peepers are much more picky in what they consider "acceptably sharp". For example, for a 25-mm μFT lens at F/5.6, focused 1 m away, the DoF computed with the traditional, .015 mm CoC will range from -116 to +151 mm. Using a pixel-peeper's CoC of .0067 mm, we will get that range from -55 to +62 mm, shrunk about by half. I have added a μFT DoF Table, Pixel Peeper's Edition to our tables collection, in case someone will need to pick a value or two. Here are depth-of-field tables for groups of cameras with different sensor sizes. With one (marked) exception all were computed using 1/1440 of frame diagonal as CoC diameter. Instead of showing absolute DoF limits, this version of the tables shows, for any distance/aperture combination, two "half-width" values, describing how far does DoF extend in front of, and behind the focus plane. I believe that this is both more intuitive and more accurate representation than any other.
A few older Olympus cameras have their own tables, designed to fit the focal length and aperture ranges of their built-in lenses: C-5050Z, C-5060/7070WZ, E-10/E-20. To automate the calculations, I wrote a simple program, Doffy, which generates an html page with tables for user-defined values of apertures, distances, and focal lengths; you can then view or print that page with any Web browser. Some of the readers of earlier versions of this article asked for graphs, especially, if not only, to illustrate points [1..3] in the Basic Facts section. Here are some. In all these graphs the horizontal axis shows the subject distance (meters). The vertical one shows how much depth of field extends ahead (negative values) and beyond (positive values) the subject, expressed as a fraction of the subject distance. For example, the values of -0.2 and +0.6, at the subject distance of 5 meters, mean that DoF extends from 1 m ahead of the subject (0.2×5) to 3 m beyond the subject (0.6×5), of from 4 to 8 m counted from the lens. |
|
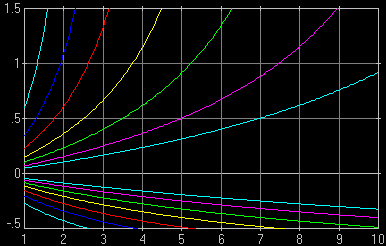
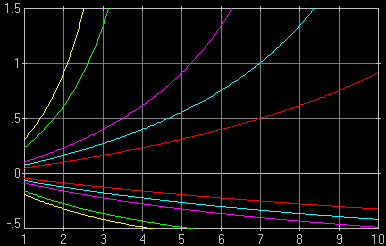
Fig. 1. Relative DoF as a function of subject distance for various apertures (F-numbers). The F-numbers, counted from the x-axis out, are 2.0, 2.8, 4.0, 5.6, 8.0, 11, and 16. Computed for a 25 mm lens on a Four Thirds system camera (EFL = 50 mm, i.e., the same field of view as a 50 mm lens on a 35-mm film camera), CoC of 0.015 mm. It is clear that (a) larger F-numbers offer dramatically more DoF; (b) at smaller distances DoF rapidly decreases, even if expressed in relative terms. This is as stated in points [1] and [3] above. |
| ||||||||
|
An example of how to read this graph: let us find the DoF for the focused subject distance of 5 meters at F/2.8. That aperture corresponds to the second pair of lines (counted from inside), shown in purple. The lower purple line crosses x=5 at about -0.25; the upper one at 0.5. This means that DoF extends from 25% of the (5 m) distance ahead to 50% beyond the 5-meter plane; in other words, from 3.75 m to 7.5 m.
| Fig. 1a. As Fig. 1, but for a 50 mm lens on a "full-frame" camera (24×36 mm sensor). While the values are different, the general behavior of lines is the same, also illustrating points [1] and [3]. Computed with CoC of 0.03 mm. A close look reveals that the third innermost pair of lines in this graph (green, for F/4.0) behaves exactly like the innermost one (aqua, for F/2) in Fig.1, the fourth pair (yellow, F/2.8) — like the second one in that picture (purple, F/2.8), etc. This is not a coincidence, see the M×A Rule.
| 
| Other graphs should be interpreted in a similar way (with the focused distance always on the x-axis), but in each of them differently-colored lines correspond to another controlled variable.
| Fig. 2. Relative DoF as a function of distance shown for a fixed aperture of F/4 and for various focal lengths. Four Thirds format, CoC of 0.015 mm. From the innermost pair of lines out the focal lengths are 75, 50, 35, 25, 17.5, 14, and 11 mm (double those values to get EFLs). The upper green line (35 mm) looks close to that for 50 mm, F/2 in Fig.1, but only for larger subject distances. Let's not get into that.
| 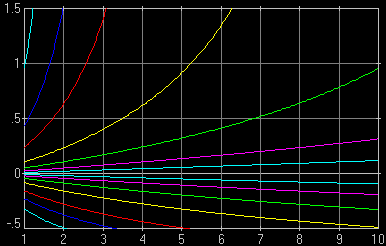
Fig. 3. Relative DoF as a function of distance for different equivalence ratios, M, but the same EFL (equivalent focal length) of 50 mm. From the innermost pair out, the curves are for M of 1 (24×36 mm), 1.5 (Canon APS-C), 2 (4/3"), 4 (2/3"), and 5 (1/1.8").
| Except for the APS-C lines (second from inside, aqua), all others could be seen in Figs. 1 and 1a. If you've read carefully the M×A Rule, you will know why... Graphs generated with Kalkulator
| 
| ||
|
There are hundreds, maybe thousands, articles on DoF available on the World Wide Web. Some of them are worthless, some — extremely useful, informative and interesting. Here is a list of best references I found useful, interesting, and free of factual or interpretational errors.
Thanks are due to the Readers who made suggestions or corrections to this page. In particular, Marc-Andre Lafortune was kind enough to point out the exact M×A Rule. |
|
|
Back to the Nitty-Gritty section, with articles on technical aspects of photography. |
| Home: wrotniak.net | Search this site | Change font size |
| Posted 2000/12/07; last updated 2017/12/18 | Copyright © 2000-2017 by J. Andrzej Wrotniak |
![[full frame]](../m43/_img/smp/em1.2-075-piwo/p-dof-1.jpg)
.jpg)
.s.jpg)