Since the original posting, the article was updated, and new image samples added, but my conclusions did not change. Consider this revision final, as I no longer have the camera. And yes, the owner is happy with it.
My choice was also driven by familiarity with competing models from some other manufacturers, most notably Canon and Nikon.

The limitations
Camera design is an art of compromises. Do not get an impression that one model will meet all your needs, and your pictures will become exhibition pieces overnight. Every camera is designed with some limitations and flaws imposed because of various reasons. In case of this model, three kinds of such limitations can be identified:
- Price: the D-580 aims near the bottom (price-wise) of the market, close to the $250 mark. (This one was bought from my long-time favorite dealer, B&H, for $270 in the very beginning of April, 2004.)Camera type (form factor): this is a shirt-pocket camera; it has to fold flat and fit into a pocket or purse.Target market (intended user): a casual user (snapshooter), who can be confused by non-essential options, especially those requiring some technical knowledge of photography.
While the third kind may bring a Big Brother approach to mind, it also makes sense. A more advanced feature can be used or misused. Even for a technically literate user, some options may make the camera less convenient for simple uses. Sometimes it is safer to just make such a feature unavailable.
The specs and what they mean
Here goes a listing of the camera's specs, as claimed by the manufacturer and confirmed (or not) by me, with comments on what they mean and how they may affect the picture-taking process on one hand, and the quality of produced images on the other.
The specs published by Olympus are very incomplete, and figuring them out required some thinking and experimentation. The manufactures does not hesitate to promise that your pictures will be "brilliant" (whatever that means), but does not want you to know, for example, in how many steps is the camera's aperture adjusted. It is not just that, in their minds, the potential market may be not interested: sometimes there is simply nothing to brag about.
Anyway, I found the detective work needed to come with a more detailed picture both challenging and entertaining. Here are the results.
Body
Form and finish: Clamshell type, metallic plastic.
The champagne finish looks quite good, and not as cheap as in some competing models, although it is not one of these jewelry-style, conversation-item models. No-nonsense, just fine.
Size (WHD) and weight: 108×58×37 mm; 165g (below 6 oz) without batteries.
This is small enough to make the camera fit into a shirt pocket, purse, or a small pouch. A smaller size would probably require using a proprietary battery (instead of the standard AAs).
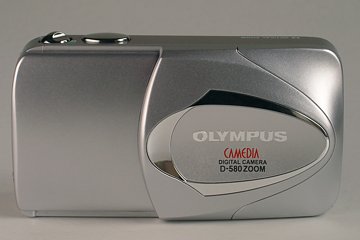

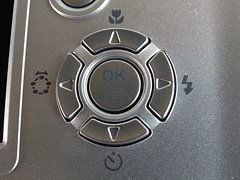
Unfortunately, I found the color of the camera quite difficult to show. It is champagne, not silver as in the picture. All camera controls are clearly visible in this picture. Elegant, simple, and quite easy to operate, a good job. Lens
Focal length:. 3× zoom range, 5.8-17.4 mm, equivalent to a 35-105 mm lens on a 35 mm camera.
This covers 99% of needs of the target user.
Maximum aperture: F/3.1 at EFL=35mm, F/5.2 at EFL=105mm.
Not impressive at all, but normal for the tiny lenses used in such cameras.
Optical construction: 5 elements in 3 groups, two aspherical elements, multicoated.
This is a very simple construction (for a zoom lens), probably necessitated by size and price constraints, but it seems to be adequate, and possibly greatly helped by the aspherical elements (which, I can bet, are plastic moulds). Actually, the image quality is higher than I expected.
Aperture: Not specified, probably just two-position: wide open and closed down.
I am 99% sure that this is not a real iris diaphragm, but just a swinging plate with a single opening. Of the pictures I took, the EXIF information shows, at a given focal length, just two values; for example, at the wide end it will be always F/3.1 or F/8.7, never anything in-between. Olympus does not quote the minimum aperture (maximum F-stop) in their specification table at all.
This is clearly a cost-cutting (read: cheap) approach, shared by most, maybe all, manufacturers in this price range. It was omitted from the specification sheet, as it does not look good. I believe honesty pays best in the long range: there would be nothing wrong in admitting that the camera has just two aperture settings.
Mechanical: Collapsible, motorized construction, plastic barrel.
The lens folds or unfolds when the clamshell cover is being closed or opened, respectively. While this is a robust solution, you have to get used to closing the camera in two steps: close the cover a bit, wait for the lens to collapse, and then slide the cover all the way.
As in all compact and clamshell Olympus cameras I've tried, the lens barrel has some wobble. This does not seem to affect the image quality and might be by design (spring-loaded?).
Zoom control: Electric motor, activated with a switch next to the shutter release.
Normal in this kind of camera (and, as usual, not precise enough for critical framing). Still, I find this solution more intuitive than zoom control buttons in the back.
Filters accepted: None.
As expected, and of no use in this market.
Optical viewfinder
Type: Real image; zooming in synch with the lens.
The promotional materials (repeated verbatim in some reviews) claim a "clear, large viewfinder" allowing for "precise framing". None of these claims are true. The viewfinder is small and leaves much of the picture area out, see below.
Field coverage: Not specified
My quick measurements show close to 75% of horizontal and vertical coverage. This results in about 56% of area coverage which is quite bad: 44% of your picture area is not seen in the viewfinder. Olympus is not alone here: most manufacturers seem to think that entry-level users do not need to see what they are taking a picture of. They do.
Parallax correction: None.
Not expected in this price range; not seen in any digital camera yet.
Information shown in finder: None. Two LEDs next to the eyepiece signal focus OK, and a need for flash.
Diopter correction: None.
Too bad. Even a casual user may need this, especially when getting into the middle age.
LCD monitor
Type: Color, active matrix (TFT).
This is what all such cameras use. The monitor has, at last, an anti-reflective coating, improving the visibility outdoors; for reasons unknown Olympus did not have this feature in previous cameras I know, only now catching up with most of the major makers.
The monitor brightness can be adjusted from the Setup menu, although the default setting is just fine for me and I never needed to use this feature.
Physical size: 37×28 mm; 46 mm (1.8 in.) diagonal.
Larger than in some earlier models; as large as the body design would allow.
Pixel count: 85k pixels (slightly better than 320x240).
More expensive models go up to 130k pixels here, which translates into about 24% higher (linear) resolution. Clearly, an economy version, although quite adequate for image viewing; the menus would, however, be more readable with the higher pixel count.
Field coverage: 100% My measurements show 100% or very close; this is good.
Shutter
Type: Electronic.
This means the camera does not really have a shutter, using electronics to define the time interval from which the light is used to build the image. This is normal in cheaper cameras and usually seems to work well enough.
Speed range: 1s-1/1000s, auto only (down to 2 seconds in the "night mode").
Quite impressive in this class. The shutter speed is not shown in the monitor: just a warning "Slow Shutter" to indicate that it is too slow for safe handholding. While the target market of users may not always understand (or care) what shutter speeds are, this does not give any indication if the needed shutter speed is just a tad too slow (say, 1/20s) or way to slow (like 1/2s).
I believe that even non-technical users do not deserve having their intelligence offended (after all, this is not a Sony!). A warning and the shutter speed readout would be better.
Drive modes: Single-frame, sequential.
In the single-frame mode a picture is taken every time you press the shutter button. In the sequential mode, the camera keeps shooting as long as the button is held pressed (or the memory buffer gets full).
Storing the images in the HQ compression settings I was able to squeeze out 10 images in 9 seconds, quite impressive in this class; in SHQ the number dropped to three. I don't think we should expect more.
Still, for shooting longer sequences the user may switch to the SQ1 storage mode (producing two-megapixel, 1600x1200 files), and then it takes 22 frames or so until the buffer is full, quite a respectable performance. (In the SQ2, VGA-sized, mode the length of the sequence is limited only by card capacity, but pictures, because of very low resolution, are suitable only for Web or email uses, not for printing).
Exposure metering and control
Meter type: TTL (through the lens), using the CCD imager itself; Matrix or spot metering pattern, selectable.
TTL metering is a standard solution in non-SLR digital cameras.
Spot metering can be useful when shooting unevenly-lit scenes (or backlighted subjects). Still, I doubt the targeted user will know (or care) about this, especially with the feature accessible only from the menu (read: cost-cutting).
Exposure control modes: Full auto and five specialized programs: portrait, landscape, portrait/landscape, self-portrait, night scene.
The specialized settings may adjust the aperture/shutter speed combination (for example, to achieve greater depth of field at the expense of slower shutter speed for the portrait/landscape mode), but I suspect they also affect the sharpness, contrast, and saturation settings the camera uses when the raw image is converted into a JPEG file.
With the user having no control whatsoever over shutter speed and aperture, this is a way to adjust the choices made by the camera to the circumstances.
While I haven't played much with the specialized programs, I found the color adjustment in the landscape mode not to my liking: the full-auto setting was better here.
The self-portrait mode is close to useless: it is much better to do it with the self-timer. I would prefer rather to see a "sports mode" instead, geared towards faster shutter speeds.
(With only two apertures available, however, adjusting the program curve is, by definition, very limited.)
Exposure compensation: Up to ±2 EV stops in 1/2 stop increments.
This is perhaps the most useful "advanced" feature on an entry-level camera. As smart as matrix-evaluation programs may be, they are not smart enough to prevent highlights from being washed-out in some scenes, and once the highlight detail is lost, it can't be recovered in postprocessing (even assuming that entry-level users would use an image editor).
If a quick inspection of a just-taken picture shows that, indeed, the highlights may be burned out, the shot can be re-taken with a negative exposure compensation. Unfortunately, this is accessible only from the menu, and the operation takes no less than six button presses!
This, actually, is my greatest complaint about this camera.
For outdoors shooting in sunny weather (or indoors with flash) I would recommend just setting the compensation to -0.5 EV and leaving it there. (From my experience this works best with most cameras.) If the "Auto Reset" feature is disabled, the setting will be remembered.
Exposure lock: Yes, with the shutter release.
Half-pressing the shutter freezes both exposure and focus, so that the picture can be re-composed and taken with the original settings. My experience shows that once beginner grasps this feature, it improves the image quality a lot.
ISO settings: Auto, from 50 to 400 ISO.
The CCD gain (ISO setting) is not user-selectable, which is OK for the intended market.
White balance: Auto, sunny, overcast, incandescent, and fluorescent.
The selection is made from a menu. The auto setting usually results in good color rendition, characteristic for Olympus cameras.
Focusing:
Autofocus: Passive system (using the image sensor), no focus-assist beam; 20 cm (8")to infinity. No provision for manual focusing.
The focusing accuracy seems to be just fine outdoors, with occasional problems indoors at lower light levels.
When taking flash test pictures, most of the test frames shot from four meters at EFL=105mm were out of focus, in spite of lots of vertical detail in the center of the frame (tilting the camera 45 degrees did not help, either). This is not a satisfactory performance.
Olympus does not say how many focusing steps are used, but this is of a secondary importance, taking into account the huge depth of field.
There is a "macro mode" setting, recommended to be used between 20 and 50 cm, but, as with other Olympus cameras, it is only used to speed up focusing; regardless of whether this option is activated or not, the camera will find the focus in the whole range (if somewhat more slowly).
Macro focus: Yes, from 7 cm.
This is unusual in a clamshell, compact camera. A separate macro mode (referred to by Olympus as "super macro" which is a misuse of the term) allows to focus from the distance of 7 cm up (measured from the front of the lens). The field of view is impressive: 20x27 mm or so.
Surprisingly, the zoom is then frozen at the longest setting (which makes picture-taking more convenient); most cameras use wide-to-moderate angle in such circumstances, which just happens to be a technically easier solution.
Another surprise: the quality of "super macro" images is much better than I've expected; very presentable. (Of course, a small tripod helps!) Sharpness is good even in the corners; definitely, not just a marketing gimmick.
The image sample below illustrates this feature, with the reduced full frame at the left, and a one-to-one pixel fragment, without any postprocessing, at the right. The picture was taken in diffused window light, using a small tabletop tripod; the distance from the subject to the front of the lens — 7 cm. The whole image, slightly cropped, re-equalized, and reduced to the XGA screen size can be seen here.
"Super macro" mode, programmed autoexposure with -0.5 EV compensation: 1/8s at F/5.2, EFL=105 mm. 1:1 pixel size sample of the same image (what you see in the screen is larger than it would be in a 9x12" print). Flash
Built-in flash range and GN: Usable range: from 20 cm to 3.4 m (wide) or 2.0 m (tele); claimed guide number of 7.6 m (30 ft) at (probably) ISO 100.
Actually, I find the camera/flash performance significantly stronger than stated in the specs. Clearly, Olympus engineers are much smarter than their publications and marketing people (I suspected that for a long time).
Test images of average-reflectancy objects, taken at the tele zoom setting, were properly exposed up to four meters (and almost so up to five), more than twice the claimed range. It turns out that the camera increases the ISO setting, if there may be not enough of flash light. In my test shots (as inspected in the EXIF data), the automatically-adjusted ISO setting went up to 400 for pictures taken at EFL=105 mm (still staying at ISO 100 for EFL=35mm at that distance.
To make it short: I found the flash in the D-580 perfectly usable up to about 4.5 meters (15 feet), and my best estimate of its GN at ISO 100 is about 10m, which makes it almost twice as powerful as claimed (the flash energy is proportional to GN squared). This greater power is supplemented by a smart use of ISO gain. For a compact camera driven from two AA batteries, a very impressive performance.
(The bad news is that the camera autofocus is imprecise at room light levels, as mentioned elsewhere.)
The recharge time is usually below 6s; shorter if the picture is taken from less than maximum range (as the flash does not discharge completely then). Obviously, flash use greatly speeds up using up the batteries.
Flash metering: TTL (through-the-lens).
Normal in this type of cameras, and just fine. While there is no separate flash exposure compensation setting, the regular one applies here as well. Again, a compensation of -0.5 EV seems to work best in most cases; one more reason to keep this setting on a permanent basis.
Flash usage modes: Auto, red-eye, off, forced on.
The forced on (fill) flash is useful to soften harsh shadows in bright sunlight. For example, beach pictures of people look usually better this way.
External flash: No provision for external units.
Normal for this class of camera, and usually not needed on this market.
Image sensor and storage
Image sensor: 1/2.5" CCD (charge-coupled device), 4 megapixels
The exact pixel count is 3.917 million pixels (or 3.736 "binary" megapixels), close to the claimed 4MP.
The "pixel count" given traditionally by all manufacturers is a little bit inflated: some of them (at the edges) are not used for the image.
Note that 1/2.5" is a really tiny sensor, smaller than one used in compact cameras (like the Olympus C-series). The image area size is near to 5.7x4.3mm.
This means, on one hand, that noise and other possible adverse effects are more difficult to control, on the other, it provides more than generous depth of field. (For example, at the wide-open tele aperture of F/5.2, the DOF is as large as in a 35-mm film camera with the same view angle at F/32.)
Native image resolution: 2288×1712 pixels.
Additionally, images can be saved in smaller, interpolated resolutions: 1600×1200 (2MP), and 640×480 (VGA). Actually, if no prints larger than 6×8" (15x20 cm) are expected, using the intermediate 2MP resolution will almost double number of images fitting on the memory card. The VGA format is usable only for Web and email uses, although even in these cases I would rather recommend reducing the images during the postprocessing, on your computer. It is also too easy to set a lower resolution and forget about it. (A friend of mine took a series of catalog pictures, only to discover later that they were in 1204×768 pixel size!)
File format and compression: JPEG only, two compression ratios in the full pixel size.
Olympus allows to save full-size images in two compressions, referred to as SHQ and HQ (super-high and high quality, which should be rather referred to as "good" and "OK"). The smaller pixel sizes don't offer this choice.
The full list of image file choices is as follows:
- SHQ: 2288×1712 (4MP), 1:5 compression ratioHQ: 2288×1712 (4MP), 1:14 compressionSQ1: 1600×1200 (2MP), 1:14 compressionSQ2 640×480 (VGA), haven't bothered to check the compression.
The compression ratios are my calculations. I find the SHQ format more than sufficient for every application, while HQ, allowing to store three times more images on the card, is OK for daily use. On the nitpicking size, I think that 1:10 in HQ would be a better choice, allowing the user just to set it and forget about it; one fewer decision to make.