|
Shooting Fireworks with a Digital Camera (With examples from the Olympus E-300) |
|
|
My other articles related to the |
|
This is a general advice on shooting fireworks with a digital camera, regardless on brand and model, illustrated with samples from the Olympus E-300 (plus some notes specific to the E-300 and E-500). What's so different about fireworks? | ||
|
Shooting fireworks is very different from most other photographic assignments. This is why most of the Fourth of July pictures you see are quite disappointing. This is not just another point-and-shoot situation. Here is why. First of all, you will be photographing a source of light, not the light reflected (or, more exactly, scattered) off the picture subject. This is quite different. Second, the whole glory of a firework show is due to their movement against the dark sky. Freezing it with a fast shutter takes all this effect away. You need a long-time exposure to show it. Third, you cannot preview the scene before the picture is taken. It keeps developing and changing while the exposure is in progress.
Each of these specifics imposes some needs and limitations on your shooting technique. In this article I'm trying to elaborate on them, hoping that you will find my remarks helpful, and that this will be reflected in your results. Read on.
|
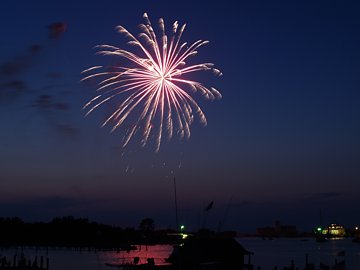
 [1] Olympus E-300, 9:08 PM: manual exposure at 8 s and F/9, ISO 100, tripod. Zoom at 28 mm (56 mm EFL). Postprocessed, cropped from horizontal. | |
|
Equipment A digital camera is great for firework shooting, as you may preview your results after the first frame or two and still correct your settings as needed. Still, most of these remarks are applicable to film cameras as well. Almost any model can be used: SLR (single lens reflex), EVF (electronic viewfinder), or optical finder one, as long as it allows you to use manual exposure and focus settings. Point-and-shoot models (by P/S we traditionally mean cameras without access to manual settings, regardless of the viewing system) are not really suitable, as you cannot tell the camera what exactly to do — you are on the mercy of the design team who know better what is good for the general public. (Some of these cameras may have a dedicated "fireworks" mode, in which case you can still use them.) Many non-SLR cameras allow you to set the shutter speed and aperture manually. I'm not talking about upper-shelf models I've used, like the Olympus C-5050Z or C-5060/7070WZ; even the inexpensive (but well-made) C-60 by Olympus will do. (The same can be said about models by Canon, Nikon, or other makers; I'm just more familiar with the Olympus line.) You do not have to use an SLR to get most pleasing results. It's the photographer, not the camera. My choice of the E-300 for this assignment was a matter of convenience, not necessity. A tripod is almost a must. You will be using exposures of two seconds or longer, and these are definitely not handholdable. I said "almost", as in emergency situations you may use a fence, window frame, or even the top of your car (preferably with an improvised beanbag), but tripod gives you a much better chance of success; not only because it will make longer exposures possible, but also for the image framing: once set, it will keep it unchanged. A medium-weight tripod will be just fine; don't go for a 20-pound Manfrotto. To get a right vantage point make sure it extends to the height of five feet or so. For these samples I've used a Slik U-212; good enough, while quite portable. The remote release can be useful, although its importance is often exaggerated. With a sturdy tripod I can rest my hand on the camera's shutter release button, and trip a four-second exposure without a noticeable shake; this is how I took the pictures shown here. If your camera accepts a wired remote, use it. If not, a wireless one will do, except that usually it has to be held in front of, or above the camera which is not too convenient. Still, you can do without. Unfortunately, the E-300 and E-500 do not have wired remote sockets. For the E-300 you can buy a battery grip which provides such a socket working with the Olympus RM-CB1 accessory. A similar grip is available for the C-5060WZ and C-7070WZ. Filters are not really useful for fireworks. If you protect your lens with an UV (or skylight) filter, you may leave it on as always with no effect. Other niceties which come into mind are folding chair and a pen light, the latter can come handy if you drop something. Last but not least, an ice bucket with a bottle of champagne. I consider this an essential accessory; even if not directly related to the shooting technique, it makes the whole experience more pleasurable. Preparations One of the most important aspects is the choice of your vantage point. You will need an unobstructed view of the fireworks, preferably void of power lines, trees and other distractions, while providing some skyline. Beware of any light sources in the field of view; too many of too bright ones may be distracting. Usually this will not be the place from most people view the show; that's usually too close to the point from which the fireworks are launched. A distance between 100 and 300 meters seems just right. | ||
|
You may scout the location ahead of time to find the right spot, and the effort will pay itself off. Be there some time before the start of the show. Set up the tripod, mount the camera, frame the field of view (you may have to re-adjust it later, as I had in this example), make sure your horizon line is not tilted. Adjust the camera settings as described in the next section. Set up your folding chair, make sure you can trip the shutter without getting up. Open the champagne, pour the glasses, enjoy the wait. |
| |
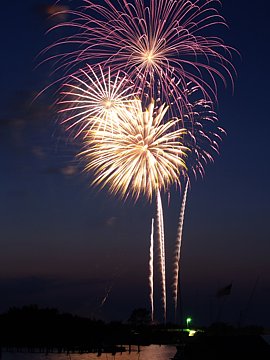
| [2] The view from my vantage point before the show, 8:50 PM: E-300, program exposure at 1/10 s and F/4.6, ISO 200, tripod. Zoom at 31 mm (62 mm EFL). Postprocessed. | ||
|
Camera settings The safest way is to set the exposure to manual. You are going to use very long shutter speeds, therefore set the CCD gain (ISO value) to something low, like ISO 100. This will keep the imager noise and hot pixels under control. Noise reduction: some cameras offer this option, applicable to longer shutter speeds. This does a good job in removing the static noise, but causes an extra delay of the length equal to the exposure itself. I consider this not worth the trouble. In the E-300 and E-500 the noise reduction becomes active at exposures of four seconds and longer (ISO 100); below that it will not kick in, even if set to ON. At ISO 100 my preferred aperture setting is F/8, although slightly smaller apertures (say, F/11) may also be OK. Using larger apertures (F/5.6 or lower values) you will risk too much of the fireworks to be washed out. If you use a different ISO setting, adjust the aperture accordingly. (If you do not know what that means, read any book on photography written in the last 60 years.) The shutter speed should be slow enough to capture the movement of fireworks across the sky. My favorite values are 2 or 4 seconds. Values below one second will cause the light tracks being too short for a pleasant effect. Exposures longer than eight seconds may allow you to capture more fireworks in the same frame. While this may be nice sometimes (more is better?), the overlapping patterns may get too busy and washed out. Also remember that longer exposures cause more noise, especially at ISO above 100. This is another reason why eight seconds should be enough. The ambient light may become a problem if the show starts before it gets really dark. (This was the case in the show I'm using to illustrate this article: it started at 9 PM, when the sky was still quite bright.) Take a test picture just before the scheduled start of the show; if the sky seems too bright, reduce the exposure time as needed (but not below 1 second) and/or step the aperture down to F/11. As the show progresses and it gets darker, move back to the recommended settings. Focusing. Forget the autofocus; the camera will not have anything to focus on. Go to manual mode and set the focus on infinity. If you are using a longer focal length, you may use AF on some detail around the place from where the fireworks are launched, and then switch to manual focusing; most cameras (all I know) will retain the setting. Besides, the F/8 aperture will provide enough of depth of field. In any case, repeat, do not use autofocus; you may end up with lots of fuzzy pictures. Set your zoom focal length so that the angle of view will include the expected height of the fireworks' path. At the distance of 200 m from the launch site this will be close to the "standard" value: 50 mm EFL (equivalent focal length on a 35-mm film camera), maybe slightly more if you frame your pictures vertically. Oh yes, framing! Most of firework shows are launched from a single spot, in which case vertical framing may make sense, as it fills the picture better. On the other hand, a horizontal frame allows you to place the fireworks off-center, which often is more pleasing, especially if there is some detail in the sky in the otherwise empty half of the image. Note that the fireworks vary in height. Your framing will be actually based on guessing. It may be a good idea to leave some extra room on the top, and then adjust the composition by cropping. A "Fireworks" mode? Some cameras have a dedicated Fireworks "scene mode", aimed mostly at beginners. Such a mode usually provides a setup fitting the job reasonably well, but not always exactly to your liking. In case of the Olympus E-300 and E-500, the fireworks mode sets the camera to the following:
(My impression was that in earlier versions of the E-300 firmware the manual focus capability was disabled while in the fireworks program; maybe I was wrong — I cannot check that any longer, as I've updated my camera to v1.4.) These are sensible settings for the task, and you should be just fine using them — except that you will not have any control over the process, or an option to change any of the settings (except for the zoom). Shooting Once you have set everything up, your main job is to press the release (remote or not) every time you expect something to happen in the sky. Usually you can see the rockets climbing; this gives you enough time to start the exposure before the firework starts "blooming", to capture the whole process. Shoot a lot. While most of your pictures should be OK technically (exposure, color, sharpness), the fireworks patterns and frame composition are a matter of chance. Once in a while you'll get a real keeper. After the first frame or two you can adjust the zoom setting, having a better guess what to expect. You may also adjust the shutter speed, providing longer exposures as the sky darkens. (It took me about 10 minutes to double the exposure in this 9 PM session.) There is not much you can do now. Keep tripping the shutter, sip your champagne, and enjoy the show. Postprocessing and results Now is the time to improve your cropping — and this is when all these megapixels come handy. Actually, this is when I decide which of the images should use vertical format — accepting the inevitable loss of resolution. If you keep the 3:4 aspect ratio, you end up with 9/16 or 56% of the pixels; for an 8 MP camera this means ending up with a 4.5 MP image. (If you mind that, shoot vertical to start with.) | ||
|
| |
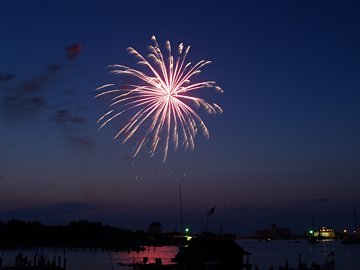
| [3] At the left, the image without postprocessing, just reduced and re-sharpened for inclusion into this page. At the right: after some cropping and slight tonal adjustment. 9:03 PM: 4 seconds at F/8, ISO 100. | ||
|

| |
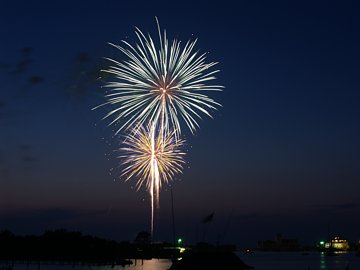
| [4] Like above, but this time I decided to go vertical. 9:06 PM: 4 seconds at F/8, ISO 100. | ||
|
Another thing you can do in postprocessing is stretching the tonal range to get the sky a bit darker. I also usually move the midtones down a bit, to give the images some extra punch. Increasing the contrast is not the same: I do not want to move the highlights even higher. There is no need to do anything with the colors, and some sharpening may be applicable if you keep the in-camera sharpening low. (Here I don't like the PhotoShop's Unsharp Mask, as it seems to enhance noise too much; the Directional Sharpen in Photo-Paint does a better job for me.) Last but not least, if you used longer exposures (in the E-300, eight seconds or more), you may have to apply the clone brush to remove any hot pixels. | ||

|
| |
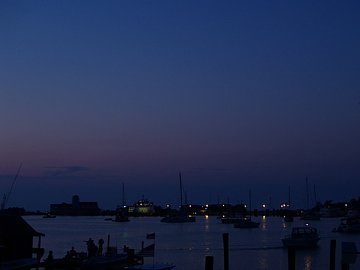
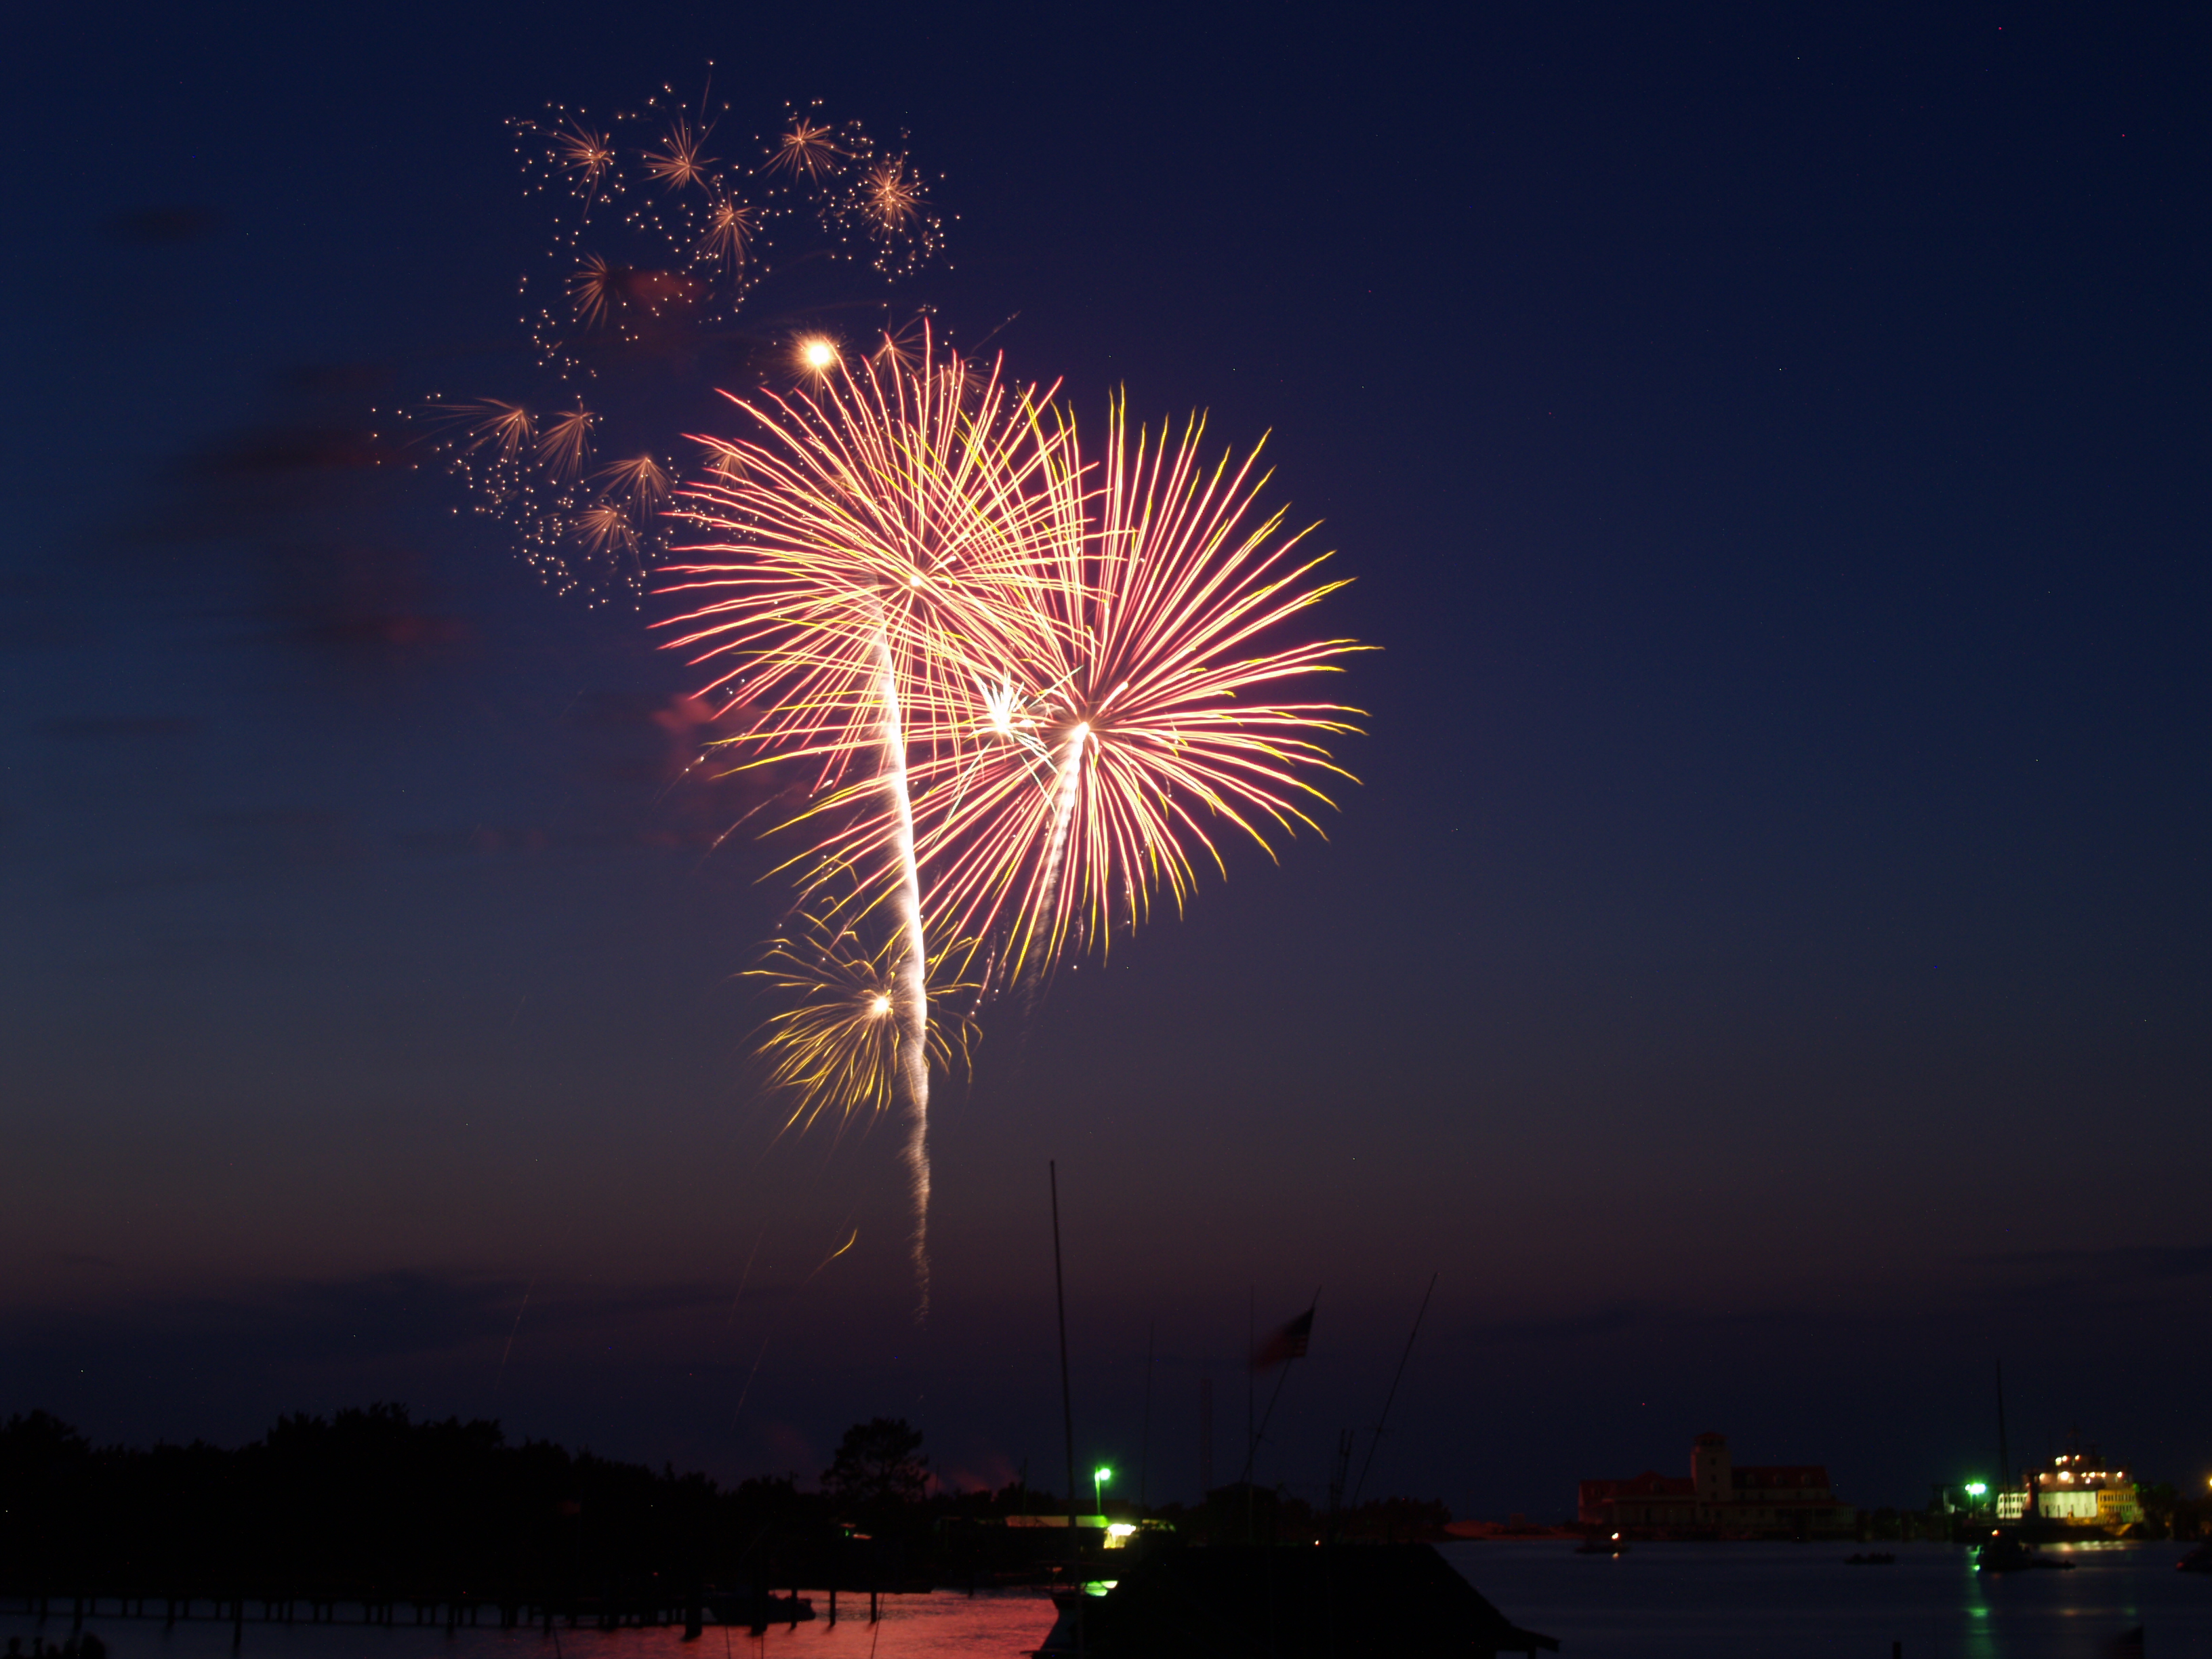
| [5] At left, the original (reduced and re-sharpened); at right — a 1:1 pixel sample from that image, showing a few of the hot pixels I had to clone out. 9:09 PM: 8 seconds at F/9, ISO 100. The full, unaltered image can be viewed here. The picture did not need any cropping and almost no tonal adjustment; a keeper. | ||
|
Altogether, I shot about 70 frames that night, within 15 minutes from 9:01 to 9:16 PM, and all ended up quite passable. The image shown as [3] above was among the worst, [5] — among the best, but this is largely a matter of taste. My wife, Agnieszka, was bravely supporting this effort, also helping with the champagne. A set of selected, postprocessed pictures from that session can be seen in my Ocracoke Fireworks gallery page. Final remarks Taking pictures of fireworks is much easier than most people think — except that it takes some more than just pressing the big, shiny button. Following this advice (or even using the dedicated fireworks mode, if your camera has one), you should get pleasing results. Just remember to bring a tripod along. And did I mention the champagne? | ||
| See also my Ocracoke Fireworks gallery page. |
|
|
My other articles related to the |
|
Evolt® and Olympus® are registered trademarks of Olympus Corporation.
This page is not sponsored or endorsed by Olympus (or anyone else) and presents solely the views of the author. |
| Home: wrotniak.net | Search this site | Change font size |
| Posted 2005/08/04; last updated 2006/07/01 | Copyright © 2005 by J. Andrzej Wrotniak. |
