
|
Pixel Peeping Galore Is Eighty Megapixels Enough? |
|
|
My other articles related to the |
|
This article is a co-operative effort with a fellow photography enthusiast, Jeremy Miracle. In particular, Jeremy shot all the samples presented here, while I provided the write-up, HTML code, plus sample postprocessing and formatting. Let me introduce you to Jeremy. To use his own words, "Yes, I acknowledge [my name] sounds fictitious, but, believe it or not, its the name I was born with. I'm very much a student of photography — not a master — occasionally I get a result that pleases me." Jeremy got the bug of photography five years ago from his brother, an experienced photographer, while assisting him in a wedding shooting session. Over the following period he's been using a Pentax ZX-10 35 mm SLR, an Olympus C-5050Z, the E-10 and E-1, recently venturing into the medium format with a Pentax 645N SLR. The purpose of the whole exercise was to see if and how much does the medium format has to offer (as compared against 5-10 MP SLRs) when the ultimate outcome is intended to be 12×16", 16×20" or 24×30" prints (that's 30×40, 40×50 or 60×75 cm size). The cameras, lenses, and settings The cameras used in the comparison were:
The digital cameras were used at lowest ISO setting available: ISO 50 for the C-8080WZ, ISO 100 for the others.
| Shooting conditions: all pictures were taken with the lenses set to the same image angle (28 mm EFL), from a tripod set up about four feet from the subject. For the 645N session the light was provided with a single AlienBees B800 strobe bounced off the ceiling, and metered with a Sekonic L-558 meter; the digital models used their internal TTL flash metering for a bounced FL-50 unit.
| 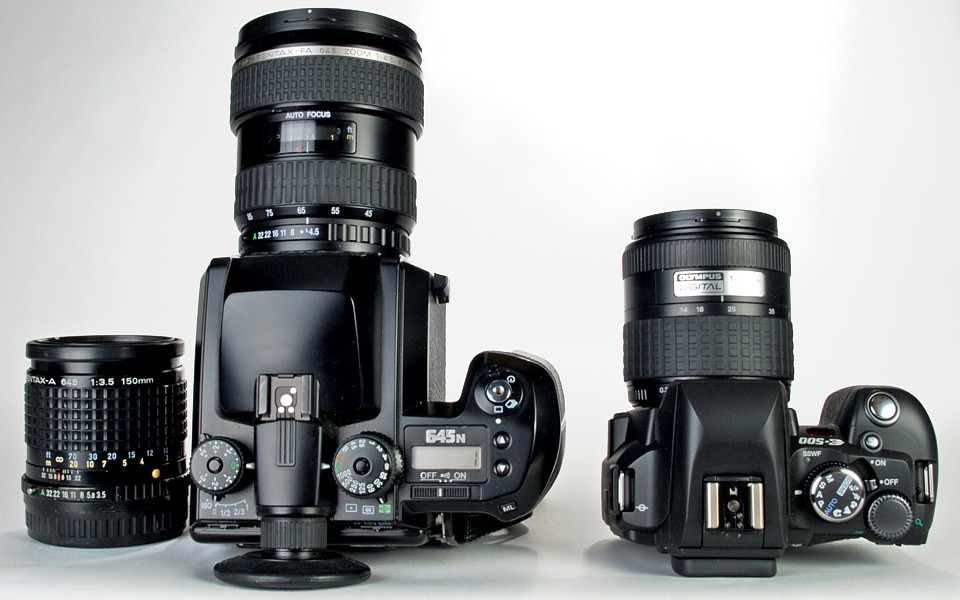
The Pentax 645N and the Olympus E-500. Click here for a larger version.
| |
|
About the samples These are not samples straight from the camera or scanner; all have been manipulated in postprocessing: adjusting the histogram range to be the same in all cases, then moving the mid-tones up or down so that the white disk on the Color Wheel has the same luminosity in all pictures; this is roughly equivalent to adjusting the tonal curves so that they match in three points. This was necessary to provide some uniformity across various samples, as every sensor or film may do a different job squeezing the tonal range of a scene into the range available to the recording medium, and scene tonality may affect the perceived (if not actual) image sharpness. We also discovered that the white balance in all samples was shifted slightly towards magenta; this was corrected, using the circle white surface as a reference. The correction might not be as good in shadows, but the differences are not so significant. While the images were saved in-camera as 24-bit JPEGs (8 bits per color), all manipulation (except for sharpening) was done in 48 bits before converting the results back to 24 bits; this way at least there was no significant error accumulation due to multiple intermediate steps. Using raw files in digital cameras (and a 16-bit TIFF format for the scan) would provide even less loss, but this seemed not crucial for the purpose of resolution analysis. (The unprocessed 645N sample was accidentally cropped a bit in the vertical dimension; instead of re-scanning the slide, I've filled the missing areas with black stripes, visible in the full, reduced image.) Native resolution First, the samples in their native resolution. In this section, at left we are showing the full frames, postprocessed as described above, and then reduced and re-sharpened; this shows the lens coverage and, outlined in red, the position of the 1:1 (pixel-for-pixel) fragments, which are shown at the right. Obviously, with the increasing sensor (or scanner) resolution, the coverage shown by the ref frame is getting smaller, because the 1:1 samples remain of the same pixel size. (In the last sample the red frame is barely visible, but it is there!) The pixel-for-pixel samples, as viewed on your computer screen, are larger than they would be on a large, but still reasonably-sized print. Let us assume a print size of 12×16" (30×40 cm). For this print size the sample height corresponds to 42 mm (1.7") for the 5-megapixel E1, to 33 mm (1.3") for 8 MP cameras, and to 11 mm (0.4") for the film scan.
|
| .r.jpg)
| .f.jpg)
|
[1] Olympus E-1 (5 MP), 14-54 mm F/2.8-3.5 ZD at 14 mm (EFL=28 mm), F/5.6, ISO 100
|
|
| .r.jpg)
| .f.jpg)
|
[2] Olympus E-500 (8 MP), 14-54 mm F/2.8-3.5 ZD at 14 mm (EFL=28 mm), F/5.6, ISO 100
|
|
| .r.jpg)
| .f.jpg)
|
[3] Olympus C-8080WZ, built-in lens at 7.1 mm (EFL=28 mm), F/4.0, ISO 50
|
|
| .r.jpg)
| .f.jpg)
|
[4] Pentax 645N, 45-85 mm F/4.0 lena at 45 mm (EFL=28 mm), F/11;
Fujichrome Velvia RVP 100, scanned with Epson Perfection 4990
|
| Jeremy actually made two scans of the 645 slide. The first one [4] was with no postprocessing at all (not even the Digital Ice scratch and dust cleaner); the second [5] adds sharpening and levels adjustment. While I have submitted all the samples shown here to some sharpening, I prefer less of it. at the first glance [5] looks "sharper" than [4], but it does not have more detail (just more contrast and steeper transitions) and also some artifacts: look at the bright spaces between lines of text, whiter than the rest of the background, which does not reflect reality. This is why it is better to tune the in-camera sharpening down, applying this only in the postprocessing, where we can adjust its amount and kind.
| .f.jpg)
[5] As [4] above, more sharpening and contrast
|
| Comparing native resolution samples from cameras (or scans) with different pixel count is not a direct job. Obviously, the resulting image magnification differs so that the low-MP images will look sharper in this format than the high-MP ones. There is more detail, however, present in the latter, even if it looks more fuzzy, undergoing more magnification. Remember again, the high-MP samples as you see them will undergo less magnification if we present all images in the same final size. Compare two extreme examples above: while the E-1 sample looks neat and quite sharp, the text below the circle axis is not readable at all. On the other hand, in the fuzzy 645N image, you can still read the "How to use" text, and I consider this quite impressive. The key is that the resolution (measured in terms of pixels) is decreasing more slowly than the image magnification increases. In other words, the resolution measured per image height is increasing, and that's what counts. (Forgive me for beating a dead horse, but too many people tend to view such samples casually, passing verdicts without giving this fact a proper consideration.) An important point in comparing such samples from two different cameras, even at the same pixel count, is that we tend to confuse contrast with sharpness. Have a look at the comparison below: which of these two samples is sharper?
|
|
| .f.jpg)
|
[2] E-500, same as [2] above
|
[2a] Sample [2] at the left, with contrast enhanced
|
| While the version shown at the right as [2a] seems sharper at the first glance, it actually is not. It contains exactly the same amount of detail as the original [2], from which it was derived. Yes, it may be more pleasing to the eye, but remember — nothing comes free: enhancing the contrast means assigning more available luminosity range to the center sub-range of the original tonality; the other sub-ranges will then suffer, which will result in loss of detail in shadows and highlights. Anyway, a closer look will show that the detail in [2a] is not more readable than in [2]. This is why I took all the pains to provide, approximately at least, the same tonal curve for samples from all cameras (samples "as shot" may have it tweaked differently by the camera or scanner firmware). To see the other side of the coin, in the next part of the comparison we will see all images (or rather their fragments) resampled to the same magnification. Resized to 5 MP To level the playing field, here are fragments of all the samples from postprocessed originals resized to the 5 MP resolution (1920×2560 pixels). Roughly speaking, looking at these may give us an idea of the quality of 9×12", i.e., 23×30 cm prints (although the prints will be sharper than what you see on the screen by about a factor of two).
|
|
| .f.jpg)
|
[1] E-1, same as [1] shown above (native resolution)
|
[6] E-500, original [2] downsampled from 8 to 5 MP
|
|
| .f.jpg)
| .f.jpg)
|
[7] C-8080WZ, original [3] downsampled from 8 to 5 MP
|
[8] 645N, original [4] downsampled from 80 to 5 MP
|
| As expected, all samples thus resized are more or less equally sharp, although the E-1 one may seem a bit less, and the 645N — more sharp than the others (in spite of a tad less contrast, possibly my postprocessing oversight). The latter also looks least "tired" or "digital" of all; hard to explain, but clearly related to more information available to start with. Note that the C-8080WZ sample shows signs of oversharpening (for example, whiter space above "MORNINGST"); it also has slightly more contrast; again, it is very difficult to adjust samples from different cameras to exactly the same tonality. The bottom line here is that even at the 5 MP resolution, higher pixel counts have some advantage over the E-1. This may be due to the fact that a megapixel as quoted in specifications of digital cameras is rather a mega-1/3-pixel; 2/3 of every pixel's information in cameras using the Bayer pattern is actually interpolated from the neighbors (see here). My experience, however, shows that you are not likely to see this difference even in 12×16" (30×40 cm) prints viewed from the right distance (i.e., one close to the format diagonal; see also Jeremy's remarks near the end). At closer viewing distances, however, some difference will be visible, and we will see that in the next set of resampled images. Resized to 8 MP Leveling the field in one direction often tilts it in another; there is no absolute justice. Therefore here I am comparing the samples rescaled, if necessary, to the 8 MP size (2446×3264 pixels); representative for print quality at 12×16", or 30×40 cm.
|
| .f.jpg)
|
|
[9] E-1, original [1] upsampled from 5 to 8 MP
|
[2] E-500, same as [2] in the previous batch
|
|
|
| .f.jpg)
|
[3] C-8080WZ, same as the original [3]
|
[10] 645N, original [4] downsampled from 80 to 8 MP
|
| Now, you cannot avoid it: upsampling the E-1 image does not stand up to the others (although a 30×40 print can be still quite good; sharpness is not all). Here you can clearly see how the C-8080WZ is affected by excessive sharpening (the camera presets are too high, even when tuned down); I prefer the results from the E-500. But the reduced 645N frame really has some advantage in this size: even with less contrast, I can see more detail in the fine print, and the image is certainly less "tired". Our brain is a wonderful tool; it does lots of the "behind the scenes" work we may not be aware of. There may be nothing obviously wrong with an image: it may look sharp, no clearly visible artifacts, tonality OK, and, still, I sometimes get an impression that not all is right with it; that's what I call a "tired" image. Usually, in my own practice at least, this happens if the original capture is not too good (say, too much underexposure), and I have to correct a lot in postprocessing, especially in 8 bits per color. Starting from raw files may often help here, for two reasons: having access to all 12 bits per color of original information, and performing the adjustments in 16 BPC, which introduces less round-off effects and tonal discontinuities in processing. For images which require just minimum adjustment, this does not really matter; this is why I resort to using raw files only if I expect problems; otherwise I'm just too lazy to do that. Resized to 12 MP While the current batch of digital SLRs uses mostly 10 MP sensors, the difference from 10 MP is not really significant; I decided to resize all samples to 12 MP instead (3072×4096 pixels). As compared to 8 MP, this is 25% more pixel resolution, already a non-negligible step. In my book this may describe the quality of 15×20", or 38×50 cm, prints, inspected at arm's length.
|
| .f.jpg)
| .f.jpg)
|
[11] E-1, original [1] upsampled from 5 to 12 MP
|
[12] E-500, original [2] upsampled from 8 to 12 MP
|
|
| .f.jpg)
| .f.jpg)
|
[13] C-8080WZ, original [3] upsampled from 8 to 12 MP
|
[14] 645N, original [4] downsampled from 80 to 12 MP
|
| Obviously, I re-sharpened the images as needed (whatever that means) after upsampling; with the amount somewhat larger for the E-1, as I was quite desperate to get that sample close to presentable. While the E-1 sample is running out of detail (see the "ON ANY" text at bottom right), I still may prefer it, if not by much, over the one from the '8080 — in spite of a tad more of detail (putting the contrast aside) in the latter. More sharpening of a fuzzy original image means only more sharply outlined blobs in place of detail; an inexperienced viewer will confuse that with a sharper image. Look at the text "YELLOW GREEN" at top right: it is already lost in the E-1, almost lost in the C-8080WZ, better in the E-500, and then a bit better again in the downsampled image from the Pentax 645N. The last image is also, again, most natural. If you look closer, you will see some "jaggies" in the upsampled images (the two extreme, radial lines). This is an artifact of upsampling combined with the pixelized nature of the image. While most graphic programs apply antialiasing when the image is resampled, obviously the Corel Photo-Paint which I'm using is not very effective in that. Before I blame the software, however, let's remember that antialiasing means adding some fuzziness to the image, so this is always a matter of some compromise. In this case I'm not worried: the sample fragments as you see them on your screen are about twice the size they would be on a 15×20 screen. The impression I'm getting from this comparison is not much different than the outcome of the previous ones: again, the downsample from an 80 MP film scan has some edge, but less that I would have expected. In terms of detail resolution, the E-1 is, obviously, left behind, even if this may be of secondary importance for the overall quality of the final picture.
| Medium-format film and effective pixel count An obvious, but not too easy to answer, question may arise: how many megapixels would a digital camera need to match the resolution of the medium format? There are many caveats here, as what we see is a sum of many effects due not just to the sensor pixel count and size, but also the lens used, the film (light scattering in the emulsion and film base), and more. The question should be rather rephrased: at what pixel count any further increase does not bring any further discernible improvement in the final image resolution, reaching the limit due to the lens, camera vibration, inaccuracies in focusing and other factors different that just the number of pixels? Jeremy and I have been playing with his samples for almost two months, scrutinizing them painfully, re-sizing, sometimes re-shooting, and exchanging dozens of emails with our impressions. Independently from each other we've arrived to the same answer: just above 20 MP. Certainly not less, as the next image will show, but not much more, either.
| Here is one more downsample of the 645N image, this time down to 20 megapixels. We can clearly see the advantages of the medium format, maybe it is even more obvious here than in the original 80 MP sample [4]. New detail is still emerging as pixel count increases: "YELLOW GREEN" is more readable here, and so is the date on the coupon (which was unreadable on the 12 MP versions of images from 8 MP cameras).
| .f.jpg)
[15] 645N, original [4] downsampled from 80 to 20 MP (i.e., half original size)
|
| But that's about it: while the 20 MP version shows more detail than the 12 MP one, the original 80 MP does not show more. Not with this lens, anyway, and not under these conditions. A better lens, sharper film, and more careful technique may relax the bottleneck imposed by these factors by 25%, but, most likely, not more. Therefore it may make sense to use a value of 30+ MP as the high limit (20×1.252) as a safer estimate, just to assure that the pixel count is not the limiting factor. | ||||||||||||||||||||||
|
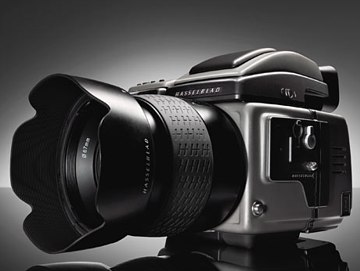
I would like to believe that Hasselblad, during development of their medium format digital camera line, reached similar conclusions. They now offer three models: H3D-22 (22 MP, 36.7×49 mm), H3D-31 (31 MP, 33×44 mm), and H3D-39 (39 MP, 36.7×49 mm).
The pixel count of 21 MP corresponds to the bottom end of our estimate range, and the others (note the smaller sensor in H3D-31) — to the top, or just above (at the street price of $32,000 you would expect some extras). (Image © 2007 Victor Hasselblad AB) |
|
While much of the above discussion is based on observations by both Jeremy and myself, here is a selection of comments by Jeremy on various related topics: The C-8080WZ shows a higher level of detail than the E1, so its lens is sharp enough to support the extra megapixels. I believe that its default sharpening is higher than the E1's. Although the images are overall very pleasing, this isn't my favorite camera for general use (I prefer an optical viewfinder and the lower noise of an SLR at higher ISOs). 35mm film — I ran such a series, too, but it wasn't my primary interest since acquiring the digital and medium format cameras. I find the [digitals I've tried] more pleasing — not quite as much fine detail but less grain/noise. Medium format: There is more detail present here and, at high magnification, there are fewer jagged diagonal lines and edge artifacts. The difference, however, is pretty subtle. Using a dedicated film scanner would also bring out a little more detail (but a separate test of flatbed versus film scanner indicates the Epson Flatbed isn't bad, and appears to reduce grain). The contrast and color response is different - the digital cameras are more realistic, while the Velvia has higher contrast and darker greens. I've printed 2.2" squares of a 16"×20" enlargement of each format. Viewed at a distance of 2 feet, I really can't tell much of a difference in detail between any of the cameras used (the E-1 images were a little soft, but moderate unsharp mask equalized things, at least from a distance). Viewing the squares from 6"-8" away, the medium format contains the best detail. The eight-megapixel cameras are not that far behind, and the E1 shows less detail but slightly more pleasing color rendition than the others (as rated by an informal panel of myself and my wife). Most of my poor images are due to wrong choice of exposure, composition, focus, or to motion blur. Negative size or megapixels really aren't my bottleneck in image quality (99% of the time). However, when I do get a shot that meets my expectations (even if it is on too rare an occasion, or maybe especially because it is too infrequent), I don't want to be limited in print size. Instead of conclusions We would like to avoid making any clear-cut, definite conclusions here; there are too many ifs and buts involved in the process of pixel-peeping, which makes it of doubtful value. More than to arrive to a "just tell me which one is better" bottom line, too often expected as an instant gratification by a casual Web surfer, we have tried to provide you with advice how, if at all, compare image samples for resolution, and what are the caveats of the process. Is a medium-format film camera capable of providing more resolution than a current breed of 10 MP, APS-C or Four Thirds digitals? Yes, and the advantage is equivalent to slightly more than doubling the pixel count, or to increasing resolution by 40%. In most cases, however, we will be either unable to take advantage of the difference (with other factors than resolution becoming bottlenecks), or incapable of seeing the difference in the final product. In any case, Jeremy decided not to bring his 645N along for the next trip to the American West. He is not unhappy, either, as this will save him $1 every time he presses the shutter release. | |
|
|
My other articles related to the |
|
Evolt® and Olympus® are registered trademarks of Olympus Corporation.
This page is not sponsored or endorsed by Olympus (or anyone else) and presents solely the views of the author. |
| Home: wrotniak.net | Search this site | Change font size |
| Posted 2007/03/25 | Copyright © 2007 by Jeremy Miracle and J. Andrzej Wrotniak |