|
Highlight Recovery from Raw Files |
|
|
My other articles related to the |
|
In my E-30 image samples I've posted a picture with the highlights blown out by a slight overexposure: perhaps 1/3, maybe 1/2 EV. I also expressed my skepticism about a possibility of recovering overexposed highlights from the information recorded in the raw image file, even with the overexposure being as slight as it was.
If this is possible in a given camera, it only means that the built-in JPEG engine does not efficiently use the whole tonal range recorded in the raw signal. I wasn't expecting the Olympus imaging pipeline to waste any significant fraction of information available. In two weeks that followed, I've received quite a number of emails on the subject from the Readers. The voices could be, roughly, divided into two groups:
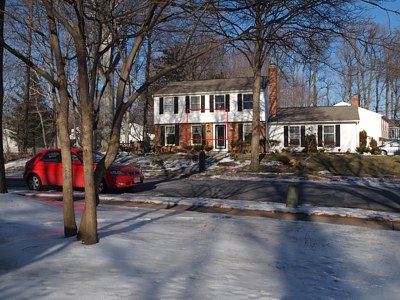
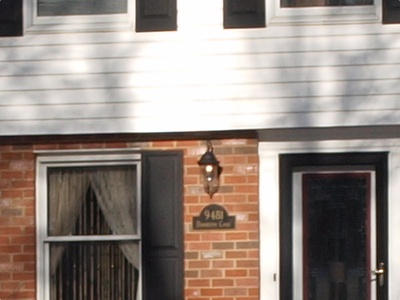
Interestingly, nobody said "my RAW pictures look better than JPEGs", which means that people who write to me are more technically literate than some magazine writers, who say similar things not realizing that you simply cannot view raw image information; it has first to be translated into RGB pixels, either in the camera or in a separate software application. Some of my respondents were kind enough to send me the results of applying their favorite raw development application to my image (which was saved in both formats: ORF and JPEG). Taking advantage of that, I decided to post this small article, showing examples. Now, let us see the images. All pictures below are from one shot, taken with an Olympus E-30 camera with a 12-60 mm F/2.8-4.0 ZD lens at 19 mm; aperture priority with -0.3 EV exposure compensation: 1/320 s at F/8, ISO 100. Other parameters: white balance at 5300°K (sunny), Normal Picture Mode with contrast and saturation at -1, noise filtering at Low. (All these can be disregarded by the raw-to-RGB conversion software, or used as that software pleases.) While the image fragments shown here are just 400×400 pixels in size, larger ones, cropped to 1024×768 pixels, are provided via the [XGA] links in captions. The best way to compare between various results is to copy all XGA folder to one folder, and view them full-screen in an image browser. (If you do not have one, the free FastStone can be recommended.) Smallest differences are then instantly visible, much better than in side-by-side viewing. The raw file, if you would like to play with it, is here. The in-camera JPEG and Olympus Studio The first sample shows the JPEG generated in the camera, by the imaging pipeline in the firmware. Traditionally, Olympus has one of the best JPEG engines in the industry, so this is perhaps as good as you get, except that I should have added 1/3 EV more of negative autoexposure compensation. In particular, there is a loss of highlight detail in wall siding above the door. |
|
| |||||||||||||||||||
| [1] In-camera JPEG (processed by the in-camera image engine) [XGA] | ||||||||||||||||||||
|
Each picture in that session was saved as both ORF (raw) and JPEG file, so I could see how the Olympus off-camera software handles the job. Being allergic to Olympus Master I did that in Olympus Studio, but both programs (most probably) share the same raw development code.
|
| .r.jpg)
| .f.jpg)
|
[2] The raw file converted to RGB in Olympus Studio "as shot" [XGA]
|
| As expected, the results are identical, at least within limits of visual inspection. Now, Olympus Studio again, but this time with use of the Exposure Compensation adjustment. The adjustment slider was at -0.3 EV.
|
| .r.jpg)
| .f.jpg)
|
[3] Olympus Studio with "exposure compensation" at -0.3 EV [XGA]
|
| If you are viewing this on an LCD monitor, then you will probably think that I mixed up the samples; this one looks identical to the one above. Sample [3] is just generally darker than [2] (more exactly, it has the white point lower), but it does not reveal any detail in the white, burned-out area. This is not exposure compensation, just moving the white point down, like printing an overexposed picture on a darker paper. | ||||||||
|
To close this section, let me show you a desperate attempt to salvage some detail from the RGB image by applying a luminosity adjustment curve to stretch the rightmost histogram area: after all, the peak at the right has some width, so maybe we can get something? Here is the transition curve applied (shown below). You can see that the lower 50% remains unaffected, the next 45% gets compressed (contrast lowered) to 40%, and the savings are assigned to the last 5% of luminance, stretching them to 10%, to make tiny differences stand apart more (contrast enhanced). This is a game of limited resources. In terms of economy: tax the upper-middle class and give the proceedings to the richest, with no new money entering the system. |
|
| Transition curve used in [4] |
.r.jpg)
|
.f.jpg)
| |
| [4] Like [2], with tonal curve adjustment | ||
|
The results are quite ugly. While, indeed, some of the groves became visible (if barely), they have this harsh, "tired" look, with posterization effects creeping in, and RGB components getting out of sync: reddish edges of tree shadows. But this was to be expected, and the sample was shown only to preempt any "why don't you just use curves?" questions. Comparison of luminosity histograms for the Olympus Studio results can be quite entertaining. The histograms show brightness distributions for the areas of full pixel scale fragments, not the whole image; this improves visibility of the overexposure region. | ||
|
.h.gif)
|
.h.gif)
|
.h.gif)
| |
| [1]: In-camera JPEG | [2]: "As shot" | [3]: -0.3 EV compensation | [4]: Curve adjustment |
|
Samples [1] and [2] are virtually identical, with a burned-out peak at the right: overblown highlights. Results from other raw-to-RGB converters Now, results contributed by the Readers using various third-party applications to convert the raw data into RGB images. In each case my intrusion was limited to formatting the resulting image in my usual way: reduced full frame, and a full pixel scale crop. The samples are shown in no particular order. I will be referring to the contributors who did the conversions by initials only. In a few cases I decided not to include images which are identical or very similar to others: this would not bring anything new (the effort is, still, appreciated, because these images gave more weight to results anyway). Adobe Camera Raw In this section I'm showing results from a number of Adobe applications, sharing the same raw-to-RGB conversion engine. According to Scott Kelby's Photoshop Insider this was a case for Photoshop CS3 and Lightroom 1.4 (except cosmetic differences in user interface), and nothing indicates that things changed since. (Correct me if I'm wrong here.)
|
| .r.jpg)
| .f.jpg)
|
[5] Raw file processed with Adobe Camera Raw 5 (in Adobe CS4) by R.S. [XGA]
|
| Here is an attempt by R.S. with use of the Adobe Camera Raw 5 (-0.3 EV highlight recovery applied). My take on this effort: the amount of detail restored is comparable (just a tad more) to that achieved with curve adjustment in [4], but without posterization and color shift. Overall, a minor improvement: adjusting the exposure by an extra -0.3 EV when the picture was taken would bring a more pronounced result.
|
| .r.jpg)
| .f.jpg)
|
[6] Raw file processed with Adobe Camera Raw 4.6 by A.K. [XGA]
|
| Another result from Adobe Camera Raw, this time Version 4.6 (Mac), contributed by A.K. The job was done using the "highlight recovery" feature, and the results are better than in the previous example (even if there is some posterization in the recovered branch shadows). But, wait a minute, look what the process did to the white building behind, shown at the right! (Now that I know where to look, I can see a similar, if less pronounced effect in the other ACR samples as well.)
| .f2.jpg)
|
Another fragment of the above
|
| During a follow-up we had with A.K. after the original recovery attempt, he found a way to get rid of the cast, by adjusting the tint towards magenta in raw development, but then correcting it again on the RGB image, before saving it. This seems to work (I'm not posting the sample, just trust me!), bringing the problem in the white house down to the level comparable with the first ACR sample in this section.
|
| .r.jpg)
| .f.jpg)
|
[7] Processed with Adobe Camera Raw (in Adobe LightRoom) by J.K. [XGA]
|
| J.K. used Adobe Lightroom, which is, for out purposes, ACR; he added the following comment: I tried a Lightroom conversion of your photo [...] that seemed to get a little detail back, not much (slightly more visible siding lines). I noticed other parts of the photo seemed to be missing detail as well, the white walls of the buildings, even though they did not show up as blown highlights. I can assure you that I do manage to 'recover' detail in blown highlights on snowy mountains routinely, as long as they aren't too blown. I sometimes do this through the recovery slider but more often through an exposure adjustment using the grad filter tool. What I can see here is a negligible amount of detail recovery, but without (or with less) adverse side-effects visible in some of the other samples. Regarding the graduated filter: while I do not dispute its usefulness in making the scene look better, its use does not recover detail lost in highlights: it just moves the white point down locally. Yes, the results look better, but this is applied to the RGB image, after any highlight detail has been recovered or lost. This will not replace using a graduated filter on the lens (which reminds me: I've lost mine fifteen years ago; got to get a new one). Let's have a look at the luminance histograms of all three recovery attempts with use of Adobe Camera Raw, as this may tell more about what happened. | |||||||||||||
.h.gif)
|
.h.gif)
|
.h.gif)
| |
| [5]: ACR by R.S. | [6]: ACR by A.K. | [7]: ACR by J.K. |
|
Sample [5], indeed, shows least detail recovery. My first reaction was that it is quite similar to the curve adjustment [4], and it is confirmed here. (For the record: I am generating the histogram only on the next day after having completed the rest of the article, including those comments.) [6] and [7] show more, see the final slope of the rightmost peak. They also adjust the tonality of the rest of the image, on purpose or not. The overall correction is well below 0.3 EV, perhaps half of that. (How much 0.3 EV is in the graph, see histogram [3], which provides a direct answer.) Raw Therapee
|
| .r.jpg)
| .f.jpg)
|
[8] Raw file processed with Raw Therapee 2.4RC by F.L. [XGA]
|
| This free program (everybody interested in raw-to-RGB conversion should read its manual, even if using another application) was used by F.L. from Germany. Luminance recovery was applied, with some highlight adjustment. While some detail has been recovered in highlights (groves in siding), the improvement is quite small (see below), and accompanied by undesirable side effects (yellow cast in branch shadows, again). This may stem from the fact that programs attempting to recover highlights do it using unreliable informatioN: for example, only two color channels, because the third one is already saturated. This amounts to guessing of 1/3 of image information, and such a guess may be not quite right. | |||||
|
The Raw Therapee histogram is interesting and a bit confusing. Below the white level (moved slightly down) we have not one but two peaks of highlights. This indicates that highlight recovery is accompanied by some curve adjustment in the highlight region. Judging the effectiveness of this approach based on the histogram is not easy, but visual comparison with [5..7] above suggests 1/3 EV or so of extra range. |
.h.gif)
|
| [8] Raw Therapee by F.L. |
|
LightZone | ||
.r.jpg)
|
.f.jpg)
| |
| [9] Raw file processed with LightZone by R.H. [XGA] | ||
|
This was done with LightZone by my old friend, R.H. (a second attempt, after the first one generally darkened the midtones too much for my taste). The detail has been nicely recovered in the problem area, including not only the groves in siding, but also some branch shadows over the brightest part (this was done well also in Aperture and Picture Window Pro, but not other programs). The luminance areas close to highlights also seem to have been adjusted in the process, providing a cleaner, more pleasing, result. This was my first choice in the original posting of this article; then the results from Aperture, contributed later, turned out to be least as good. Importantly, the resulting image does not show color shift in other areas (like the white house at the right or the snow in the foreground). | ||
|
The histogram shows, in addition to the white level being moved down, "unloading" of the original highlight peak, mostly to the left, with a minor amount of detail to the right of it. That peak is much lower than in the original (judge it not by the height in the picture, as this is rescaled, but in a relation to the total area under the line). |
.h.gif)
|
| [9] LightZone by R.H. |
|
Picture Window Pro
|
| .r.jpg)
| .f.jpg)
|
[10] Raw file processed with Picture Window Pro 5.0 Beta by J.L. [XGA]
|
| J.L. used Picture Window Pro to do the conversion, with maximum (Level 8) highlight recovery, with results as shown above. This would be, indeed, one of the best recovery efforts so far, if not for the run-away, canary yellow background house, shown at right.
| .f2.jpg)
Another fragment of the above
| | ||||
|
Indeed, the histogram looks very nice at the high end, indicating a solid 1/3 EV of highlight detail recovery, maybe a bit more. It also shows that the shadows were clearly moved down; it would be better if the recovery feature tried to leave the lower half (at least) unaffected. |
.h.gif)
|
| [10] Picture Window Pro by J.L. |
|
Raw Shooter Premium | ||
.r.jpg)
|
.f.jpg)
| |
| [11] Raw file processed with Raw Shooter Premium 2006 1.0.1 by S.S. [XGA] | ||
|
S.S. used first the Adobe DNG Converter 5.2 to get the image into the DNG format, and then Raw Shooter Premium 2006 1.0.1 for RGB conversion and highlight recovery. He sent me two versions; the one shown above used Detail Extraction at 50 with exposure compensation of -1.0 EV; the other one (applying -3 EV of compensation) retrieved the same amount of highlight detail, just being darker. Let me quote some of his remarks (with minor edits), as you may find this interesting: RawShooter, discontinued after Adobe purchased the company, is still my favourite raw conversion program. As it is no longer updated with new camera models, converting newer raw files to DNG format is the only way to work with them. In late 2007 I tested all the major programs available at the time for converting my E-1 raw files, and found that RawShooter Premium, combined with a custom colour profile, gave me the most pleasing and detailed overall results. [...] For E-1 raw files, I ranked the programs I tested into two categories: — Acceptable (in order of preference): RawShooter Premium 2006 1.0.1 (with OlyColy v3a profile), Olympus Studio 1.3, Bibble 4.7, Adobe Camera Raw 3.7 (or Lightroom 1.3) — Unacceptable: SilkyPix 3.0, Capture One 4, Raw Therapee 2.2, RAW Magick, LightZone 3.0. In terms of highlight recovery, RawShooter does quite a good job, a bit better than Adobe Camera Raw; not as aggressive as LightZone, but less affecting the rest of the image. Still, note that some of the groves in siding are "overrecovered", another symptom of working with incomplete information (the same effect is seen in a number of other samples, even if I am not mentioning it every time). | ||
|
This impression stays in agreement with what the histogram shows. We can see the right slope of the highlight peak, and some detail beyond (with the white level moved just a bit down). A respectable, conservative job without adverse side-effects. |
.h.gif)
|
| [11] Raw Shooter Premium by S.S. |
|
Raw Shooter Essentials | ||
.r.jpg)
|
.f.jpg)
| |
| [12] Raw file processed with Raw Shooter Essentials 2006 by V.Z. [XGA] | ||
|
In this attempt V.Z. used the same engine, this time in Raw Shooter Essentials 2006 (the last version before Adobe took over), after converting the ORF file to DNG using the Adobe DNG Converter. He applied -1.3 EV of exposure compensation, adjusted shadow and highlight contrast, and applied detail extraction; a slight tint correction removed any traces of the red tint in highlights. As you can see, the results are very pleasing, with no posterization or other symptoms of overexposure left; this image looks, indeed, as if it were exposed right to start with. | ||
|
A look at the histogram confirms that. The highlight peak has been spread a bit more than in the previous Raw Shooter sample, and the amount of actually recovered detail (to the right of that peak) remains similar. |
.h.gif)
|
| [11] Raw Shooter Essentials by V.Z. |
|
Capture One | ||
.r.jpg)
|
.f.jpg)
| |
| [13] Raw file processed with Capture One 4.6.1 by A.P. [XGA] | ||
|
Capture One developed by Phase One, a manufacturer of medium-format digital data backs, has been long recognized as one of the leading raw-to-RGB converters. A.P. developed my sample in that program, with results as you can see above. No adjustments were applied, except for exposure compensation at -0.7 and highlight recovery to 83 (in the arbitrary units used by the program). I would call this a moderate, but clean highlight recovery: the amount of detail reclaimed is similar to that in ACR, but with less adverse side effects. Very much like the Raw Shooter Premium. | ||
|
The histogram shows the same, also being surprisingly similar to that delivered by Raw Shooter in two previous examples. Once again, 0.3 EV of gain (maybe a bit less), without any detrimental side effects. |
.h.gif)
|
| [13] QUO by A.P. |
|
SilkyPix | ||
.r.jpg)
|
.f.jpg)
| |
| [14] Raw file processed with SilkyPix 3.0 by J.B. [XGA] | ||
|
The first release of this comparison did not have a sample processed by SilkyPix, a program with a large following. Within days from the original posting I received such a sample from J.B., who applied a 1/2 EV exposure compensation and then moved the mid-tones slightly up to compensate for general darkening of the picture. This brought out a moderate amount of highlight detail (groves in the siding) at the expense of posterization in those areas. These, as in some other examples shown before, acquired some of what I call a "tired look"; similar to what I get when overprocessing a JPEG file. J.B., an old hand with Olympus cameras, shares these remarks: Your conclusions are [largely] the same as my experience with the E-3 and E-510 [which] have considerably less hidden image information in raw files (compared to out-of-camera JPEGs) than E-1 has. I don't know if it is the NMOS vs. CCD sensor or a better JPEG routine — maybe both. I love Studio for its faithfulness, but since the out-of-camera JPEGs look so good, I rarely need it. I also use SilkyPix in only those tricky situations with burnt highlights as in your example. | ||
|
The histogram looks quite different than in the few last examples: the highlight peak is very narrow, pushing against the white level. Something interesting, however, is happening below: note the secondary, smaller peak to the left which was not present in the original [1] or [2]. This indicates that SilkyPix uses a recovery method quite different than other programs compared. |
.h.gif)
|
| [14] SilkyPix by J.B. |
|
Aperture | ||
.r.jpg)
|
.f.jpg)
| |
| [15] Raw file processed with Aperture by J.W. [XGA] | ||
|
Another sample contributed after the original posting uses the Aperture by Apple. As the program does not yet support the E-30, J.W. had to use the Adobe DNG Converter 5.2 (Mac). Then he applied -0.7 EV of exposure compensation and maximum highlight adjustment in Highlights & Shadows.
| ||
|
Don't be misled by the seemingly large peak in mid-tones; it is the same height (approximately) as one seen in most other attempts, except that Aperture fared well in removing the highlight spike, and my ACDSee software (like most other programs) stretches the histogram vertically to use the whole available drawing space. This is a very nice, if conservative, highlight recovery job. |
.h.gif)
|
| [15] Aperture by J.W. |
|
Conclusions and discussion Various raw converters may deliver from zero to 0.5 EV of highlight detail recovery from raw images produced by the E-30. The Olympus Studio (or Master) extracts no extra detail at all I could see. In my subjective ranking Aperture did the best job, closely followed by LightZone. Keep in mind that this article is not intended as a meaningful comparison between capabilities of various programs: the results also depend on the magnitude of the effort invested, and on the skill (and taste) of the program user. These factors were not controlled. Treat this rather as an illustration of the range of results possible, and a demonstration of various ways to achieve the effects and of side-effects accompanying the process. The size and character of those side-effects varies quite widely. While ones impacting the general tonality of the image can be easily corrected in further postprocessing, others, affecting only parts of the image, may pose a greater challenge. This is due to the incompleteness of information used in the recovery process. The engineers designing in-camera converters are not lazy or stupid: they are playing it safe, using only the reliable information (I know I'm simplifying, but this is supposed to be short) from areas where all photosites provide response within working range. Stand-alone converters take more adventurous approach, trying to use information from areas where one or even two groups of the RGB sites are already saturated, or very close. This is equivalent to guessing, and a guess may work or not. If your picture has been overexposed just by one F-stop (or, we may say, one EV), it will not be saved by "shooting raw", unless you are using a camera where the internal conversion is sub par. This is certainly not the case with the E-30. Regardless of that, in situations where 1/2 EV or less makes a difference, using the highlight recovery feature of a stand-alone raw converter may, indeed, save the image. This requires some diligence on behalf of the program user, as it is quite easy to compromise other aspects of the image. Whether this is worth the trouble depends what "worth" means in the eye of the beholder. (Exposing the frame 1/3 EV lower would, still, be better.)
You have to keep in mind that this comparison refers only to the E-30 and its JPEG engine. Other cameras (including those from Olympus) may be generating JPEGs making less use of the recorded information, and in such cases the extra range which can be squeezed out of a raw file may be greater. According to a friend, Sony Alpha cameras leave All this considered, I have to correct my original statement: highlight recovery from raw image files is not an urban legend. But it is pretty darn close, at least for the Olympus E-30. Acknowledgements Sincere thanks are due to all those who spent time and effort writing me on their take on highlight recovery and sent the converted images. These were: Adrian, Axel, Chris, Daniel, Endika, Frank, Harri, Hillar, Jens, John, Johannes, Jon, Marcin, Norman, Oren, Reinhard, Ricardo, Stefan, Stephen, and Woody (I hope I haven't missed anyone, as all deserve credit). They come from places as diverse as Australia, Austria, Canada, Estonia, Finland, Germany, Iceland, Poland, Romania, Spain, Sweden, United Kingdom, and United States. It's been a pleasure interacting with you guys, and without your help I could not have done this comparison. I have learned in the process, and I hope to learn more. The word "guys" used above does not mean I am politically incorrect or sexist; it just happens that all who wrote were men; not a single lady in the bunch. Looks like raw files are manly stuff. See also Raw Image Format: Pros and Cons in my Nitty-Gritty section. |
|
|
My other articles related to the |
|
Olympus® is a registered trademark of Olympus Corporation.
This page is not sponsored or endorsed by Olympus (or anyone else) and presents solely the views of the author. |
| Home: wrotniak.net | Search this site | Change font size |
| Posted 2009/02/22; last updated 2009/03/01 | Copyright © 2009 by J. Andrzej Wrotniak |
![[XGA]](_img/smp/e30/hirec/090131-1189.fx.jpg)
![[XGA]](_img/smp/e30/hirec/090131-1189-ost(as).fx.jpg)
![[XGA]](_img/smp/e30/hirec/090131-1189-ost(ec).fx.jpg)
![[XGA]](_img/smp/e30/hirec/090131-1189-acr(rs).fx.jpg)
![[XGA]](_img/smp/e30/hirec/090131-1189-acr(ak).fx.jpg)
![[XGA]](_img/smp/e30/hirec/090131-1189-acr(jk).fx.jpg)
![[XGA]](_img/smp/e30/hirec/090131-1189-rth(fl).fx.jpg)
![[XGA]](_img/smp/e30/hirec/090131-1189-lzn(rh).fx.jpg)
![[XGA]](_img/smp/e30/hirec/090131-1189-pwp(jl).fx.jpg)
![[XGA]](_img/smp/e30/hirec/090131-1189-rsp(ss).fx.jpg)
![[XGA]](_img/smp/e30/hirec/090131-1189-rse(vz).fx.jpg)
![[XGA]](_img/smp/e30/hirec/090131-1189-con(ap).fx.jpg)
![[XGA]](_img/smp/e30/hirec/090131-1189-spx(jb).fx.jpg)
![[XGA]](_img/smp/e30/hirec/090131-1189-apr(jw).fx.jpg)